Catalogue Item Tags
Introduction
In Social Learning, Tags are used to fulfil different purposes:
- To provide information for learners on Catalogue tiles.
- To set items to appear in filters on the Learn dashboard and Carousel
- To provide retrievable words in the Search field.
Providing information for learners on Catalogue tiles
In the image example below:
- The Category and Type are tags linked to the Catalogue item. They are manually set to display on the tiles. Instructions on how to achieve this are covered in the topic below Enabling Tag Types on tiles.
- The Provider (CrossKnowledge) and Author (Didier Noyer) are fields in the Catalogue Item, which if populated, will automatically display on the tile.
- Other information such as the status
 , star ratings
  and comments
  are automatically set to display by the system.

Learn Dashboard Filters
The filters available on the Learn page are set by the system. The lists that appear in some of the dropdowns can be controlled by Tags on Catalogue Items.
Note these filters are not available on the Learning Carousel.
Default filters include Quick Filter, Filter by Interest, Filter By Author, Duration. All other filters can be included via Settings > Social Learning Settings > Tags

Quick Filter
This is a default filter. Items in the Quick Filter dropdown are set by the system and include:
- Quick Filter
- Most Viewed
- My Completed
- My Uncompleted
- Highest Rates
- Most Commented
- Newest
- Title

Filter by Interest
This is a default filter. Items in the Filter by Interest dropdown are controlled by the Tags you have set in the Tag Type of Professional Interests. It is also controlled by the Professional Interests selected by the user. For example you may have ten professional interest tags in the system but the learner has only selected 2 in their professional interests. It is only the users selected tags that will appear in this list.

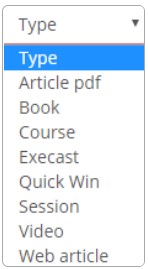
Type
Items in the Type dropdown are controlled by Tags you have set in the Tag Type of Resource Type.
Duration
The Duration field is controlled by the values set in the Approx Duration (minutes) field of the Catalogue Item. By adding a duration will assist the learner in planning and allocating their time to undertake the learning.
Default duration ranges include:
- 5 minutes or less
- 5 – 10 minutes
- 10 – 20 minutes
- 20 minutes plus
Providing retrievable words for the Search field
This is also referred to as Azure Search and is enabled at a global level. If you would like more information on this feature please contact your Janison Account Manager or Project Team.

The results returned in Search are determined by Tags and three fields of the Catalogue Item.
- Catalogue Name
- Catalogue Overview
- Catalogue Author
There is a weighting applied to each item which determines the order in which a user will see results. Tags have the greatest weighting, followed by Name and then Overview and lastly Author.
As a simple example, when we have 4 catalogue Items:
- Catalogue Item one is tagged with Elephant.
- Catalogue Item two has the word Elephant in the Title.
- Catalogue Item three has the word Elephant in the Overview.
- Catalogue Item Four has an Author of John Elephant.
When we search for ‘Elephant’ the Catalogue items will be returned in the following order:
- Catalogue Item one.
- Catalogue Item two Elephant.
- Catalogue Item three.
- Catalogue Item Four.
Weighting
If a Catalogue Item is tagged with Elephant and has Elephant included in the title, it will appear above the Catalogue Item one listed above. This is due to weighting. The Tag weight of 4 + the Name weight of 3 = 7 which is higher than just the Tag which is = to 4.
| Item | Weighting |
|---|---|
| Tags | 4 |
| Name | 3 |
| Overview | 2 |
| Author | 0 |
Note: Tag Types are ignored by the search.
Managing content loaded globally vs content loaded locally
When your organisation subscribes to the Global content library the content is loaded and managed by Janison on the parent site. Local content is loaded and managed locally by the client on their Tenant which is a child of global site.
Content loaded globally is equally searchable as content loaded locally.
There are two means available to stop content from appearing in the search and in the filters:
- Remove the tag. This is only possible if the tags have been applied locally. Any tags applied globally can only be edited by Janison.
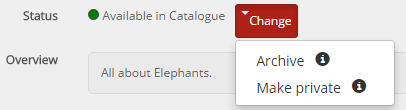
- Archive or make the Catalogue Item private by changing the Status. You can read more about setting the status in our Catalogue Manager document.
Note:
- Setting a catalogue Item to Private will prevent it from appearing in the search results and filters but learners already enrolled will still have access to the Catalogue Item via their Dashboard.
- Setting a Catalogue Item to Archive will prevent it from appearing in the search results and filters and in addition will remove all learner access to the Catalogue Item. This option is used to completely hide content from learners.
New Catalogue Items
There will be a one hour delay before you can see any newly created Catalogue Items. This is due to the time it takes for Azure search to index the content. It will take longer on the Beta site, up to 24 hours.
Setting up Tags
Tags in the social learning UI are created in the same way as all tags in the system. To read more about tags please refer to the Tags topic.
There are several ways to add tags to the system:
- Via Add Tags
- Via Add Tag Types
Steps to add tags via tags
- Browse to Manage Learning > Manage Tags.
- Select Add Tag
- Complete the Tag form details
- Enter a Name (Mandatory)
- Select a Tag Type from the drop menu
- Enter a numerical value for Sort Order (if required)
- Enter a description (if required)
- Upload a thumbnail (if required)
- Select Inactive to deactivate the tag
- Click Save Tag
Steps to add tags via tag types
- Browse to Manage Learning > Manage Tags.
- Select Manage Tag Types.
- Select Add Tag Type.
- Complete the Tag Type form details
- Enter a Name (Mandatory)
- Enter a Display Name (Optional)
- Enter a Description (Optional)
- The option of One Tag link only per entity. If enabled, only one tag can be linked to an entity (e.g. catalogue item) from this tag type, This indicated that this tag type represents a single option.
- Select Applicable Documents if required
- Enter a new tag name in the tags field
- Select the
 icon to add each tag.
 - As you add tags, they will appear in a list above the new tag entry.
- Repeat step 6 to add tags as required
- To Edit a Tag
Once the tag has been added it can be edited if required prior to saving the tag type - Select the edit
 icon to edit the tag.
 - When Edit made Select the
 icon to Save Changes
 - Select the
 icon to remove the tag.
 - Select Save Tag Type.

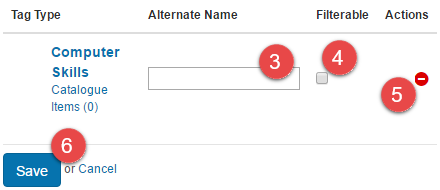
Enabling Tag Types on Tiles
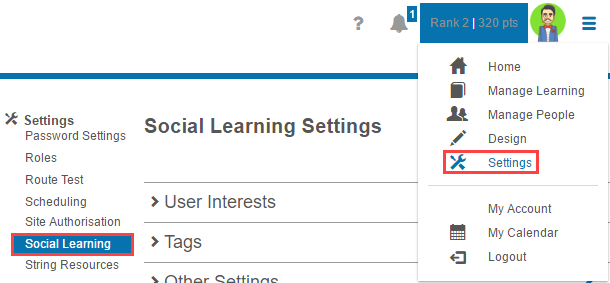
Browse to Settings > Social Learning.
- Select the
 icon in the Tags Section.

- Select Tag Type.
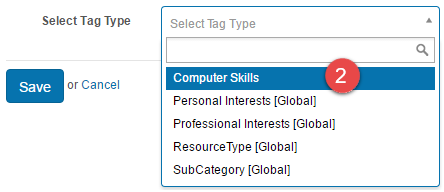
The Tag Type will be added to a list.
- Optionally, enter an Alternate Name for the Tag Type. Alternate Name will override the Tag Type’s name when displayed on a catalogue item.
- Optionally, select
 Filterable. Selecting Filterable allows users to filter search results to this Tag Type.
 - Select the icon to remove it from this list.
- Select Save.
Adding Tags Manually
Browse to Manage Learning > Manage Catalogue.

- Select the require Catalogue Item from the list.

- Select the icon in the Tags section.

- Enter a Tags name in the Link existing tag option.
As you type, options will be filtered contextually. At any time you can select one of these options.
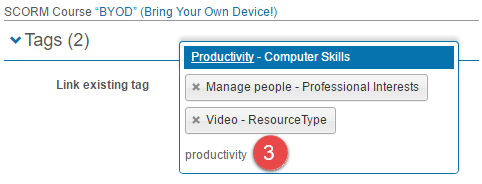
Once selected, these Tags are added to the Catalogue immediately. There is no need to select Link New Tag or Cancel.

Import Catalogue Item Tags
To Import Catalogue Item Tags you will need to know the Identifier of each Catalogue Item you would like to apply a Tag to. An easy way to gather this information is with a Customisable Report using the Catalogue Item Entity and making sure the Name and Identifier columns are selected. You can also incorporate filters to focus your list of catalogue items.

Read the Customisable Report guide for more details on this feature.
Browse to Manage Learning > Manage Catalogue.
- Select Import Catalogue Item Tags.

- Select
 Template. A template file for Catalogue Item Tag Imports will download.
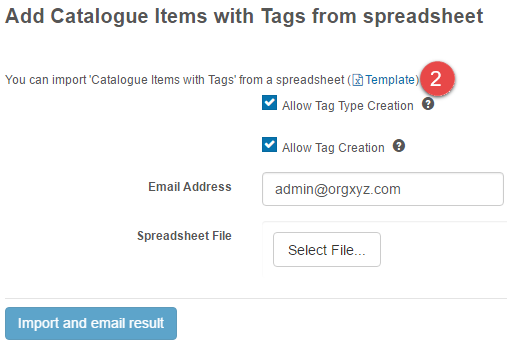
- Open the file and enter your required Catalogue Item Identifiers onto the Catalogue Item ID column.
- Enter the Tag Type.
- Enter the Tag.
- Enter True in the Is Active column.

There are also two columns for Custom Attributes. These do not apply to the standard Tag import and can be removed. 
- Save the template.

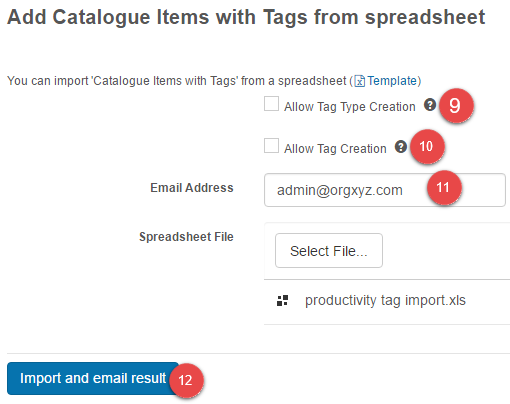
- Select File… or drag and drop your saved file into the Spreadsheet File area.

- Optionally,
 select or
  clear Allow Tag Type Creation.
 - Optionally, select or clear Allow Tag Creation.
Note: These options allow the import process to create tags and tag types from the report if they do not already exist within the system. In this example, we are going to clear them as we are using tags and tag types which already exist within the system and do not want to risk creating tags as a result of spelling mistakes entered into the spreadsheet.
- Enter the Email Address where the import summary will be sent.
- Select Import and email results.
View Applied Tags
To see the Tag applied to the Catalogue Item, Search from the Home page.

Note: The Tag Type is listed as well as the Tag.
The Tag can also be seen from the Catalogue Item details.
