Groups
Introduction
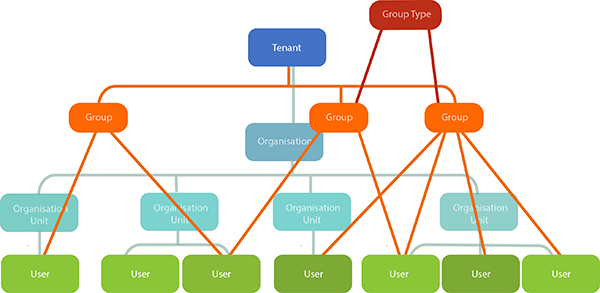
A group is a collection of users that are brought together for various purposes. A group belongs to the tenant although it can be restricted to a particular organisation or organisation unit if desired.
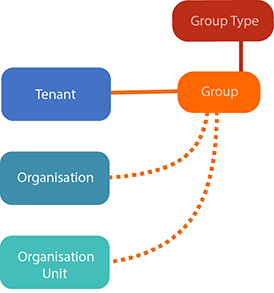
Group types are collections of groups. They can be used to categorise groups.
The diagram above shows the main groups relationships; the dotted lines indicate an optional relationship. Note that group types belong to the tenant however for simplicity this is not indicated in the diagrams here.
Groups allow cohorts of people to be defined and managed in various ways. CLS users are already organised by their membership in an organisation and an organisation unit. Groups provide complementary and/or alternative ways to organise and handle cohorts of users, see uses of groups. Users can be a members of multiple groups, including groups that are attached to a different organisation unit from their own. A list of all the users in a group is available through its details screen.
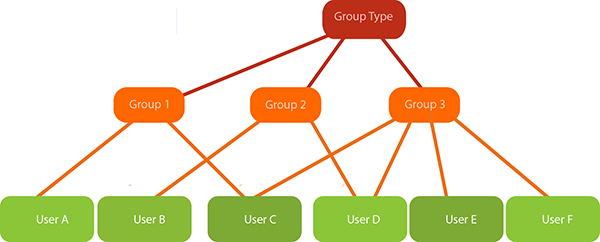
The example above shows three groups that are all members of one group Type. Group 1 contains users A and C. Group 2 contains users B and D. Group 3 contains Users C, D, E and F. Users C and D are members of more than one group. If you wanted to locate all of the users in this example you could use the group type and then target the members of each group that belongs to it.
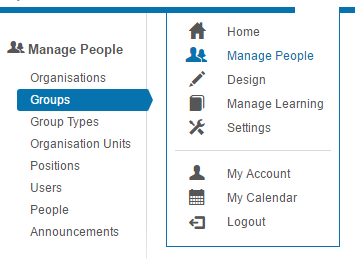
Groups are managed by selecting Manage People > Groups.
Uses of Groups
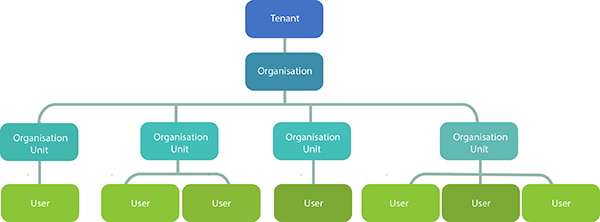
CLS users are already organised by their membership in an organisation and an organisation Unit. This follows a strict tree structure with two levels between the Tenant and the User. A User can only belong in one org unit in this hierarchy.
Groups offer additional and/or alternative methods for categorising cohorts of people because a user can belong to more than one group and a group does not have to be restricted to one organisation or organisation unit.
Broadly speaking, there are two main ways that groups are used to collect cohorts of users:
- Create cohorts of users that transcend organisational structures.
Groups and group types can be created to collect Users into cohorts that are independent of an organisational hierarchy.
- Provide extra levels of hierarchy in an organisational structure.
Groups and group types can be created to further categorise users into cohorts within an organisation unit and hence create extra levels in an organisational hierarchy.
Note that in one tenant you could have a number of groups, with some groups playing the first of these roles and other groups playing the second.
What can you do with these cohorts of users? There a number of options:
- You can control the courses that users see in the catalogue by setting up catalogue access rules. You can read more about this topic in our document on catalogue access settings.
- Through groups, users can be enrolled in learning through:
- The assign learning wizard. You can optionally specify that users who join this group after the wizard has been run will also be enrolled in the learning.
- User enrolment rules that automatically enrol selected users in Catalogue items either when they register on the site or when a daily check is run. You can also specify that they be re-enrolled when the learning that they were previously enrolled in using this method is about to expire. Users are targeted using filters (see below).
- The Catalogue Item itself where there is an option to select groups of Users to enrol.
- Users can be targeted through groups and group types using filters which are used in a number of places in the CLS. Users can be targeted through their group membership(s). Users are not members of a group type. However you can select the group type and are then shown all the groups that belong to it. You can specify some or all of them. In this way (and depending on what plug-ins have been installed in your system). Cohorts of users can be searched for, reported on using customisable reports, coupled to competency requirements and CPD plans and have passwords regenerated or accounts activated in bulk.
- Groups work together with user roles. You can specify one or more users who can administer a whole group of users and what they can do with them. Roles are specified in Settings > Roles. Once a user is allocated a role-linked permission over a group, that user has the right to various appropriate activities, depending on the role. For example, setting a user as a marker of a group will give that user access to Manage Learning > Marking where they can mark any test attempts that the group members produce. See Roles and Administrators Widget for further information.
Note also that when users establish an account on the CLS (self-registration) this can be set up so that they also select their group, for example joining age-limited groups that (invisible to the user) are members of an age range group type.
The two main ways that groups organise user cohorts are described below.
Cohorts that transcend Organisational structures
To understand this concept consider the strict tree structure that organisations follow and the example of the tiny company discussed in organisations which follows the organisations structure above.
Remember that a user can only be in one place in the hierarchy. It can only belong to one organisation unit.
In contrast, a groups structure is capable of a more flexible structure because users can be members of many groups that are not necessarily aligned with their organisation or organisation unit.
Below we can see three groups (orange) with their user members. This is overlaid on the users’ organisation structure. Note that one user can belong to more than one group and that the group memberships here cross organisation unit boundaries.
An example where this kind of structure might be useful is the appointment of building wardens for each building in an organisation. They are not necessarily aligned to the HR structure of the organisation. The building wardens are further divided into:
- Chief wardens (white cap),
- Area wardens (yellow cap) and
- Fire wardens (red cap).
These groups cross boundaries: they are not limited to any particular place in the organisations hierarchical structure. A participating user is a member of the building wardens group type as well as a member of, say, the red cap group. This is shown in the portion of the structure shown below:
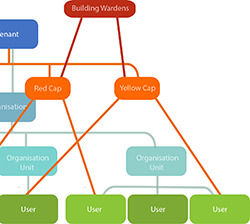
These groups and group types allow cohorts of people to be targeted. For example, appropriate training and competency requirements could be directed at all building wardens through the building wardens group type or fire safety material could be directed only at the members of the red cap group.
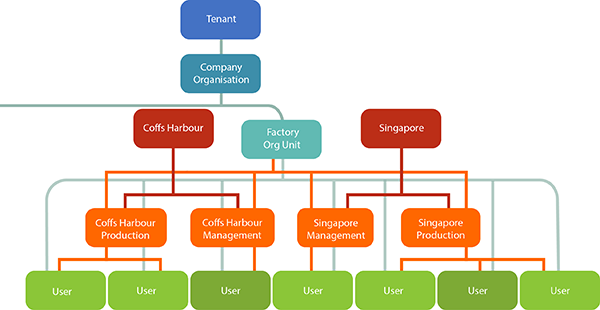
Cohorts that extend Organisational structures
To understand this concept, see organisations and groups. In summary, this section discusses the scenario where an organisational structure needs two more levels of HR organisation. The solution is provided by groups and group types that create, in effect, two extra levels in the hierarchy (shown here in red and orange). Here each group belongs to one org unit.
It is worth repeating that there is no one fixed way to manage multi-level HR structures in the CLS. Another approach would be to create a new organisation structure with more than one Organisation in the Tenant. It all depends on what you want to be able to do with your cohorts of people and how you want to manage them. The CLS is flexible enough for you to design a configuration that best suits your organisation’s needs. You should discuss how to configure your implementation of the CLS with Janison and consider:
- How is the HR data of my organisation already set up?
- What kinds of enrolling, reporting and management functionality do we want to implement?
- What cohorts of people do we need to enrol, manage, assess, report on and/or require competencies/CPD of?
In summary, CLS users are already organised by their membership in an organisation and an organisation unit. Groups offer additional and/or alternative methods for categorising cohorts of people because a user can belong to more than one group and a group does not have to be restricted to one organisation or organisation unit. Thus, multiple tree structures can be built using groups to suit the people management requirements of particular organisations and/or to provide other layers of user management.
Add Groups
Groups can be added one by one or imported in bulk. Steps to create groups via both methods are detailed below.
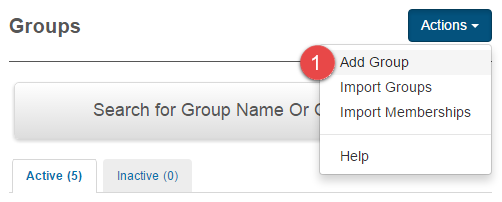
Navigate to Manage People > Groups.
Add group manually
You would use this method if you only had one or two groups to add.
- Select Add Group from the Actions menu.
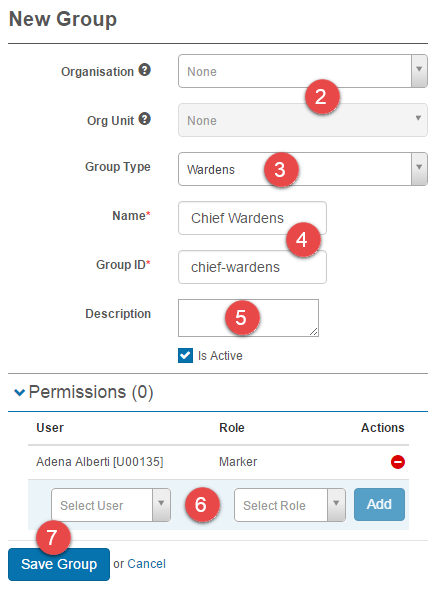
The New Group screen will be displayed.
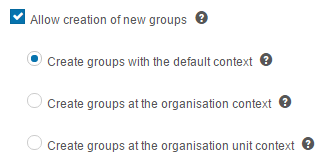
- Select an Organisation and Organisation Unit (optional).
- Select a Group Type. Group types need to be added prior to the creation of the new group.
- Enter a Name. The Group ID will populate automatically.
- Enter a Description (optional).
- Add Permissions (optional).
Granting users permission to the group open options such as the ability to enrol group members into catalogue items, mark tests of group members and send messages to group members. - Select Save Group
Import groups
You would use this method if you had multiple groups to add.
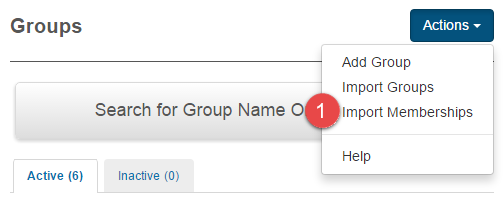
- Select Import Groups from the Actions menu.

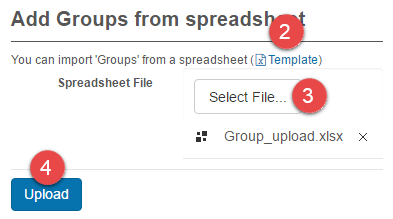
The Add Groups from spreadsheet screen will be displayed.
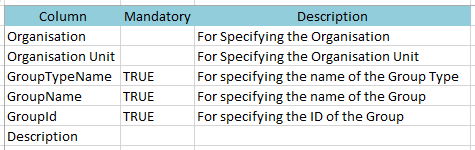
- Download the template and populate with your group data. The template will provide you with sample data. The Supported Attributes tab has information on requirements for the fields.
- Select File to upload your new groups spreadsheet.
- Select Upload.
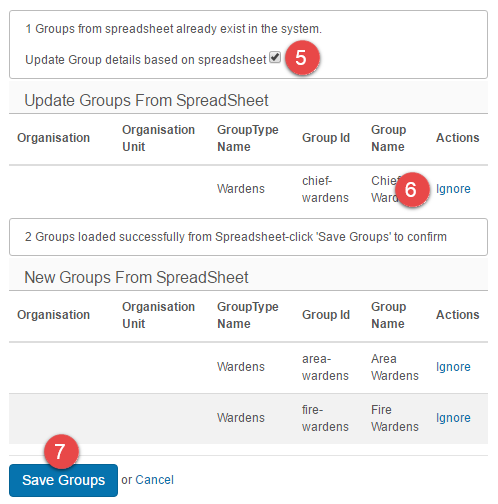
A feedback screen will be displayed where you can review the import data.
- Select Update Group details based on spreadsheet (optional). This will update details of existing groups.
- Select Ignore (optional). This will remove the row from the import.
- Select Save Groups.
Note that you can import groups using the user import feature. You can read more about this topic in our document on import users.
Archive Groups
Groups can be archived if they are no longer required. Archived groups will no longer appear in the system.
Navigate to Manage People > Groups.
The Groups list screen will be displayed.
- Select the box to the left of the group name. Selecting the checkbox at the top will select all groups.
- Select Archive.
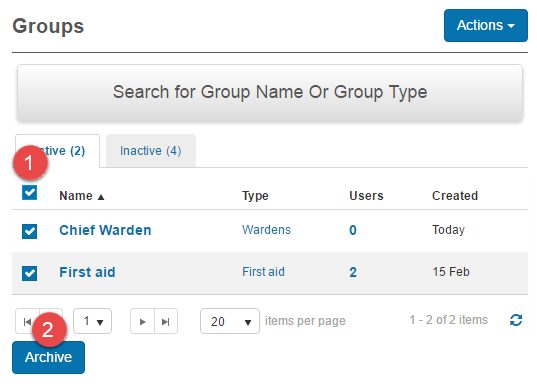
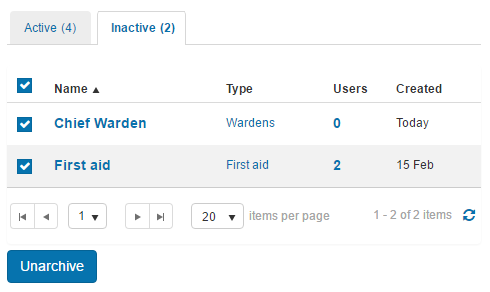
Archived groups will be moved to the Inactive tab and can be unarchived from there.
Add Memberships
You can add users to a group manually or using the import feature. Steps to add users via both methods are detailed below.
Navigate to Manage Users > Groups.
Import memberships
- Select Import Memberships.
The Import group memberships from spreadsheet screen will be displayed.
- Download the template and populate with your user data. The template will provide you with sample data. The Supported Attributes tab has information on requirements for the fields.
- Select Inactivate old group memberships (optional). Any group memberships a user has which are not specified in the import file will be inactivated. This only applies to group types specified in the import file.
- Select Create groups (optional). This will create groups if they don’t already exist.
- Enter an Email Address for import feedback.
- Select file.
- Select Import and email result.
If issues exist in the import file, feedback will be displayed.
If no issues exist with the file, other feedback will be displayed.
Note that you can import group membership using the user import feature. You can read more about this topic in our document on import users.
Manually add memberships
Open a group.
- Select an entity. The options are users, organisations, organisation units and groups.
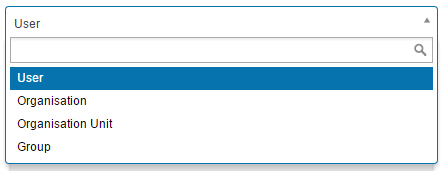
- Select the relevant items. The items in this field will be determined by the entity selected above.
- Select Add.
The item added will appear in the section below, in this example it is a user, Adena Alberti. - To remove the item select the box to the left.
- Select Remove.
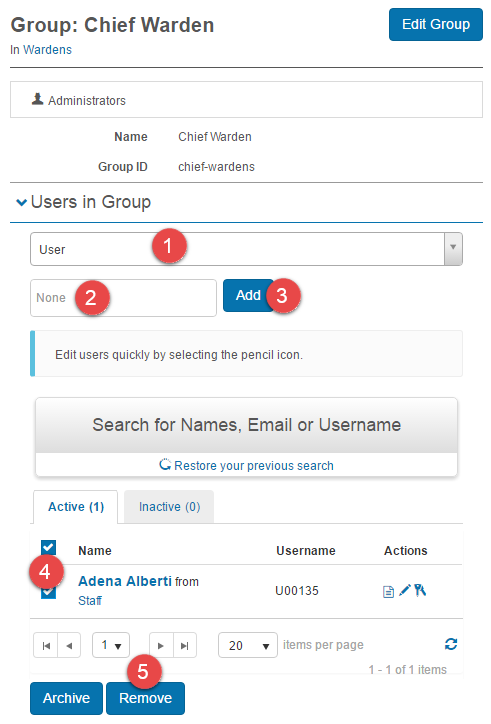
Note that users can be archived and edited form here. Selecting the links such as to edit and archive will direct you to the user screen.