Organisations
Organisations are the top-level structures for organising people in the CLS and are directly attached to the Tenant
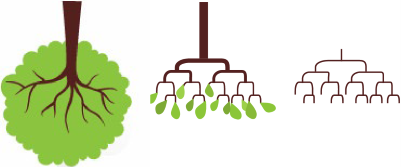
Organisations are set up using a strict tree structure, a structure that is based on an upside-down, idealised tree:
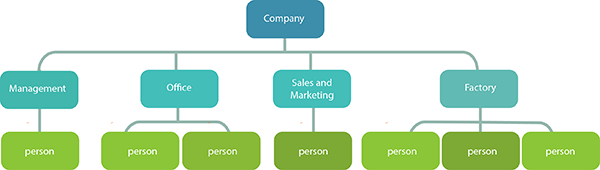
Consider the example of a tiny company with four separate sections:
- Management: 1 staff member.
- Office: 2 staff members.
- Sales and Marketing: 1 staff member.
- Factory: 3 staff members.
To bring this company into the CLS we start with their HR diagram:
If we take this HR structure and translate it into the CLS Organisations model, the company would be the Organisation. From the Organisation there are several specific categories of people. In the CLS these categories are called Organisation Units and their staff are the CLS Users:
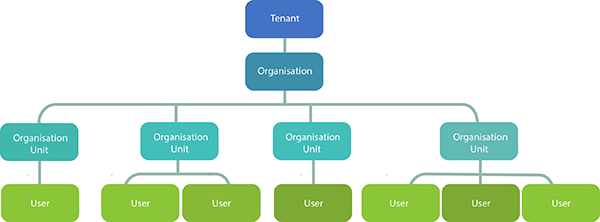
After merging these two hierarchies into the diagram below, we can see that the Organisation Units are now:
- Management –1 User.
- Office –2 Users.
- Sales and Marketing –1 User.
- Factory –3 Users.

[The abbreviation Org Unit is used in the CLS for Organisation Unit].
As is clear, this strict tree structure models the HR structure of the company. Each person belongs to one and only one Org Unit. As is also clear in the diagram, the strict tree structure means that (working from the bottom to the top) a User can only belong to one Organisation Unit but s/he could be one of a number of Users that also belong to this Organisation Unit. And this Organisation Unit can only belong to one Organisation but it could be one of many Organisation Units that also belong to the Organisation.
This kind of strict tree structure is used in other parts of the CLS, for example with Position to Position reporting hierarchies, see Positions. Groups use a different, more flexible kind of tree structure. They can play an important role in the CLS by augmenting and/or bypassing the organisation structure above, see Organisations and Groups for a full description.
Overall, every CLS User is a member of one Organisation, one Organisation Unit and possibly one or more Groups. A User may also have a Position. Combining these functionalities makes it possible to model the HR structures of Health, Government, Education and Corporate organisations and to make it easier to manage and report on large numbers of Users.
Note also that most Users will not be able to see the Manage Organisations screens described here because the CLS Security management system uses scope-based Roles. This does not allow Users to see lists of items beyond the scope of their assigned Role. For example, someone who manages a particular organisation will not be able to see a list of all organisations. Organisations are the highest level (widest scoped) people structure in the CLS, thus only high-level administrators are able to see them.
[Tree image courtesy of cliparts.co]
Organisations and Groups
In the Introduction to Organisations we saw that Organisation and Organisation Units are set up following a hierarchical structure known as a strict tree structure. Different kinds of more flexible hierarchical structures operate elsewhere in the CLS, such as with Groups. A User can belong to more than one Group and Groups are not necessarily tied to the Organisations structure.
Groups are collections of Users and Group Types are collections of Groups, see Groups for more information. Groups can play an important role in the CLS by augmenting and/or bypassing the structure provided by Organisations. Using Groups, cohorts of people can be specified that cross HR boundaries, such as a group of Organisation-wide fire wardens.
Another equally important role that Groups can play in the CLS is to augment the hierarchy provided by Organisations. Consider the situation where the tiny company described in the Introduction grows in size and complexity. For example, it now has two separate factories with their own management and production sections, which has introduced two new levels to the company’s original HR structure:
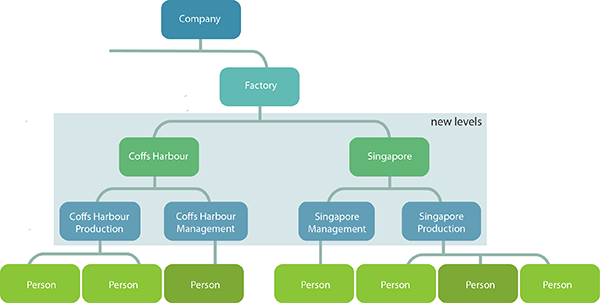
[The number of Users here is reduced for simplicity.]
In the CLS the Organisations structure is two levels deep. To match this new HR structure we need to have four levels of organisation. We can create Groups and Group Types to create the extra levels in the hierarchy.
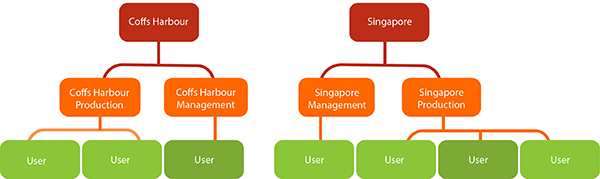
In this example, Coffs Harbour could be a Group Type (in red) with Coffs Harbour Production and Coffs Harbour Management being Groups (in orange) that are members of this Group Type. Similarly Singapore would be a Group Type with Singapore Production and Singapore Management being Groups that are members of this Group Type. All four Groups contain Users, as shown below.
The diagram below shows part of the company’s original Organisations hierarchy, which was seen in the Introduction. The new Groups and Group Types hierarchy has been overlaid (in red and orange) on the Organisations hierarchy. The Groups are all linked to the Factory Org Unit. And all the factory staff in both locations are members of the same Factory Org Unit.
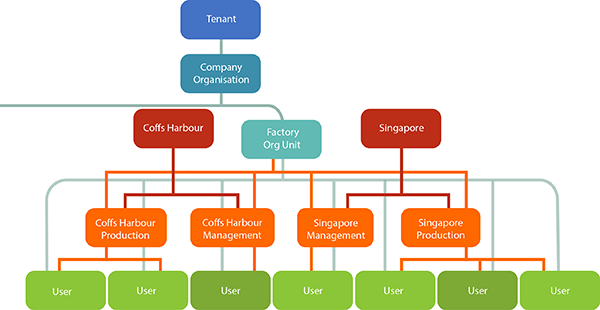
Thus a Group/Group Type hierarchy offers a way to address cohorts of staff within one Org Unit through Group memberships. For example all the Singapore factory staff – both production and management – could be targeted through the Singapore Group Type. These staff don’t belong to the Group Type but they do belong to Groups that are linked to it and hence could be located via the Group Type. And factory management staff in both locations could be targeted through the Coffs Harbour Management and Singapore Management Groups.
Thus, Groups can be used to add levels to an Organisations hierarchy or to create the cohorts of Users that bypass the Organisations hierarchy altogether. An example of the latter is a group of organisation-wide wardens described in more detail in Groups. It is important to understand that there is no one fixed way to manage multi-level HR structures in the CLS. Another approach to the situation above would be to create a new organisation structure with more than one Organisation in the Tenant. It all depends on what you want to be able to do with your cohorts of people and how you want to manage them. The CLS is flexible enough for you to design a configuration that best suits your organisation’s needs. You should discuss how to configure your implementation of the CLS with Janison and consider:
- How is the HR data of my organisation already set up?
- What kinds of enrolling, reporting and management functionality do we want to implement?
- What cohorts of people do we need to enrol, manage, assess, report on and/or require competencies/CPD of?
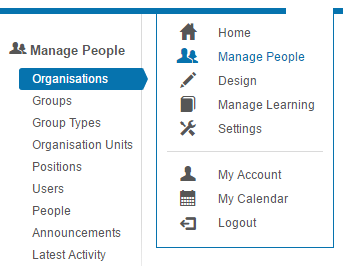
Manage Organisations
Organisations can be accessed by selecting Manage People > Organisations.
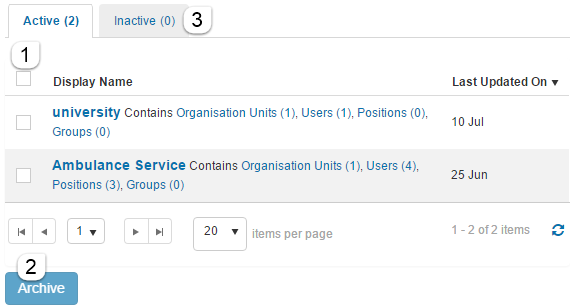
The screen shows a list of Organisations in the tenant.
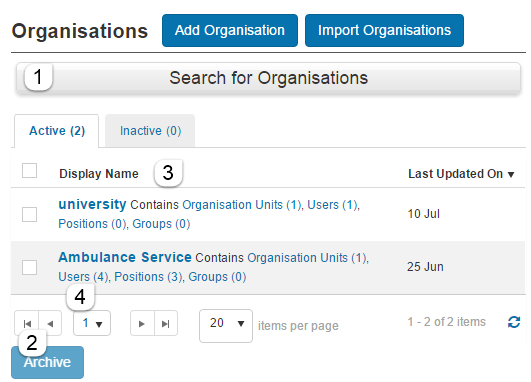
From this screen you can:
- Search for Organisations, see Search for Organisation.
- Archive Organisation(s), see Archive via Organisation List.
- Examine the list of Organisations.
Each Organisation is listed, along with the number of Organisation Units, Users, Positions (if Position management is enabled) and Groups that are attached to it. Each of these items is itself a clickable link to further information about the list items and ultimately the opportunity to examine or edit members of the list. For example clicking Users attached to the Ambulance Service Organisation (4) leads to a list of those 4 Users with links that allow you to email, inspect or edit each User.
Note that you can reorder the list of Organisations by Display Name or Last Update by clicking on the appropriate column heading.
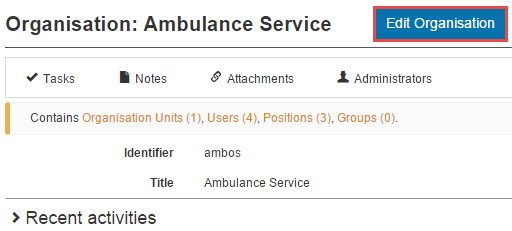
Inspect Organisation Details
Inspecting an Organisation’s details shows you the Identifier and Title of the Organisation as well as the number of Organisation Units, Users, Positions (if Position management is enabled) and Groups that are attached to it. These are also links to lists of those entities.
To inspect an Organisation’s details navigate to Manage People > Organisations locate the Organisation and click its Name.
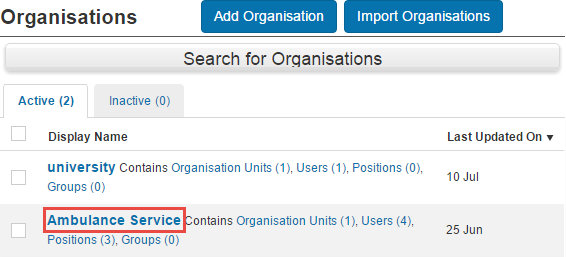
Inspect the details as desired.
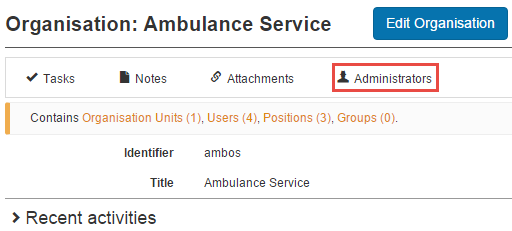
You can also click Administrators to add Users with various Roles over the Organisation. For example, depending on how the Roles are set up, making a User as a Marker will give her/him access to Manage Learning > Marking where s/he can mark any Test Attempts that Users in this Organisation produce. Note that this Administrators widget allows authorised Users to add and remove administrators too.
Creating an Organisation
Organisations can be added to the system manually or by importing a CSV file.
Note that Organisations support linking to Custom Attributes, which can be really useful for reporting purposes. Set up the Custom Attributes for the Organisations entity first, see Custom attributes, then enter values for them in the manual edit form or spreadsheet import.
Manually adding an Organisation
Select Manage People > Organisations > Add Organisation.
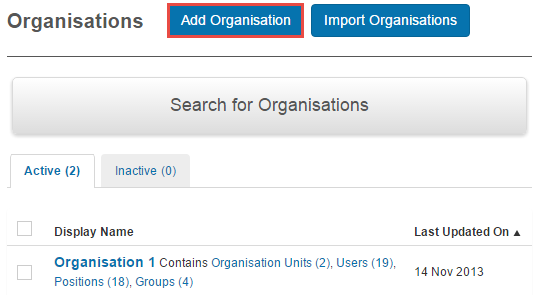
- Create a Title for the Organisation.
- The Identifier will automatically load the same as the Title however this can be changed. Note that like many entities in the CLS, Organisations have a mandatory and unique ‘human-readable’ identifier. This identifier shouldn’t be changed often and is relied upon during the spreadsheet import to match existing organisations.
- A brief Description about the Organisation can be added but is not mandatory.
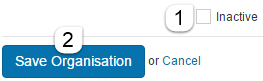
- The Organisation will be active in the system unless the Inactive box is checked.
- Select Save Organisation.

Import an Organisation
Select Manage People > Organisations > Import Organisations.

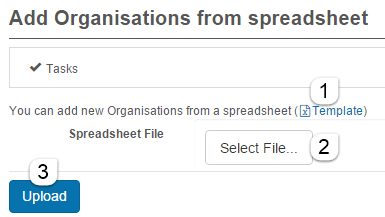
- The CLS provides a sample excel template that can be obtained by clicking Template.
Enter all required data in the template and save to your local machine.
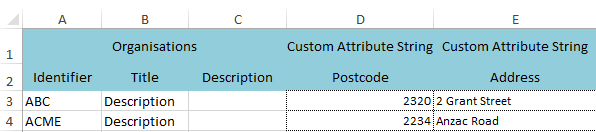
Note that there is a provision for the addition of values for Custom Attributes and these must exist in the system prior to the import. In the example above there must be custom attributes already in the system with identifiers PostCode and Address. If so, the importer will assign these custom attributes to the Organisation entity and they should be visible on the Organisation details screen.
- Click Select to browse to the required CSV file from your local browser and save it.
- Click Upload.
Import an Organisation
In addition to being created manually, new organisations can be imported from a CSV file (e.g. a Microsoft Excel spreadsheet). Any organisations that already exist in the system can also be updated via spreadsheet import. Janison Academy provides a template that you will need to download and populate with your organisation data before importing it.
To download the example organisation import spreadsheet template
- Navigate to Manage People > Organisations.
- The Organisations screen will display. Select Import Organisations at the top of the screen.
- The Add Organisations from spreadsheet screen will display. Select Template to download the template file.
To edit the organisation import spreadsheet template
Important things to note when editing the file
Custom attributes may be included in the upload. The template includes example Custom Attribute String columns. In order to be able to import custom attribute values during an organisation import:
- the required custom attributes must already exist in the system and be linked to the organisation entity in the system;
- the first row of the custom attribute string column must contain the text Custom Attribute [Attribute type] where [Attribute type] is replaced with the custom attribute type (e.g. String, Boolean, Number, etc.); and
- the identifier in the second row of the spreadsheet for any custom attribute you wish to import with an organisation must match the identifier for that attribute already in the system – note that identifiers are case sensitive.
If you attempt to upload an organisations import spreadsheet with custom attributes that do not already exist in the system, or are not linked to the organisation entity, an error message will display. Delete any unneeded custom attribute columns from the spreadsheet to avoid errors.
Example: Organisations import spreadsheet
In this example organisations import spreadsheet, custom attributes with identifiers Postcode and Address must already be linked to the organisation object in the system. Once linked, the custom attribute will be visible on the Add Organisation and Edit Organisation screens and values for the custom attributes can be added or imported. See the help section on custom attributes for more information.
Editing the file
Open the template file downloaded from the Add Organisations from spreadsheet screen, populate it with the required data, and save the file to your local machine or network storage device. You may want to give the file a new name when saving.
To import a new organisation from a spreadsheet
- Navigate to Manage People > Organisations.
- The Organisations screen will display. Select Import Organisations at the top of the screen.
- The Add Organisations from spreadsheet screen will display. Select Select File to browse your local machine or network storage device and select the organisations import spreadsheet.
- The filename will display on screen. If you have chosen the incorrect file, select the X next to the filename to remove it, or select Select File again to choose a different file to import.
- Select Upload to import the organisations in the spreadsheet.
- If any errors caused by problems with the data in the spreadsheet display:
- Refer to the error messages, adjust the data in your spreadsheet accordingly and then re-save the spreadsheet file.
- Continue from step 3 above to attempt the file upload again.
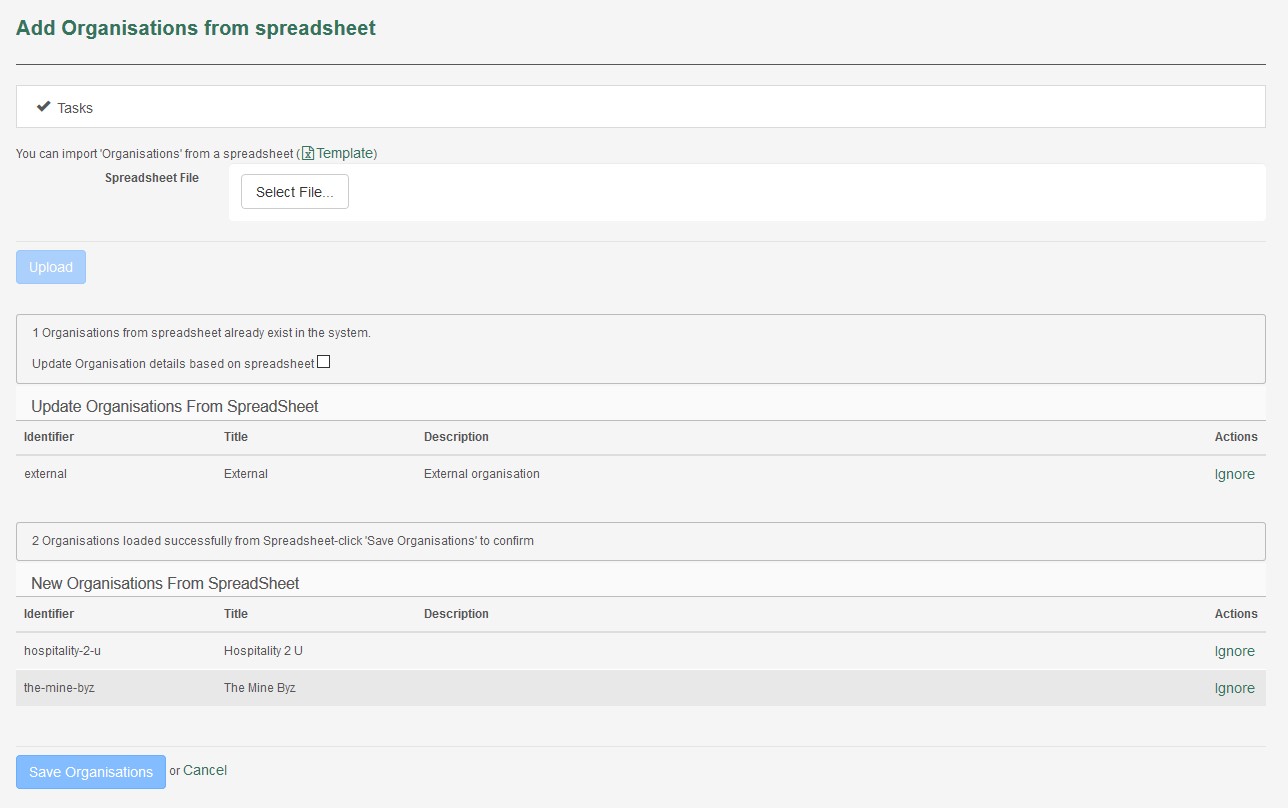
- Once the system has successfully validated your file:
- The organisations in your import spreadsheet that do not yet exist in the system will be listed under New Organisations From SpreadSheet.
- Any organisations in your import spreadsheet that already exist in the system will be listed under Update Organisations from SpreadSheet.
Any details contained in the spreadsheet for an existing organisation will overwrite the details in the system.
- Review the details to ensure the details to be imported match your expectations. If you would like to continue with the import, but have the system skip any particular organisation listed, select Ignore next to the organisation to be skipped.
- Select one of the following:
- Save Organisations to confirm the details and import the listed organisations into the system.
- Cancel to cancel the import and reset the Add Organisations from spreadsheet screen.
- After saving the organisations import, a success message containing an import summary will display.
Search for an Organisation
The Search feature allows you to quickly find an Organisation. Search is only required when there are a large number of Organisations in the list.
To search for an Organisation select Manage People > Organisations.
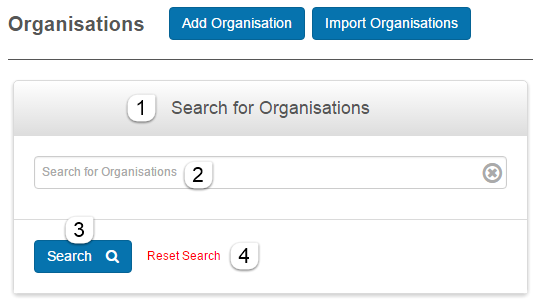
- Click Search for Organisations and a search field will appear.
- Enter search word.
- Click Search.
The search results will appear in the Display Name column.
- To perform another search click Reset Search.
Edit an Organisation
The Organisation Edit form allows administrators to modify the Organisation’s details.
Follow the steps to inspect the Organisation and then click Edit Organisation.
Change the details as required and click Save Organisation.
Archive an Organisation
Organisations should be archived rather than deleted. There are two ways to archive an organisation:
- Archive via Edit Organisation.
- Archive via Organisation List.
Archive via Edit Organisation
- Search for the Organisation using the search menu. Or
- Click on the Organisation from the Display Name list.
- Check the box beside Inactive.
- Click Save Organisation.
Archive via Organisation List
Select Manage People > Organisations.
- Locate the name of the Organisation you want to archive in the list of Organisations and click the check box to its left.
- ClickArchive.
- This Organisation will now be listed as an inactive Organisation. You can see the list by clicking its tab. You can reverse your archive decision by using theUnarchivebutton at the bottom of the Inactive list.