Create user accounts
There are several ways to add user accounts to Insights:
- Add a single user using the New User screen.
- Add multiple users quickly with the QuickAdd feature.
- Import users or test-takers from a spreadsheet.
- Allow users to self-register.
- Use the Janison API framework to automatically create or update users by connecting Insights to your internal systems, such as your HR system. Read more.
Note: The Insights system is highly configurable, so the labels and menu items you see may differ from those shown here. Your access will also depend on your role permissions.
Add a single user
Use this option if you only need to add a few accounts.
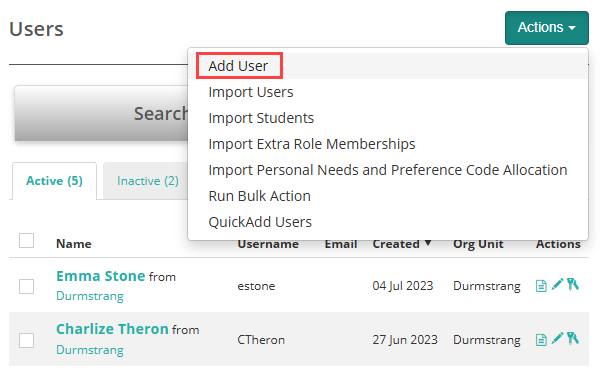
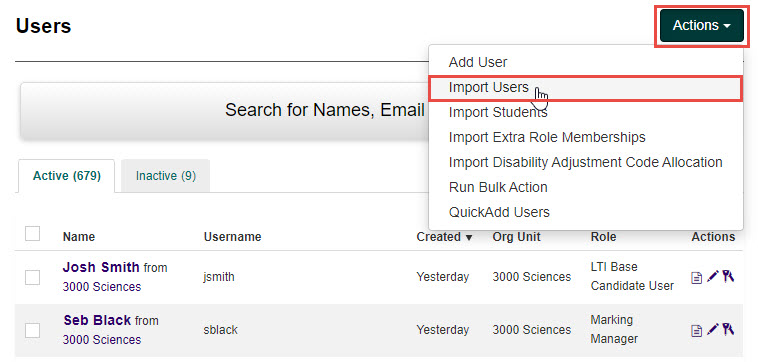
Navigate to People > Users.
Select the Actions drop-down and choose Add User.
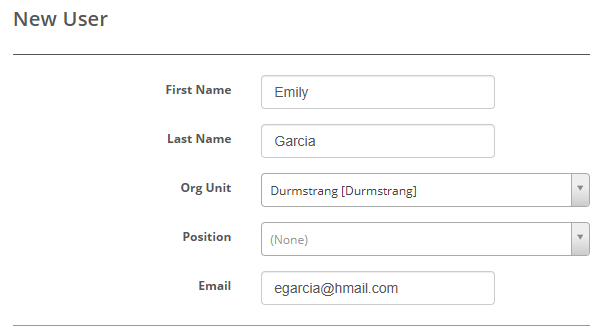
Enter the user’s personal and organisational details as needed.
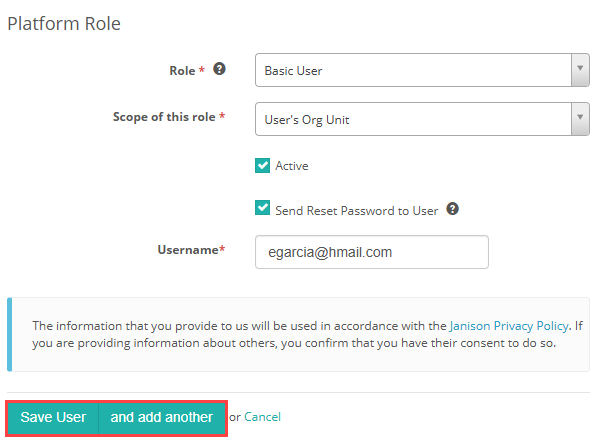
In the Platform Role section:
Select the appropriate role from the Role drop-down.
Select the scope from the Scope of this role drop-down.
Enter a Username based on your organisation’s naming conventions (e.g. egarcia or the email address).
Select Save User to save and finish, or and add another to add another user.
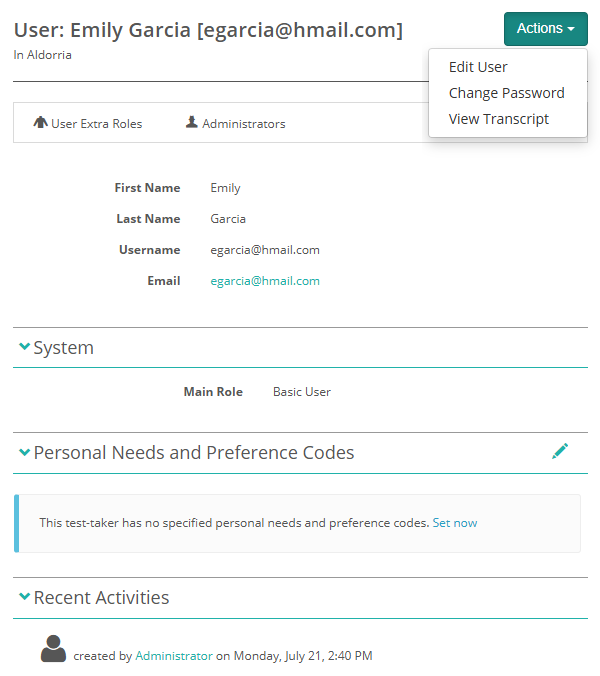
The User screen displays an Actions drop-down with options to:
- Edit User
- Change Password
- View Transcript
Additional sections let you:
- View the user’s role
- Add Personal Needs and Preference Codes (learn more)
- View recent activity
Import users
Users can be added to the system in bulk using an import. For general users such as marker or test authors, you would use this option. For test-takers you would use the Import test-takers option covered below.
There are two types of imports:
- Data upload
- Sync data from a HR system
Important
Syncing Users from a HR system will deactivate any users already in the Janison Academy who are not listed in the spreadsheet.
The data upload option will not deactivate users on import, even if they are not on the spreadsheet. They will only be deactivated if the Is Active column is set to No.
Change the default settings
Your preferences for the import settings can be set as default. To do this:
- Select the Actions drop-down button, then select Import Users.
- Select the Default Settings button.

- Edit the default settings in the User Import expandable section as required:
- Selecting one or more options in the first column will make that option selected by default from now on.
- Selecting any of the options to Disable Manual Override? will remove the setting from the Data Upload screen.
- You can limit the number of Users to be imported by entering a number into the Max number of users to be imported using Web Role field.

- Select the Save button to save your default settings.
Complete the data upload
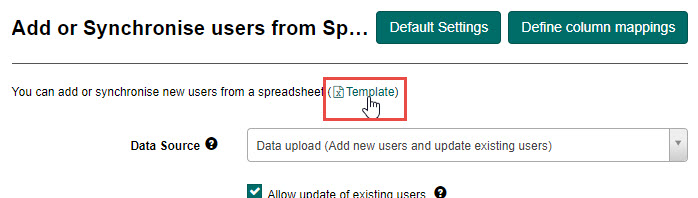
From the Data Upload screen:
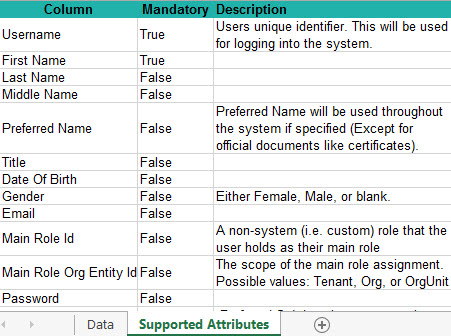
- Select the Template link to open a sample Excel template. The template will provide you with sample data. The Supported Attributes tab has information on requirements for the different fields.
- Open the downloaded Excel template, enter all required data and then save the template to your local machine.
- Complete the following:
- Ensure Data upload (Add new users and update existing users) is selected in the Data Source drop-down field.
- Check the checkboxes beside any of the additional settings which you require.
Tip
For more details on any of these options, hover over the ? icons
- The Email Address field will automatically populate with the email address recorded for you in the system. You can change this if you would like someone else to receive the import notifications.
- Select the Select File button to locate and select the saved file on your local machine. The uploaded file will display.
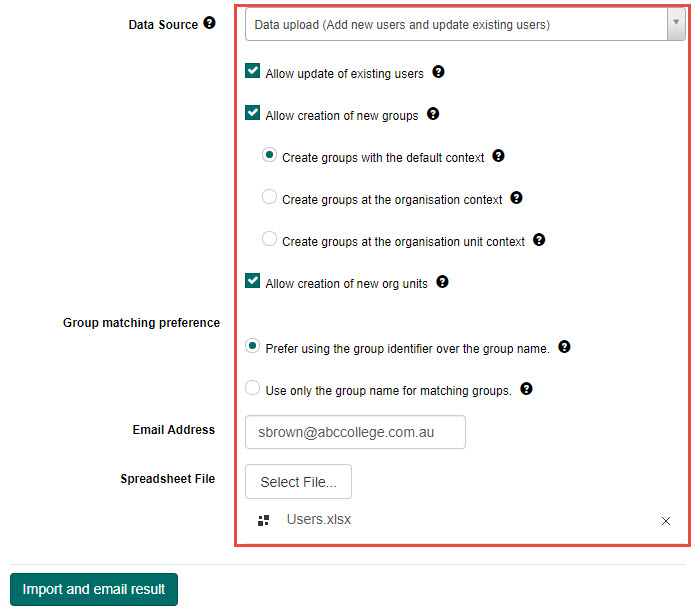
- Select the Import and email result button to complete the import process.If the import is submitted for processing, feedback will be displayed with a link to the import log. Selecting the View Import Log button will open a copy of the log which was also sent by email to the identified email address.

Sync data from a HR system
Set the default settings and column mappings
Tip
The default settings for syncing can be set as per the instructions in the Completing the data upload section.
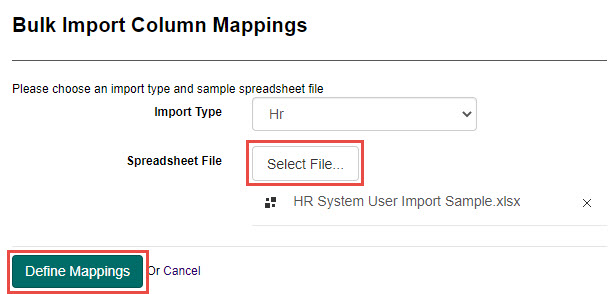
- Select the Define column mappings button.

- Select the Select File button to locate and select a template file on your local machine. Once your file has uploaded, select the Define Mappings button to match fields between your spreadsheet and the system.
- The spreadsheet headings that you uploaded will appear in the first column. Select the drop-downs in the second column to map them to the appropriate system field.
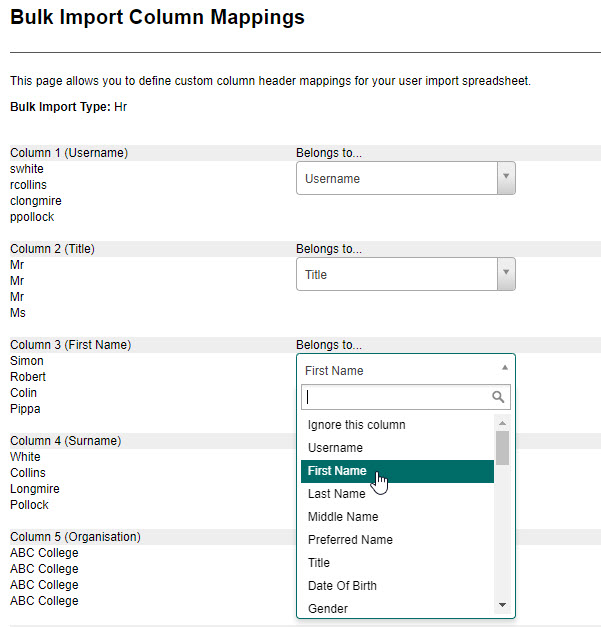
- Select the Save button to save these column mappings.
Synch data from a HR system
Once you have defined your column mappings, the HR import will then need to be scheduled. See the section on Schedule a job for these steps.
Quick-add users
This option allows you to quickly add Users with limited fields available.
Tip
This feature is a plugin and will not be available unless the plugin is active. Please contact your Account Manager for more information
To add Users using the QuickAdd plugin:
- Select the Actions drop-down button, then select QuickAdd Users.

Tip
The fields and columns you see may differ depending on the options you have set. To learn more about these settings, see the QuickAdd User settings section.
Complete the QuickAdd Users information:
- If you would like to link the User to an Organisation, select it from the Organisation drop-down field.
- If you would like to link the User to an Organisation Unit, select it from the Organisation Unit drop-down field.
- If you would like to assign the User a Role, select it from the Role drop-down field.
- If you would like the system to automatically send a welcome email to the new User, leave the Send Welcome Email to User checkbox selected.

- Fill in the relevant information for the new User.

Tip
As soon as you select any of the editable fields, a new row is automatically created ready to add the next new User.
In this example, the automatic generation of Username and Password is turned off. To learn how to adjust these settings, view the QuickAdd User settings section.
- Once you have finished adding all new Users, select the Save Users button to save them.
Set up self-registration
This is where a new system user is required to register themselves on the system.
There are two ways this might be done:
- Via a self-registration form on a separate page of the system
- Via a secure self-registration link which is sent in an email
Important
By default, self-registration is disabled in Janison Insights. To learn how to enable this setting, see the Self-registration form section in User settings.
Self-registration form
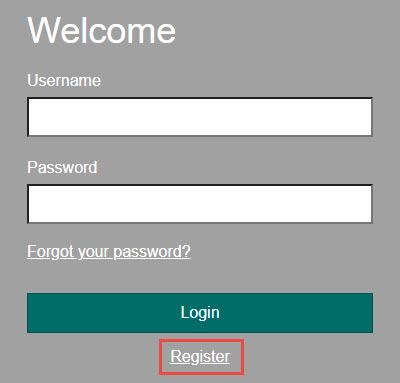
If the Registration form on a separate page option is selected, Users will register using the self-registration form as follows:
- Select the Register link on the login page.
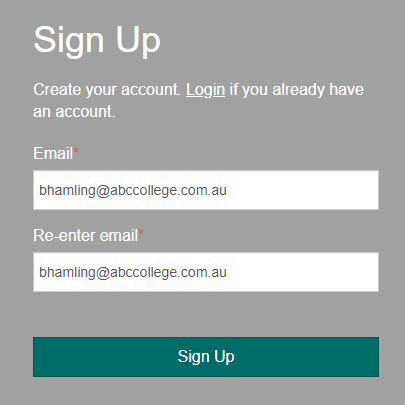
- Enter the required registration information. Any mandatory information which must be entered is indicated by a red asterisk. Select the Sign Up button to submit.
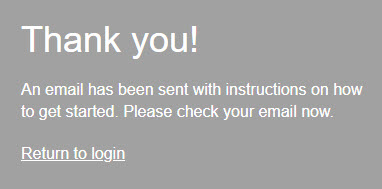
A notification displays advising an email has been sent with instructions on how to get started.
Self-registration link
If the Registration via secure link in Email option is selected, you can invite up to 30 Users at a time to self-register by emailing them a secure link.
To do this:
- Navigate to People in the Menu, then select Users.

- Select Invite users via a secure link from the Actions drop-down button.

Complete the following:
- Select an Organisation from the Organisation Unit drop-down field.
- Select a role from the Role drop-down field.
- Select the scope for the role from the Scope of the Role drop-down field.
- Enter the email addresses of the people you want to invite to self-register in the Email Addresses field.
- Edit the email you would like sent to these people in the Email Body field.

- Select the Send Invitations button to send.
When a User selects the link in the email, they will be directed to the Sign Up screen.
View and edit a User
Users can be accessed from the Users tab under the People menu. This screen displays any Users which have already been created.
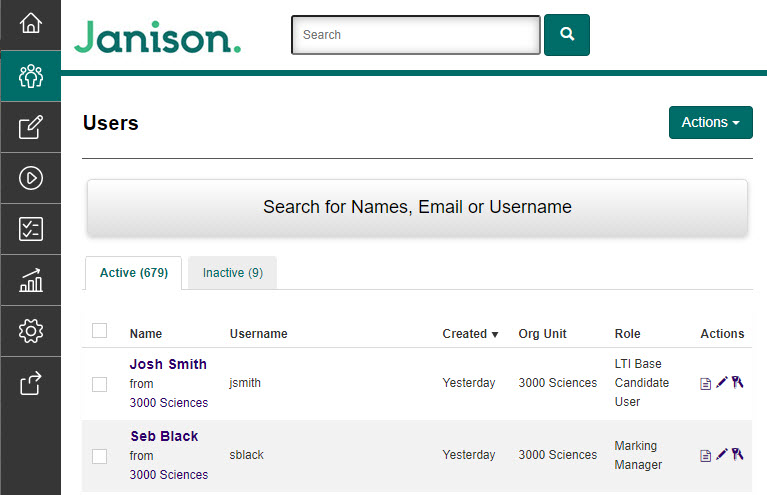
Tip
You can reorder the list of Users by selecting any of the column headings (eg. Name, Username, Created etc.).
From this screen you can:
- Search for a User
- View a User’s details
- Edit a User
- Change a User’s password
- Add User roles
- Archive a User
Search for a user
The search feature allows you to quickly find a User. This is only needed when there are a large number of Users in the list.
- In the Search field, type the User you wish to search for, then select the Search button.
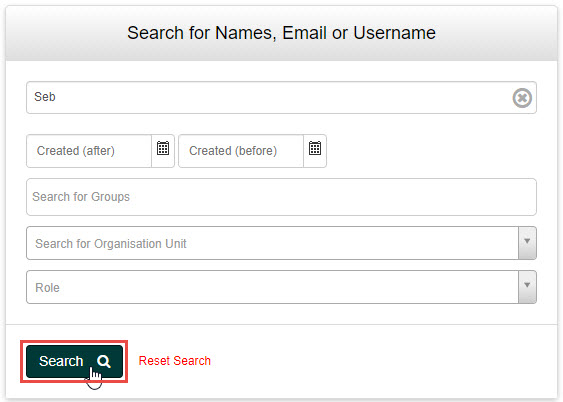
Tip
To perform another search, select Reset Search next to the Search button.
View a user’s details
The view functionality allows you to view the details of a User.
- Search for the User you wish to view as covered in the previous section.
- Select the name of the User to open the record.

The User’s details are displayed.

Tip
From this screen you can also view the following information for a User:
- System role
- Groups
- Disability Adjustment Codes
- Competency
- Recent activities
Edit a user
The edit functionality allows you to edit the following details of a User:
- Profile image
- Personal details (Name, Address etc.)
- Organisational details (Organisation, Organisation Unit)
- User role in the system
To edit the User’s details:
- Search for the User you wish to edit as covered previously.
- If the Actions column is active, you can enter the Edit User screen by selecting the Edit icon.

Tip
If the Actions column is inactive, then you will need to view the User’s details as previously covered, then select the Actions drop-down button and select Edit User.

- Update any of the details as needed, then select the Update {User’s Name} Profile button to save your changes.
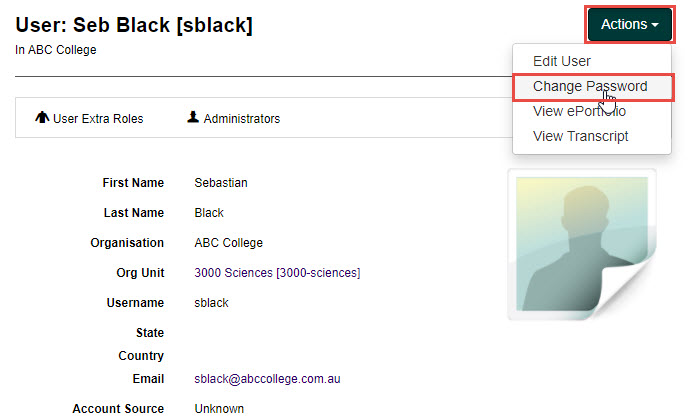
Change a user’s password
As an Administrator, you are also able to change a User’s password if required. To do this:
- Search for the User as covered previously.
- If the Actions column is active, you can enter the Change Password screen by selecting the keys icon.

Tip
If the Actions column is inactive, then you will need to view the User’s details as previously covered, then select the Actions drop-down button and select Change Password.
- Enter the new password in the New Password field, then again in the Confirm Password field.
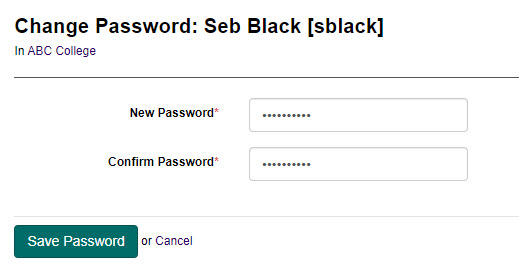
- Select the Save Password button to save the change.
Add user roles
A role is a collection of permissions that refer to a set of actions a User can perform.
Tip
To learn more about roles, see the Roles and key features section.
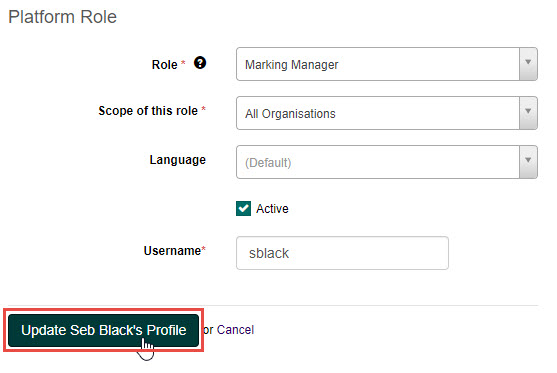
Role persmissions are edited/added in the Edit User screen.
To edit/add the Main Role of a User
- Go to the Edit User screen for the User.
- Scroll down to the Platform Role section and choose the appropriate role from the Role drop-down.

- Select the Update {Users Name} Profile button to save your changes.
Archive a user
Archiving a User will set them to inactive and remove their access to the system. Users can be individually archived in the Edit User screen or in bulk from the User List.
To do this:
- Select the checkbox next to the User(s) you wish to archive, then select the Archive button.

- Select the Yes button to confirm the archive process.
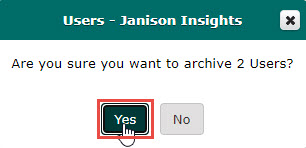
- The User(s) will now appear under the Inactive tab.

Tip
You can select the checkbox next to the User(s) and select the Unarchive button to remove the archive and return the User(s) to the Active list of Users.
To edit/add the Extra Roles of a User
- Go to the User details screen.
- Select the User Extra Roles widget, then select the Edit Roles button.

- Select a role from the Role drop-down field, then select the appropriate scope for the role from the Scope entity drop-down field.

- Select the Add Role to save your changes.