Welcome to the Janison Insights help portal

Resources

The ‘Resources’ feature in Janison Insights empowers you to enrich your test questions with supplementary content, creating a more engaging and informative assessment experience for test-takers. By attaching various resource types directly to a question, you can provide essential context, supporting materials, or interactive elements that enhance understanding and allow test-takers to demonstrate their knowledge more effectively. This guide will walk you through the different types of resources you can add to your questions and how they can be utilised.

View the test below to see an electrical circuit in action, built using the HTML Snippet resource type. We’ve included the code so you can easily copy it and try it on your own site.

Practice test demonstrating HTML Snippet

Open this test in the Janison test player and view a question with an HTML snippet attached.

Read more

				
					<!DOCTYPE html>
<html lang="en">
<head>
  <meta charset="UTF-8">
  <title>Interactive Electric Circuit</title>
  <style>
    body {
      font-family: Arial, sans-serif;
      background-color: #f0f0f0;
      text-align: center;
      padding: 20px;
    }

    .circuit-box {
      background: white;
      border-radius: 10px;
      border: 1px solid #ccc;
      padding: 20px;
      display: inline-block;
      max-width: 470px;
      width: 100%;
      box-shadow: 0 4px 6px rgba(0,0,0,0.1);
    }

    .circuit-container {
      display: flex;
      align-items: center;
      justify-content: space-evenly;
      flex-wrap: wrap;
      margin-bottom: 20px;
    }

    .component {
      display: flex;
      flex-direction: column;
      align-items: center;
      margin: 10px;
    }

    .component-label {
      font-size: 11px;
      margin-top: 5px;
      font-weight: bold;
    }

    /* Battery */
    .battery {
      width: 45px;
      height: 75px;
      background: #ddd;
      border: 2px solid #555;
      border-radius: 5px;
      position: relative;
      display: flex;
      flex-direction: column;
      align-items: center;
      justify-content: space-around;
      padding: 5px 0;
    }

    .battery::before {
      content: '';
      position: absolute;
      top: -8px;
      width: 20px;
      height: 8px;
      background: #aaa;
      border: 1px solid #555;
      border-bottom: none;
      border-radius: 3px 3px 0 0;
      left: 50%;
      transform: translateX(-50%);
    }

    .battery span {
      font-size: 14px;
    }

    /* Wire */
    .wire {
      flex-grow: 1;
      height: 6px;
      background: #444;
      border-radius: 3px;
      margin: 0 5px;
      min-width: 20px;
    }

    /* Switch */
    .switch {
      padding: 8px 12px;
      border: 2px solid #333;
      border-radius: 6px;
      width: 75px;
      height: 45px;
      display: flex;
      align-items: center;
      justify-content: center;
      font-weight: bold;
      font-size: 16px;
      cursor: pointer;
      transition: 0.3s ease;
    }

    .switch.open {
      background: #e74c3c;
      color: white;
    }

    .switch.closed {
      background: #2ecc71;
      color: white;
    }

    /* Bulb */
    .bulb {
      display: flex;
      flex-direction: column;
      align-items: center;
    }

    .bulb-top {
      width: 55px;
      height: 55px;
      background: #b0e0e6;
      border-radius: 50%;
      border: 2px solid #505050;
      position: relative;
      transition: 0.4s ease;
      display: flex;
      align-items: center;
      justify-content: center;
      margin-bottom: -2px;
    }

    .bulb-top.on {
      background: #fffacd;
      box-shadow: 0 0 25px 10px #fffacd;
    }

    .bulb-top::before {
      content: '';
      position: absolute;
      width: 8px;
      height: 20px;
      background: #778899;
      border-radius: 3px;
      transition: 0.4s ease;
    }

    .bulb-top.on::before {
      background: #ffd700;
    }

    .bulb-base {
      width: 28px;
      height: 20px;
      background: #aaa;
      border: 2px solid #505050;
      border-radius: 0 0 5px 5px;
    }

    button {
      margin-top: 15px;
      padding: 10px 20px;
      background: #3498db;
      color: white;
      border: none;
      border-radius: 6px;
      font-size: 14px;
      cursor: pointer;
    }

    button:hover {
      background: #2980b9;
    }
  </style>
</head>
<body>
  <div class="circuit-box">
    <div class="circuit-container">
      <div class="component">
        <div class="battery">
          <span>+</span><span>1.5V</span><span>-</span>
        </div>
        <span class="component-label">Battery</span>
      </div>
      <div class="wire"></div>
      <div class="component">
        <div id="switch" class="switch open" onclick="toggleCircuit()">OFF</div>
        <span class="component-label">Switch</span>
      </div>
      <div class="wire"></div>
      <div class="component">
        <div class="bulb">
          <div id="bulb1" class="bulb-top"></div>
          <div class="bulb-base"></div>
        </div>
        <span class="component-label">Bulb</span>
      </div>
    </div>

    <p id="circuit-text">Click the switch to complete the circuit!</p>
    <button onclick="resetCircuit()">Reset Circuit</button>
    <audio id="click-sound" src="https://cdn.pixabay.com/download/audio/2022/03/15/audio_4760f1fa43.mp3?filename=switch-1-6993.mp3" preload="auto"></audio>
  </div>

  <script>
    let isOn = false;

    function toggleCircuit() {
      const switchEl = document.getElementById('switch');
      const bulb1 = document.getElementById('bulb1');
      const text = document.getElementById('circuit-text');
      const sound = document.getElementById('click-sound');

      if (!isOn) {
        switchEl.classList.remove('open');
        switchEl.classList.add('closed');
        switchEl.textContent = 'ON';
        bulb1.classList.add('on');
        text.textContent = 'The bulb is glowing!';
        sound.play();
        isOn = true;
      }
    }

    function resetCircuit() {
      const switchEl = document.getElementById('switch');
      const bulb1 = document.getElementById('bulb1');
      const text = document.getElementById('circuit-text');

      switchEl.classList.remove('closed');
      switchEl.classList.add('open');
      switchEl.textContent = 'OFF';
      bulb1.classList.remove('on');
      text.textContent = 'Click the switch to complete the circuit!';
      isOn = false;
    }
  </script>
</body>
</html>


Resource Types

In Janison Insights, you’ll find a variety of resource types available. While there are several legacy resource types listed, our current focus and recommendations are on the following types, which are actively used and supported:

Audio: This resource type allows you to embed audio files (e.g., MP3, WAV) directly into the question. This can be useful for language assessments (listening comprehension), providing instructions, or setting a specific context through sound.

Important: Questions come with a dedicated audio section that includes advanced features to support diverse testing needs. You can find more details in our audio guide.

Document: You can attach various document formats as resources. This is ideal for providing lengthy reading passages, detailed instructions, data tables, or reference materials that test-takers might need to answer the question.

Image: This resource type enables you to include visual aids such as photographs, diagrams, charts, or illustrations. Images can provide essential context, support understanding, or be the subject of the question itself.

Video: Embedding video files (e.g., MP4) can provide dynamic and engaging content. This can be utilised for delivering instructions, presenting scenarios, or providing visual explanations relevant to the question.

HTML Snippet: Similar to HTML, this option allows you to insert HTML code. This is useful for adding elements like small interactive widgets, or formatted text blocks without needing to create a full HTML page. The practice test at the top of the page contains an HTML snippet of an electrical circuit in action. It’ll give you a feel for how you can use this resource type.

Important: Legacy resource types may appear in the dropdown but are not covered in this guide, as they’re kept for compatibility with older content and are not needed for your current tasks.

Create a resource

You can create resources via the left navigation menu and then add them to a question from within the test question editor when you are building or modifying a question. An option also exists to upload a new resource via the test question editor.

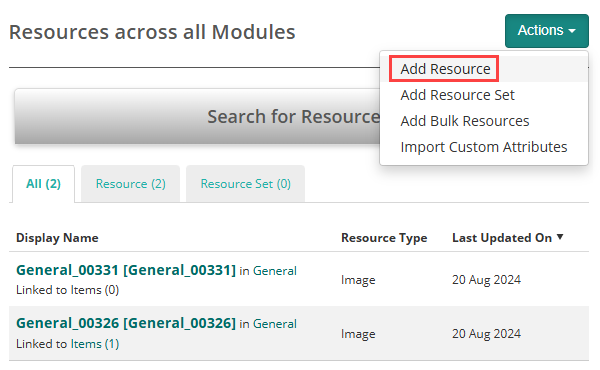
From the Resources menu

Select Author > Resources.

The Resources across all Modules screen displays, where you can view and manage the resources.

Select Actions > Add Resource.

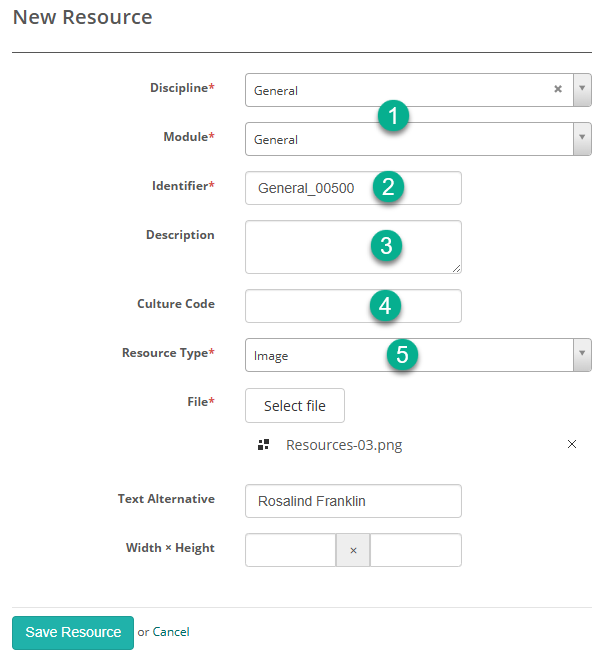
The New Resource screen displays.

Below is an example of a completed form.

  1. Select the Discipline and Module.
  2. Enter an Identifier.
  3. Optionally enter a Description. This is for your own reference and will not display to the test-taker.
  4. Optionally enter a Culture Code.
  5. Select the required Resource Type.

Add resources to a question

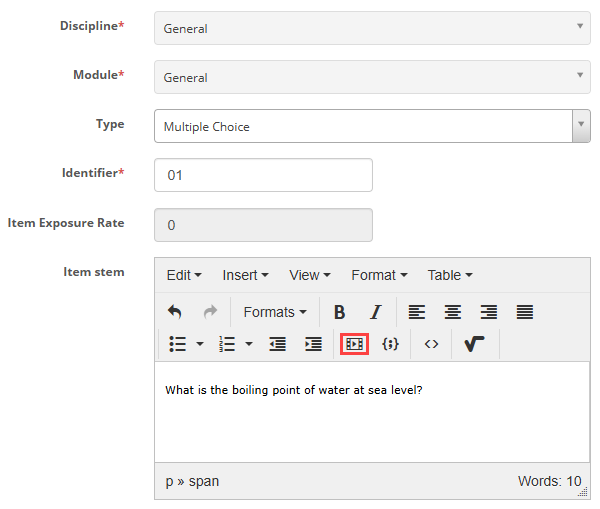
When you create a question, an editor is available to enter the item stem. The insert/edit resources icon   allows you to load existing resources or upload new ones.

Preview: It is highly recommended to preview the question after adding the resource to ensure it displays and functions as expected for the test-taker. This allows you to verify the content is correct and the integration is seamless.

Related documents

Topics on this page