Assessment Module Questions
Introduction
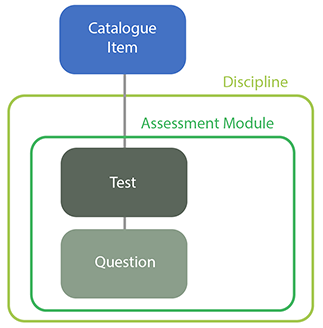
In the CLS, Questions are linked to Tests. There are two kinds of Modules that Tests and Questions can belong to: Learning Modules and Assessment Modules. The first kind of Module is oriented towards the learning experience; the second is oriented towards assessing that learning. Because of this, Tests and Questions are managed differently depending on the type of Module they belong to.
Assessment Tests are described at Assessment Tests. This document covers Assessment Questions.
The first step in creating a Question is to select the type of question you want to create. Many different kinds of Assessment Module Questions are available.
Once a Question has been created, its details screen is available. The screen displays the Question’s linked entities (Tests, etc) and all aspects of the Question. The screen allows you to view and edit linked Stimuli, Comments and Marking rubrics (where appropriate). It also shows you a Response Analysis of previous Test Attempts using this Question. In the widgets bar and depending on permissions, you can view and edit Tags, Administrators, Workflow states and Psychometric data. You can also preview the Question as it appears to a student.
Note that the CLS caters for a wide range of uses: from a major Test development process involving teams of authors, editors and reviewers to a single Teacher with 25 minutes to create an automatic marked quiz. To achieve this range of uses Test Designer settings are available under the Settings menu to customise how things work. Thus the functionality available in this section of the CLS is determined by what has been selected in Settings > Test Designer Settings and everything described here may not be visible on your screen.
Managing and Exporing Questions
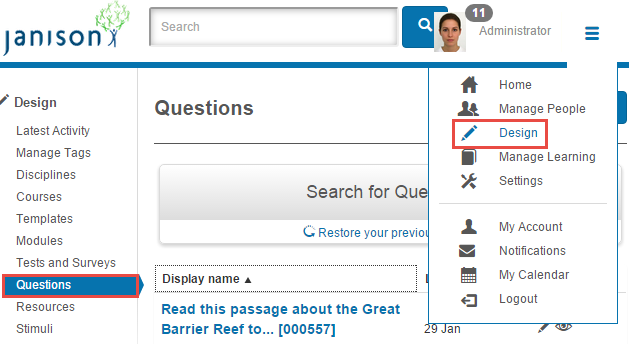
To manage Questions select Design > Questions.
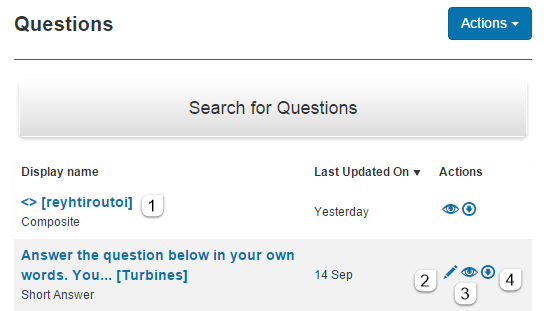
A list of Questions is displayed with names, the type of question, its workflow state (if enabled) and date of last update.
The list can be ordered by name or last update date by clicking the appropriate headings.
You can study an individual question:
- Click the name of the Question to inspect its details.
- Click the pencil icon to edit the Question.
- Click the eye icon to preview the Question, that is, to see how it would be displayed to Users in the Test Player.
- Click the arrow icon to export the Question. This option is only available for QTI compliant Questions. For more information refer to the document on QTI.
Question Details
To inspect a Question’s details screen navigate to Design > Questions and open the Question.
You can use the Search feature to help find a Question.
Once you have opened a Question, the top shows the name of the Module it belongs to and the type of Module it is. The name of the Module is a link which will open the Module.

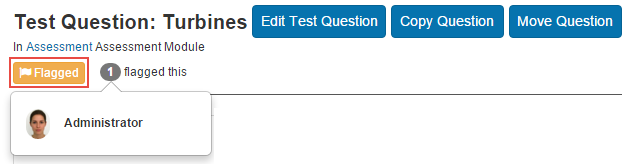
Flag this
The Flag function can be used as part of a review process. Click Flag This to Flag the Question.

The widget will change to indicate that it has been flagged. Hovering over the number makes a pop-up appear listing who has flagged it.
You can remove a Flag from a Question by clicking the
 button.
Flagged Questions can be located using the Search bar and selecting from the options under For me.

Widget bar
The widget bar allows you to view information and perform a number of actions.
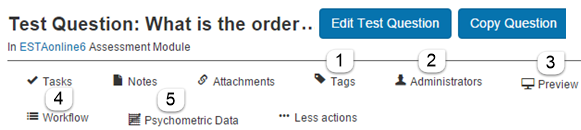
The important components are:
- Tags–Questions can be tagged as a way of categorising and locating them, see Linking Tags for instructions on how to do this.
- Administrators– this is used to set permissions over the Question. Click the widget to view Users who have various Roles over the Question and to edit this list.
- Preview– click this to preview the Question to see how it would be displayed to Users in the Test Player.
- Workflow– A workflow widget is only visible if workflow has been turned on in the test designer settings. Here authorised users can change the Question’s workflow status.
- Psychometric Data – any metadata that has been collected and linked to a Question will display in a pop up box.
Immediately under the widget bar is a list of clickable links that show the relationships that this Question has with other entities in the CLS.

Basic information about the Question appears under the list of links.
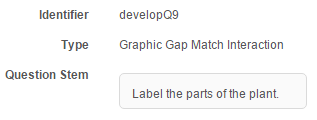
Underneath the basic information are a number of sections that are collapsed by default.
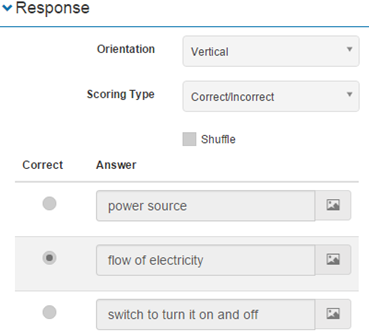
Response
This shows the full details of the Question itself. It is the same as you would see if you created or edited the Question, however nothing can be edited here.
Naturally the layout will depend on the type of Question involved. Below is an example of the Response section for a multiple choice question.
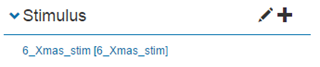
Stimulus
If a stimulus had been added to a Question it can be viewed here.
Click the pencil icon to make any edits.
Click the + icon to create a new Stimulus and link it to the Question, see the document on Stimuli for details about creating them.
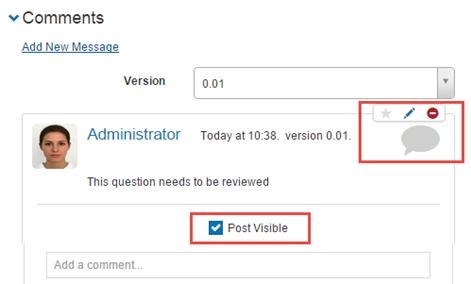
Comments
If this functionality has been turned on in the Test Designer Settings, comments can be added to the Question. They are available for others to view and reply to. Comments are a useful tool if workflow is enabled and Questions need to be studied and approved as part of a review process, particularly when there are multiple Users involved.
Type a message in the blue text box. You can classify it by selecting an icon:
- General
- Question
- Support
- Challenge

Add a file if required by clicking Select files and click Post to complete the process.
Once a Comment has been posted the screen changes slightly. The Comment can be:
- edited by clicking the pencil icon.
- deleted by clicking on the red minus icon.
- hidden by removing the check mark next to Post Visible.
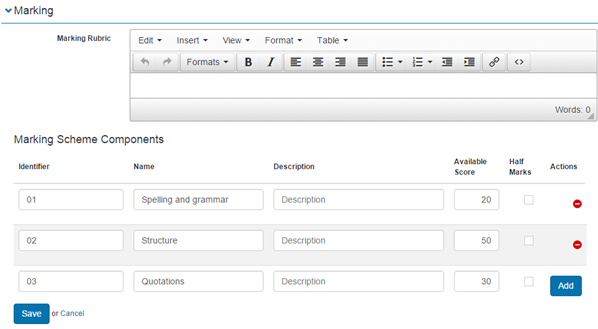
Marking
This section only exists for Question types that cannot be automatically marked: short answer, multiple short answer and file upload question types. Appropriate Users must mark these Questions and need guidance on how to do this. The other Question types have the marking rubric established as part of the question and the CLS marks them automatically.
This section contains two elements:
- Text box for textual information about how the Question should be marked, i.e. qualitative information.
- Marking Scheme Components for the quantitative marking information, i.e. numerical values.
A good example of the latter would be a Test Question set as an English essay. The marking scheme components would be the breakdown and score allocation for each aspect of the essay, e.g. spelling and grammar, structure, quotations etc. To complete this form:
- Create an Identifier for each component.
- Give the component a Name.
- A Description of the component can be added but is not mandatory.
- Allocate a Score for the component. Check the box under Half Marks if you want to use decimal places when marking.
- Click Add to save the component.
- The red minus icon will delete the component if needed.
Response Analysis
This section gives details about attempts taken on the Question.

Recent Activities
Displays any recent activity on the question.

Add a Question
To add a Question navigate to Design > Questions and select Add Test Question from the Actions drop-down menu.

The next steps depend very much on the type of Question you are creating, see Assessment Question Types for details.
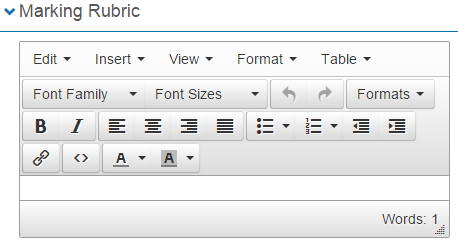
The bottom of the screen also contains a section for notes on the marking rubric. Click Marking Rubric to open it and enter information in the text box.
Click Save Test Question to save this Question. Click and add another if you want to save this Question and then go straight to the New Test Question screen.

Edit a Question
Once a Question has been saved, the Edit Test Question button is available.
To edit a Question navigate to Design > Questions.
- Select the desired question from the Display Name list, or search for the question using the Search bar.
- Select Edit Test Question.

You will be taken to the edit screen where you can change details as required. The fields available will be the same as the ones available when you created this question, see Assessment Question Types for details.

Click Save Test Question after editing it.
Preview a Question
Previewing a Question is an important aspect of Assessment Development. Questions can be previewed at any time however any Test Attempts for the Question while in preview mode will not be saved.
To preview a question navigate to Design > Questions.
Locate the Question you wish to view from the Display Name list, or search for the Question using the search bar at the top of the page.

Click its eye icon. The Test player will open in a new window:

Note that you can also preview a Question from its details screen.
Search for Questions
The search feature allows you to quickly find a question. Select Design > Questions.
- Click Search for Questions and a search field will appear.
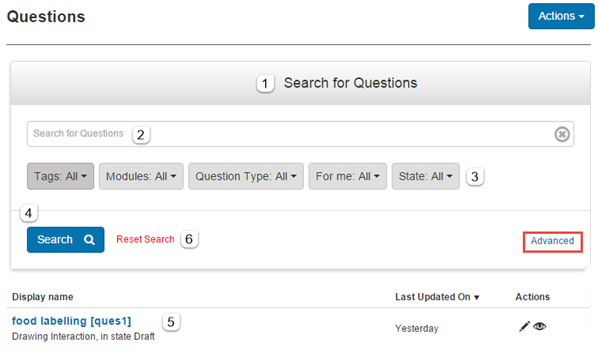
- Enter search field.
- There are 5 options to narrow down the search to, for example, certain Workflow states, certain tagged Questions, Questions made or Flagged by you, etc. Click the arrow beside the option desired.
For example you can click the Modules tab in the Search feature and filter the list of Questions to see only those that belong to a particular Discipline, e.g. the Assessment Discipline below.
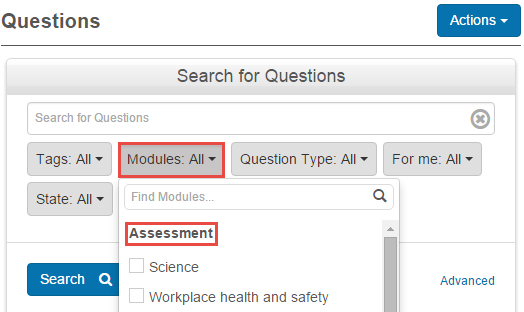
- Click Search.
- The search results will appear in the Display Name column.
- To perform another search click Reset Search.
You can click Advanced (highlighted in the screenshot) to customise the search filter using filters, see Building Filters.
Copy a Question
You can copy Questions. The copy will be placed in a different Module, which can also be in another Discipline if desired.
Click Copy Question from the details page of the desired Question.

Select the new Discipline and Module you want the copied Question to belong to:

You may choose to modify some aspects of the Question in the copied version.
Scroll down and select Save Test Question.
A pop up warning box may appear advising you about Resources, Stimuli and Metadata depending on where you are moving the Question to.
In the example shown below there are two messages in the box:
- Any changes subsequently made to the original Question will not be applied to the copied version of the Question (or vice versa). Similarly, if changes are made to the Stimului or Resources attached to the original Question this is not applied to the copied Question.
- If you move a Question to a different Discipline the metadata collected for the Question will not be copied.
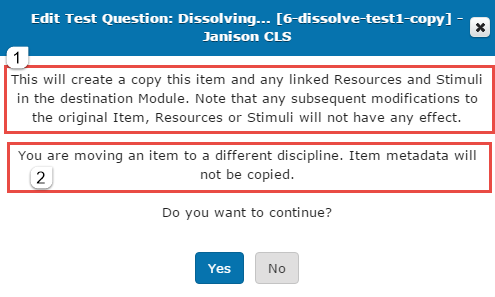
Click Yes or No to continue.
Note that the Question will now seem to appear twice in the list of Questions. The copied version will have copy next to its name, as shown in the example below. Of course, as explained above the two Questions are now independent of each other and are two separate Questions with no ongoing relationship.

You will now find that the newly copied question is available through the Discipline and/or Module that you copied it to.
Note also that the newly copied Question has an extra section, Linked Items, in its details screen showing its origins:

The original Question has the copy noted under the Recent activities section.

Move a Question
Questions that are not linked to a Test or Test Section can be moved to another Module, which can also be in another Discipline if desired. If a Question is already part of a Test it can be copied but not moved. Click Move Question from the details page of the desired Question.

This will move the Question to the other Module. A copy of the liked resources and stimuli will be made and also moved to the Module.

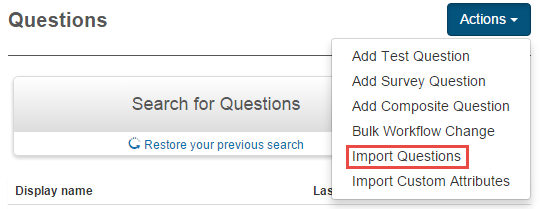
Import Questions
There are two ways that you can import questions into the CLS. You can can use a spreadsheet to import multiple Questions into a Module, as described below. Alternatively you can import QTI questions, see the QTI document for details.
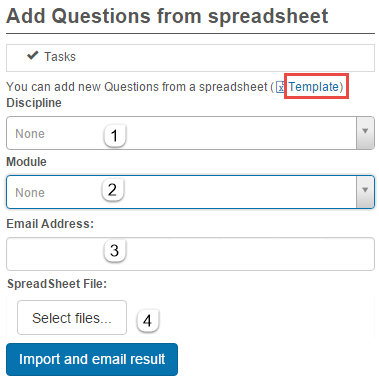
To use a spreadsheet to import questions, select Design > Questions and click Import Questions from the Actions drop-down menu.
A template for the spreadsheet is provided. Click Template to download it, then customise it as described below.
- Select a Discipline from the drop-down box.
- Select the Module in that Discipline from the drop-down box.
- Enter an email address for the results to be sent to.
- Select your spreadsheet and click Import and email result.
There are four pages in the template spreadsheet. The first three are used to enter different kinds of information about the same questions and the last page lists which fields in the first three are mandatory and which Question types are valid.
In the first three pages, each entry must identify which question it refers to.
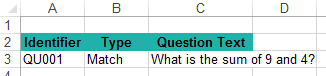
Questions
This is where you enter the Identifier, Question Type (valid options are on page 4) and the Question Body. A sample entry is provided:
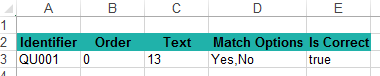
Options
This is where you match the Question Identifier with its options. A sample entry is provided:
- Order: the order in which the option is displayed to the end User.
- Text: the text of the Question option
- Match Options: a comma separated list of match options for this option; it is only used in match type questions.
- Is Correct: Is this option correct?
Response Conditions

This is only relevant for some question types question types. It is where you match the Identifier with responses. A sample entry is provided:
- Order: the order in which response conditions will be evaluated for this question.
- Match Expression: the regular expression pattern to be matched against question answer. It is for a regex pattern which is a well-known pattern matching language.
- Score Multiplier: An integer value between 0 and 1. It will be multiplied against question weight to determine final score if this condition is matched. In the example above only the first combination will be marked as correct. Partial marks could be awarded if a fraction is entered instead of a 0 or 1.
- Report Code: the code recorded against answer if this condition is matched. In the example above there are four possible report codes:
-
- 1 if the student selects potassium, carbon then oxygen in that order.
- 2 if the student selects krypton, carbon then oxygen in that order.
- 3 if the student selects phosphorus, carbon then oxygen in that order.
- 4 otherwise.
Supported Attributes
This sheet provides information about which are the mandatory fields in the first three pages and which are the valid Question types.

The Question Types column has been reduced here to fit onto the screen.
Add a Composite Question
A Composite Question is one that is composed of a number of Questions. They will all be displayed to students on one long screen. For example, a composite question might consist of a multiple choice question followed by an extended text question. Learners are required to complete all of the interactions within a composite question to be considered to have successfully answered the composite question.
Scoring can be assigned for the composite question as a whole, or the individual interactions can be scored and marked separately. Score allocation is set at the time of authoring. Scoring Mode will only available if the multiple graded responses check box has been activated in the Test Designer Setting. For more information about this refer to the document on Test Designer Settings.
To add a Composite Question navigate to Design > Questions and select Add Composite Question from the Actions drop-down menu.


- Select a Discipline from the Actions drop-down menu
- Select a Module from the Actions drop-down menu
- Enter an Identifier.
- Click Save Composite Question.
This takes you to the details screen for the Question. There are two new sections here specifically for Composite Questions. Click each one to open its window.
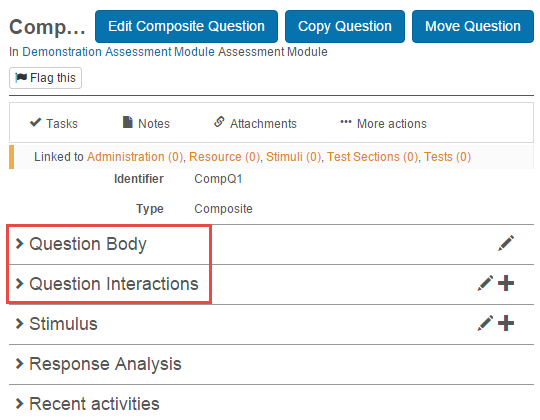
Question Body
Enter the first part of the Composite Question here. This could be an explanation for students. You can also edit it by clicking the pencil icon.

Question Interactions
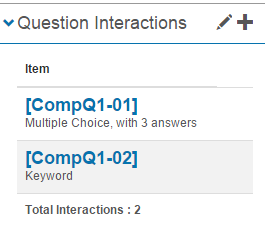
Each Question that is part of the Composite Question is called a Question Interaction. You can create and edit them here.
- Click the plus icon to add a Question Interaction. A screen appears where you can select the Question Type. The Identifier will be assigned automatically and cannot be changed.
- Enter the appropriate information for the Question Interaction based on the type of question that you choose.
- Click Save.

The Question Interactions that you entered are listed in the Questions Interaction section, for example:
If you click the name of the Question Interaction you can edit the question.
If you click the pencil icon you make option available where you can delete an Interaction by clicking its minus icon. You can also change the Interaction’s position in the list by dragging its other icon up and down.

Import Custom Attributes
Custom Attribute data can be imported using a spreadsheet. This process will enter data into Custom Attributes that you have added to Questions. You specify the Questions that will be updated through their identifiers.
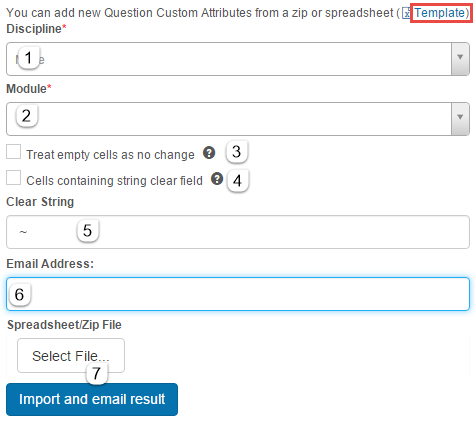
Navigate to Design > Questions and select Import Custom Attributes from the Actions drop-down box.
A template for the spreadsheet is provided. Click Template to download it and customise it as described below.

- Enter the Discipline.
- Enter the Module.
- Click the check box if empty cells should not update existing custom attribute values.
- Click the check box if cells containing the clear string (in 5) should clear existing custom attribute values.
- Enter the clear string if desired.
- Enter the email address where the import results will be sent.
- Locate your updated spreadsheet and click Import and email result.
Note that the spreadsheet can contain references to images and these need to be uploaded with the spreadsheet. This is done by creating a zip file containing the spreadsheet and all images that it references. When an image file is specified in the spreadsheet, the path must be relative to the spreadsheet. If no images need to be uploaded, the spreadsheet can be uploaded instead of a zip file.
The two pages in the spreadsheet template are the page you will complete (with sample data) and some instructions for it. On page one you enter:

- A number of columns with the identifiers of each Custom Attribute as headings
- Each row starts with the identifier of the Question that will have its Custom Attributes updated.
Note that:
- For custom attributes of type Boolean, values must be in the format ‘true’ or ‘false’.
- For custom attributes of type image, use the image name and include image in the zip.
- For custom attributes of type image, use the image name and include image in the zip. If the image is contained in folder include path.
- For custom attributes of type image, use the image name and include image in the zip. If the image is contained in folder include path.
- For custom attributes of type list that do not support multi selection use element identifiers.
- For custom attributes of type list that support multi selection, separate element identifiers with a comma.
The first page of the template gives examples of each of these in the sample data.