Assessment Question Types
Introduction – Creating Questions
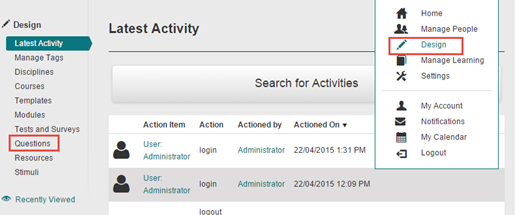
To create a new question select Design > Questions
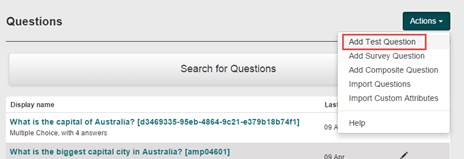
Select Add Test Question from the Actions drop-down menu.
Associate Interaction
An Associate Interaction question type asks candidates to create pairs of items using drag and drop. The pairings can be images or text (or a combination). This is a more powerful question type, because an item can be paired with more than one other item, leading to more complex assessments.
A Match Interaction question type is similar to this one, however it starts off with one image/text already placed in each pair.
Notes:
- Use the settings in Min/Max Associations (see 3. below), Match Min/Max (see 8. below) and Correct (see 9. below) to determine: the total numbers of pairs that candidates are permitted to create; the number of pairings they may create containing any individual item; and which of those multiple pairings are correct.
- When using images, it is best to check and adjust sizes before uploading, as re-setting height and width within the question may alter the image’s height to width ratio.
Scoring
This item type is marked automatically. Score allocation is set at the time of authoring.
Steps
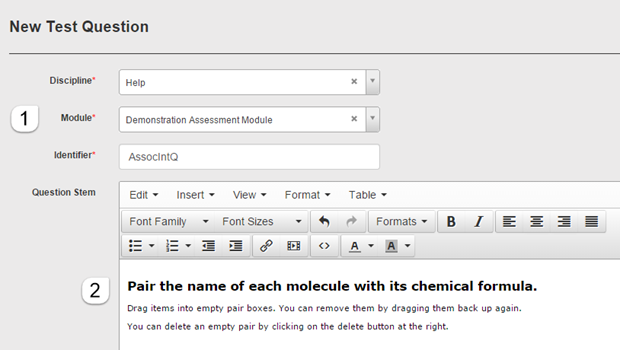
Navigate to Design > Questions and select Add Test Question from the Actions drop-down menu.
- Select the Discipline and Module that the question will belong to. Create an Identifier for the question
- Enter the question into the Question Stem field.
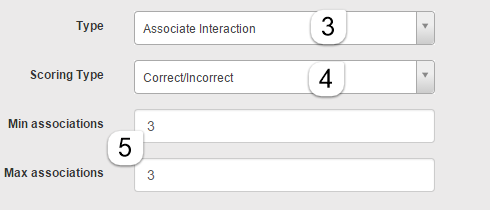
- Select Associate Interaction from the Type dropdown.
- Select either Correct/Incorrect or Per Distractor from the Scoring Type field. The first option scores the entire question, the second allows you to allocate different scores to different pairings.
-
Set the minimum and a maximum number of pairs (associations) that the candidate can make in Min Associations and Max Associations.
If you leave these blank, enter 0 into both or set a maximum number greater than the minimum number then an Add Pair button will be visible to candidates. This button disappears when candidates have created the maximum number of pairs. It never disappears if you have left these fields blank or entered zero.
However, If Min Associations and Max Associations are equal and also greater than zero, candidates will see that number of empty pair boxes, with no visible Add Pair button. In the example below, candidates see three empty pair boxes and no Add Pair button. They must make 3 pairs before they can submit their response.
- Enter the Source items that the candidate will form into pairs. You can use Display order to sequence Source items for display to candidates. If the fields are left blank, the system will automatically shuffle the order.
- Either text or image can both be used as Source items. For text, type it in the text column; for images click in the text box then click the image icon to load an image.
- Set a minimum number of times the Source item can be put in a pair in Match Min. Candidates will not be able to submit their response until this minimum is reached. Set a maximum number of times the Source item can be paired in Match Max. Note that once the maximum has been reached, this Source item will disappear from the Source items displayed at the top of the candidate’s screen.
- Click and use the drop-down list to select the correctly matching Source item(s) in the Correct field. If desired, you can set multiple items that are all correctly matching pair items. Note that once you have specified a pairing for an item, you don’t have to enter the same pairing in the Correct field of its pair partner.
You can delete a Source row by clicking its minus icon at the right
- If you had set the Scoring Type field to Per Distractor (see 4.), you would also see a Scoring area where you enter scores for each correctly matched pair.
- Add Resources to the question if desired by clicking the arrow and following the instructions
- Select Save Test Question.

Preview
You can preview the question in the Test Player by selecting Preview from the Question header bar.

In this example, we specified that each item must be paired and it can only be correctly paired with one other item. Note also that a pair box will re-size as necessary to fit items dragged into it.

Cloze
A Cloze question type asks candidates to fill in blanks in a passage of text. Depending on how the question has been set up, the candidate fills in blanks by selecting from a drop-down box and/or by entering text. There is no limit to the number of blanks that can be included in a passage of text.
Scoring
Cloze questions are scored as either right or wrong. If a candidate selects the correct option from the drop-down list or enters a correct value in the blank (as specified above) they get full marks. If they select a wrong option or enter an incorrect value, they get no marks at all.
Steps
Navigate to Design > Questions and select Add Test Question from the Actions drop-down menu.
- Fill out the form details including the Discipline and Module you want the question to belong to. Create an Identifier for the question.
- Enter the question text in the Question Stem field. Insert one or more blanks. The blanks in the two possible formats are set up a little differently:
- Drop-down list:
This is defined by a comma-separated word list contained inside square brackets [ ].
The correct answer/s are indicated by an asterisk * at the start of the correct word. The question is displayed to the candidate as a standard drop-down box.
For example [left, right, *up, down] would appear as a dropdown menu showing ‘left’, ‘right’, ‘up’ and ‘down’ with ‘up’ as the correct answer.
- Text input:
This is defined by a comma-separated word list contained inside curly brackets { }.
All words contained in the list are accepted as correct. Case sensitive answers are indicated by an equals sign, i.e. =, at the start of the word. The question is displayed to the candidate as an empty text entry box. The maximum number of characters that can be entered in an empty box is equal to the length of the longest word contained in the list.
For example {=Right, Left} would result in ‘Left’, ‘left’, or ‘Right’ being correct answers; however, ‘right’ would be incorrect.
- Select Cloze from the Type dropdown.
- Click the check box next to Partial Scoring if desired
- Add Resources to the question if desired by clicking the arrow and following the instructions
- Select Save Test Question.

Preview
You can preview the question in the Test Player by selecting Preview from the Question header bar.
This will appear as:

Comment
A Comment question type provides information to candidates without requiring a response. It is most often used to give details about the questions that directly follow it or setup a scenario which the following questions relate to.
Scoring
This question type is not marked
Steps
Navigate to Design > Questions and select Add Test Question from the Actions dropdown menu.
- Fill out the form details including the Discipline and Module you want the question to belong to. Create an Identifier for the question.
- Enter text in the Question Stem field. Images can be added in this area through selecting Insert > Resources.
- Select Comment from the Type dropdown.
- Click Save Test Question

Preview
You can preview the question in the Test Player by selecting Preview from the Question header bar.
This will appear as:

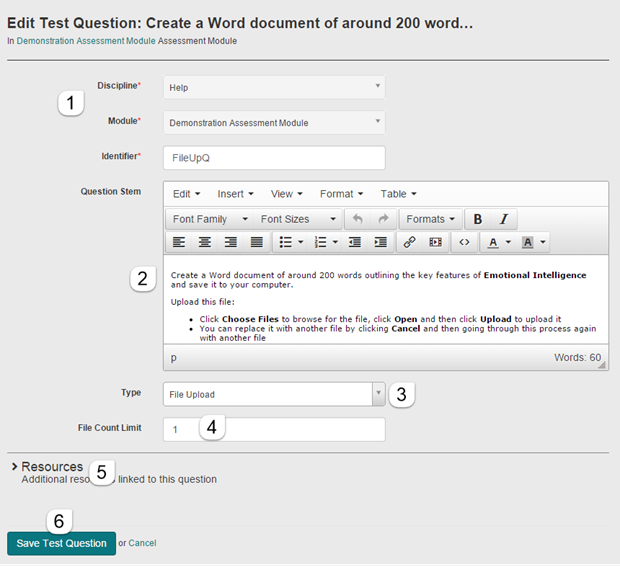
File Upload
The File Upload question type asks candidates to upload one or more files in response to a question.
Scoring
This question type cannot be marked automatically and must be scored manually.
Steps
Navigate to Design > Questions and select Add Test Question from the Actions drop-down menu.
- Fill out the form details including the Discipline and Module you want the question to belong to. Create an Identifier for the question.
- Enter the question/instruction text in the Question Stem field.
- Select File Upload in the Type dropdown.
- In the File Count Limit field enter the number of files a candidate can upload
- Add Resources to the question if desired by clicking the arrow and following the instructions
- Click Save Test Question
Preview
You can preview the question in the Test Player by selecting Preview from the Question header bar.
Candidates see:

Gap Match Interaction
A Gap Match Interaction question asks candidates to correctly drag text or images into gaps within text. The candidate can choose from a source list of options.
Scoring
This question type is marked automatically. Score allocation is set by the author at the time of authoring.
Steps
Navigate to Design > Questions and select Add Test Question from the Actions drop-down menu.
- Fill out the form details including the Discipline and Module you want the question to belong to. Create an Identifier for the question.
- Enter a question stem into the Question Stem field if desired.
- Select Gap Match Interaction from the Type dropdown.
- Select the Orientation for the question, either from above or below. This determines where the pool of possible answers will be displayed to the candidate

- Select either Correct/Incorrect or Per Distractor from the Scoring Type field. The first option scores the entire question, the second allows you to allocate different scores to different pairs
- Enter the text that will have gaps in it in Interaction Body. Place the cursor where each gap will be and select Insert>Gap from the Interaction Body menu
- In the Source list enter the set of text and/or images that the candidate can choose from. For text, type it in the text column; for images click in the text box then click the image icon to load an image
- In the Match Max column you specify how many times a source list item can be dragged into a gap. Blank or zero represents no limit.
- In the Correct column you define any gap that is a correct pairing for the source list item.
- You can click the minus icon to delete a source item
- If you had set the Scoring Type field to Per Distractor (see 5.), you would also see a Scoring area where you enter scores for each correctly matched pair.
- Add Resources to the question if desired by clicking the arrow and following the instructions
- Select Save Test Question.

Preview
You can preview the question in the Test Player by selecting Preview from the Question header bar.
This will appear as:

Graphic Associate Interaction
The Graphic Associate Interaction question type shows a background image with hotspots defined on it. The candidate creates pairs by dragging lines between the hotspots in order to associate them with each other.
This is a powerful question type because one hotspot can be paired with multiple hotspots, leading to more complex assessments. Use this question type if the hotspots are related to the background image. Note that candidates can also pair items (images or texts) using the Associate Interaction question type, which does not have a background image.
Notes:
- You use the settings in Min/Max Associations (see 8. below), Match Min/Max (see 8. below) and Correct (see 9. below) to set: the total numbers of pairs that candidates are permitted to create; the number of pairs that an individual hotspot can be in; and which of those multiple pairings are correct.
- Don’t make the hotspots too big relative to the background image, as large spots can make it difficult for candidates to draw/delete the connecting lines.
- Hotspots should not overlap as this makes it difficult for candidates to differentiate between them. The system will always snap a line to just one hotspot.
- When using images, it is best to check and adjust sizes before uploading, as re-setting height and width within the question may alter the image’s height to width ratio.
Scoring
This question type is marked automatically. Score allocation is set by the author at the time of authoring.
Steps
Navigate to Design > Questions and select Add Test Question from the Actions drop-down menu.
- Select the Discipline and Module that the question will belong to. Create an Identifier for the question
- Enter the question into the Question Stem field.
- Select Graphic Associate Interaction from the Type dropdown.
- Select either Correct/Incorrect or Per Distractor from the Scoring Type field. The first option scores the entire question, the second allows you to allocate different scores to different pairs.

- Click the image icon to select image(s) from the available resources. This will be the optional background image. You can change the size of the image by entering new Width and Height values (but see Notes above).
- Hotspots are added by clicking the tool for a rectangular, circular or many-sided hotspot. For the first two you then drag out a shape, for the third you then click to add each vertex and click the first vertex again to close the shape. When no tool is selected the first two hotspot types can be dragged into new positions and proportions

- Each time you add a hotspot, e.g. the circular hotspot over the labelled Oxygen picture below, a Source line appears with required fields marked in red
- The first time you add a hotspot the Max associations and Max associations fields also appear. Here you set the minimum and maximum number of associations (pairs) that a candidate may create. In general, the maximum will match the number of hotspots as this allows for the widest scope of answers. The system will also use this value if you do not enter anything in the field.
- In the Text column enter a name for the hotspot. Candidates will not see this.
- You must enter the maximum number of matches (pairs) for the hotspot. Optionally you can also enter a minimum number to force the candidate to match it to something before moving on.
- Select the other correctly matching hotspot(s) from the drop-down list in the Correct field. If desired, you can set multiple hotspots that are all correctly matching hotspots, as in this example for the Oxygen hotspot. Note that once you have specified a pairing for an item, you don’t have to enter this same pairing in the Correct field for its pair partner
- You can delete a hotspot altogether by clicking the red minus icon at the right.
- Repeat steps 6-7 and 9-11 for each hotspot required

Select Save Test Question.
Preview
You can preview the question in the Test Player by selecting Preview from the Question header bar.
Candidates see this:

In this example, candidates can create 0-2 bonds from each atom and a total of 0-3 bonds in the whole question. Thus, they are given no indication that such bonds do exist in water, how many there are and where they are.
For an easier question, candidates could for example, be limited to a minimum and maximum of 1 bond for each hydrogen atom.
Graphic Gap Match Interaction
A graphic gap match interaction question is based on an image containing a set of hotspot gaps. The candidate answers the question by dragging answers (images or text) from a set of options into the hotspot gaps.
Note
- When using images, it is best to check and adjust sizes before uploading, as re-setting height and width within the question may alter the image’s height to width ratio.
Scoring
This question type is marked automatically. Score allocation is set by the author at the time of authoring.
Steps
Navigate to Design > Questions and select Add Test Question from the Actions drop-down menu.
- Fill out the form details including the Discipline and Module you want the question to belong to. Create an Identifier for the question.
- Enter the question into the Question Stem field.
- Select Graphic Gap Match Interaction from the Type dropdown.
- Select the Orientation for the possible answers to either Above or Below.
- Select either Correct/Incorrect or Per Distractor from the Scoring Type field. The first option scores the entire question, the second allows you to allocate different scores to different pairing

- Click the image icon to select image(s) from the available resources. This will be the optional background image. You can change the size of the image by entering new Width and Height values (but see Note above).
- Hotspots are added by clicking the tool for a rectangular, circular or many-sided hotspot. For the first two you then drag out a shape, for the third you then click to add each vertex and click the first vertex again to close the shape. When no tool is selected the first two hotspot types can be dragged into new positions and proportions

- Each time you add a hotspot, eg the leaf hotspot below, a line appears in the Destination list with required fields marked in red
- In the Text column enter a name for the hotspot. Candidates will not see this.
- If desired enter the maximum number of matches (pairs) for the hotspot.
- You can delete a hotspot altogether by clicking the red minus icon at the right.
Repeat steps 8-11 for each hotspot required
- Enter a Source item. Either text or image can both be used. For text, type it in the text column; for images click in the text box then click the image icon to load an image.
- Set the maximum number of times that it can be matched with a hotspot
- Click and select the correct hotspot from the options available.
- You can delete a Source item altogether by clicking the red minus icon at the right.
Repeat steps 12-14 for each Source item. To add to the difficulty of a question you can add Source items that are not matched to any hotspot.
- Select Save Test Question

Preview
You can preview the question in the Test Player by selecting Preview from the Question header bar.
This will appear as:

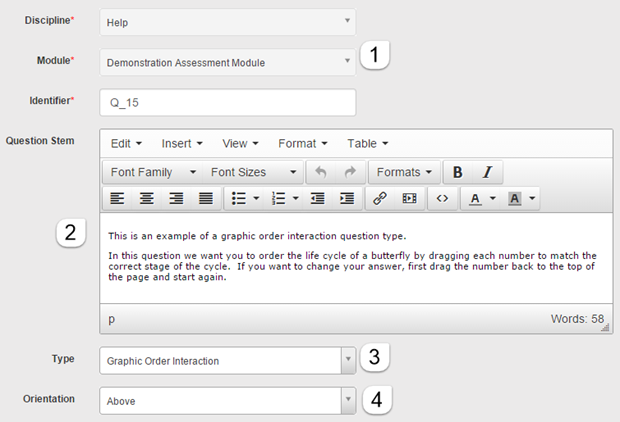
Graphic Order Interaction
A graphic order interaction question asks a candidate to drag numbers onto defined and visible hotspots on an image in order to indicate a correct order. A hotspot will turn green when a number is dragged over
This question type is very similar to other hotspot questions. The main difference is that instead of selecting correct hotspots, the candidate specifies the order of the hotspots.
Scoring
This question type is marked automatically. Score allocation is set by the author at the time of authoring.
Steps
Navigate to Design > Questions and select Add Test Question from the Actions drop-down menu.
- Fill out the form details including the Discipline and Module you want the question to belong to. Create an Identifier for the question.
- Enter the question into the Question Stem field.
- Select Graphic Order Interaction from the Type dropdown.
- Select the Orientation for the potential answers, either above or below.
- Click the image icon to select image(s) from the available resources. This will be the optional background image. You can change the size of the image by entering new Width and Height values (but see Notes above).
- Hotspots are added by clicking the tool for a rectangular, circular or many-sided hotspot. For the first two you then drag out a shape, for the third you then click to add each vertex and click the first vertex again to close the shape. When no tool is selected the first two hotspot types can be dragged into new positions and proportions
- Each time you add a hotspot, eg the egg hotspot below, a line appears in the list with required fields marked in red
- In the Label column enter a name for the hotspot. Candidates will not see this.
- In the Correct Order column enter the correct number
- You can delete a hotspot altogether by clicking the red minus icon at the right.
- Repeat steps 8-11 for each hotspot required
- Enter the maximum and minimum number of pairings a candidate must make before being able to submit their response.
- Click Save Test Question.

Preview
You can preview the question in the Test Player by selecting Preview from the Question header bar.
This will appear as:

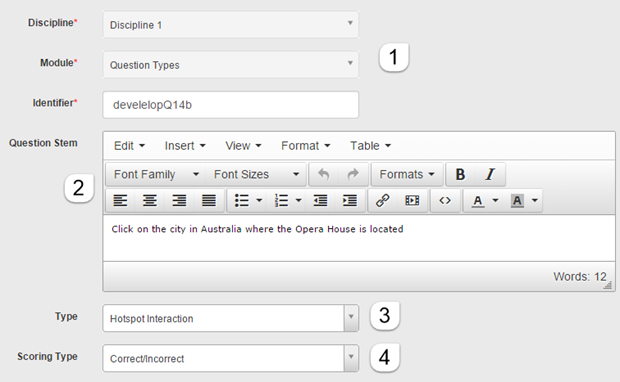
Hotspot Interaction
A Hotspot Interaction question asks candidates to correctly select one or more areas (or hotspots) on an image. These hotspots are visible to the candidate and their labels also become visible when the candidate rolls over them.
Note that Hotspots can overlap. The hotspot last on the list will be the one that is selected if the candidate clicks on the overlap. This could be used to award more points for a more accurate answer.
The Select Point Interaction question type is similar to this question type, but it does not show where the hotspots are.
Scoring
This question is marked automatically. Score allocation is set at the time of question design.
Steps
Navigate to Design > Questions and select Add Test Question from the Actions drop down menu.
- Fill out the form details including the Discipline and Module you want the question to belong to. Create an Identifier for the question.
- Enter the question into the Question Stem field.
- Select Hotspot Interaction from the Question Stem dropdown.
- Select either Correct/Incorrect or Per Distractor from the Scoring Type field. The first option scores the entire question, the second allows you to allocate different scores to different pairing
- Click the image icon to select image(s) from the available resources. This will be the optional background image.
- Hotspots are added by clicking the tool for a rectangular, circular or many-sided hotspot. For the first two you then drag out a shape, for the third you then click to add each vertex and click the first vertex again to close the shape. When no tool is selected the first two hotspot types can be dragged into new positions and proportions
- If a background image is selected (step 5) then two new fields appear. Max and Min choices can be used to set the minimum and maximum number of selections a candidate can make. Candidates cannot submit their response until Min Choices is met. If the fields are empty this will be unregulated.
- Each time you add a hotspot, a new line appears with required fields in red
- Enter a value in the Label column for the hotspot name
- Identify whether this hotspot is a correct answer by checking the box beside it in the Correct column
- You can delete a hotspot by clicking the red minus icon to its right. You can move the place of a row in the lists by dragging the plus icon
Repeat steps 8-10 for each hotspot
- Select Save Test Question.

Preview
You can preview the question in the Test Player by selecting Preview from the Question header bar.
This will appear as:

Keyword
In a Keyword question type candidates are asked to enter text to answer a question. The candidate can type a word or a phrase. They enter this via a free input text box which sits below the question. If the answer entered matches any of the correct answers that were specified (it is not case specific), it will be marked as correct.
Scoring
This question type is marked automatically. Score allocation is set by the author at the time of authoring.
Steps
Navigate to Design > Questions and select Add Test Question from the Actions drop-down menu.
- Fill out the form details including the Discipline and Module you want the question to belong to. Create an Identifier for the question.
- Enter the question stem into the Question Stem field.
- Select Keyword from the Type dropdown.

- Select either Correct/Incorrect or Per Distractor from the Scoring Type field. The first option scores the entire question, the second allows you to allocate different scores to different pairings.
- Set the size of the text box that candidates will see in Expected Length if desired .
- If an Input Restriction is selected from the drop-down box then candidates will only be able to enter the kind of text specified here. Click the Show hint for valid input check box if you want them to be informed about this
- Enter the possible answers under the Match section. Any of these responses the question will be marked as correct. For example:
- Sydney
- Sidney
- Sydnay
- Sidnay
- You can click the minus icon to delete a Match item
If you had set the Scoring Type field to Per Distractor (see 5.), you would also see a Scoring area where you enter scores for each correctly matched pair
- Add Resources to the question if desired by clicking the arrow and following the instructions
- Select Save Test Question.

Preview
You can preview the question in the Test Player by selecting Preview from the Question header bar.
This will appear as:

Match Interaction
A Match Interaction question type asks candidates to create pairs. They drag an image/text into a pair box where the first image/text in the pair has already been placed. The pairings can be images or text (or a combination). There can be more than one set of pair boxes. There can be more than one correct pairing for any particular image/text.
This question type is similar to an Associate Interaction question type, except that it does not start with two empty places in the pair boxes.
Scoring
This item type is marked automatically. Score allocation is set by author at the time of authoring.
Steps
Navigate to Design > Questions and select Add Test Question from the Actions drop-down menu.
- Fill out the form details including the Discipline and Module you want the question to belong to. Create an Identifier for the question.
- Enter the question into the Question Stem field.
- Select Match Interaction from the Type dropdown.
- Select how you want the source choices to be presented in Orientation
- Horizontal from above – Source items are above and Destination items are row labels
- Horizontal from below – Source items are below and Destination items are row labels
- Vertical from above- Source items are above and Destination items are column headings
- Vertical from below – Source items are below and Destination items are column headings
- Select either Correct/Incorrect or Per Distractor from the Scoring Type field.

- Under Source list the images and/or texts that are available for candidates to drag. Enter text in the Test field or click in the field and then click the picture icon to insert a picture resource
- In MatchMax you define how many times a source item can be paired.
- Select the minus button in the Actions column to delete that Source item
- Under Destinations enter the images and/or texts that candidates will match with the Source items. For text, type it in the text column; for images click in the text box then click the image icon to load an image
- In MatchMax you define how many times a destination item can be paired
- Click in the Correct box for each Destination item to select the Source Items that are correct matches for this Destination item.
- You can select the delete button in the Actions column to delete that Destination item.
- Click Save Test Question.

Preview
You can preview the question in the Test Player by selecting Preview from the Question header bar.
This will appear as:

Multiple Choice
In a Multiple Choice Question type a candidate is asked to choose one answer from of a set of options. The options can be text (as in the example below) or pictures.
This Question type is similar to Yes/No and True/False Question types in that there is only one answer a candidate can select and only one answer can be correct. In contrast, in a Multiple Choices Question more than one answer can be correct.
The standard presentation for a Multiple Choice Question is a list of options with radio buttons.
Scoring
This question type is marked automatically. Score allocation is set by the author at the time of authoring.
Steps
Navigate to Design > Questions and select Add Test Question from the Actions drop down menu.
- Fill out the form details including the Discipline and Module you want the Question to belong to. Create an Identifier for the Question.
- Enter the question text in the Question Stem field.
- Select Multiple Choice from the Type dropdown.
- Select the Orientation of the answers – horizontal or vertical
- Select either Correct/Incorrect or Per Distractor from the Scoring Type field.
- Click the Shuffle check box if the answers are to be displayed to candidates in a random order
- Enter the answers in the Answer section. The answer can be a text (as in this example) or a picture. For the latter, click the text box and then click the picture icon to insert the resource.
- Select the radio button next to the Correct answer.
- You can delete an answer by clicking the red minus icon at its right
- Add Resources to the question if desired by clicking the arrow and following the instructions
- Select Save Test Question.

Preview
You can preview the question in the Test Player by selecting Preview from the Question header bar.

This will appear as:

Multiple Choices
A Multiple Choices Question type allows the author to specify multiple answers that can be correct. The options can be text (as in the example below) or pictures. This Question type is different from a Multiple Choice question, where there are multiple answers but only one can be correct.
The standard presentation for a Multiple Choices Question is a list of options and checkboxes. Note that if Scoring Type is set to Correct/Incorrect (Point 5 below), the candidate must select all of the correct answers to be marked correct. If this is not desired, then set the Scoring Type to Per Distractor and adjust appropriately.
Scoring
This Question type is marked automatically. Score allocation is set by the author at the time of authoring.
Steps
Navigate to Design > Questions and select Add Test Question from the Actions drop-down menu.
- Fill out the form details including the Discipline and Module you want the question to belong to. Create an Identifier for the question.
- Enter the Question text in the Question Stem field.
- Select Multiple Choices from the Type field.
- Select Orientation of the answers: horizontal or vertical
- Select either Correct/Incorrect or Per Distractor from the Scoring Type field.
- Click the Shuffle check box if the answers are to be displayed to candidates in a random order
- Enter the answers in the Answer section. Note that the answer can be a text (as in this example) or a picture. For the latter, click the text box and then click the picture icon to insert the resource.
- Select the Correct check box for each correct answers. You can have any number of correct answers.
- You can delete an answer by clicking the red minus icon at its right
- Add Resources to the question if desired by clicking the arrow and following the instructions
- Select Save Test Question.

Preview
You can preview the question in the Test Player by selecting Preview from the Question header bar.
This will appear as:

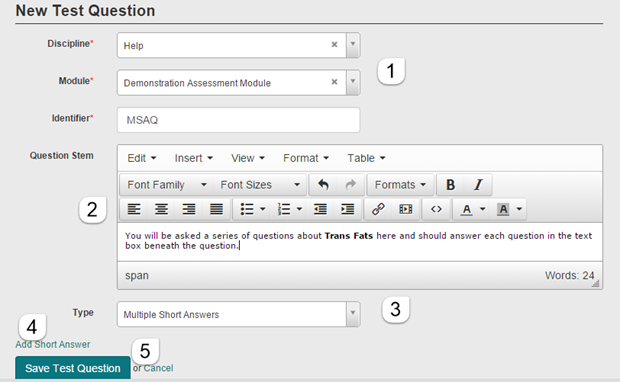
Multiple Short Answers
A Multiple Short Answers question type combines several Short Answer questions in one question. Thus, candidates provide multiple answer responses within the same question. Each of the Short Answer question asks candidates to write an extended amount of text in their own words. This can be used for answers that vary from a single sentence to a full essay. The word count can be specified and certain actions can be set to occur when a word limit is reached.
Scoring
This question type cannot be marked automatically and must be scored manually.
Steps
Navigate to Design > Questions and select Add Test Question from the Actions drop-down menu.
- Fill out the form details including the Discipline and Module you want the question to belong to. Create an Identifier for the question.
- Enter the question text in the Question Stem field. You can include resources in this question type.
- Select Multiple Short Answers from the Type dropdown.
- Click Add Short Answer for each Short Answer that you want to add and enter the required text (see no. 6 below)
- Click Save Test Question.
- When you add a Short Answer question a window opens for it. You can close the window by clicking the arrow to the left
- Enter Instruction text for that Short Answer (in effect a Question Stem)
- Enter the number of lines the text box will show on the screen in Line Count.
- Optionally enter the maximum number of words allowed in Word Limit.
- In Word Limit Action you can choose what will happen if the word limit is met:
- Ignore – ignore any word limit and not place restrictions or send messages to the candidate
- Advise – advise the candidate how many words they have remaining of the word limit. This is displayed under the text box
- Restrict – restrict the candidate from going over the word limit. This will not allow the candidate to add any words past the set limit
- The minus icon at the right allows you to delete the Short Answer altogether

After you have closed the Short Answer boxes by clicking on their arrows, you can re-shuffle the order by clicking and dragging on the icon of a Short Answer and moving it up or down

Preview
You can preview the question in the Test Player by selecting Preview from the Question header bar.
This will appear as:

Order Interaction
An Order Interaction question type asks a candidate to put a set of text and/or images into either horizontal or vertical order.
Note:
- You should enter the items into the system in their correct order
- You can display them to candidates in a particular order or have the system shuffle them.
- When using images, it is best to adjust sizes before uploading, as re-setting height and width in the question may alter the image’s aspect ratio.
Scoring
This question will be marked automatically. The score allocation is set at the time of authoring.
Steps
Navigate to Design > Questions and select Add Test Question from the Actions drop-down menu.
- Select the Discipline and Module that the question will belong to. Create an Identifier for the question
- Enter the question into the Question Stem field.

- Select Order Interaction from the Type field.
- Select either Horizontal or Vertical from the Orientation dropdown.
- Enter the text items or images in the correct order.
- You can enter the Display Order in which each item will be displayed. This fixes the item in that position, with 1 being first. Leaving the field blank causes the item to be shuffled in the list.
- Select Save Test Question.

Preview
You can preview the question in the Test Player by selecting Preview from the Question header bar.
This will appear as:

Position Object Interaction
Position Object interaction asks candidates to drag an image to the correct position (hotspot) on another (larger) background image. Multiple images can be correctly dragged into positions by defining multiple hotspots. This question is similar to Graphic Gap match Interaction but it differs in that there is no indication of the hotspot locations, plus the dragged images do not ‘snap’ into place to reveal the hotspots.
Notes:
- An image can be linked with more than one correct hotspot location.
- You can make this question more difficult for candidates by displaying images that can be dragged but do not have matching hotspots. Hence dragging them into a position doesn’t answer the question.
- Make sure that the size of a hotspot is big enough to fit the image that will be dragged onto it.
- When using images, it is best to check and adjust sizes before uploading, as re-setting height and width in the question may alter the image’s aspect ratio.
Scoring
This item type is marked automatically. Score allocation is set by the item author at the time of authoring.
Each image/hotspot combination can be given a different score
Steps
- Select the Discipline and Module that the question will belong to. Create an Identifier for the question.
- Enter the question into the Question Stem field.
- Select Position Object Interaction from the Type field.
- Select either Correct/Incorrect or Per Distractor from the Scoring Type field. The first option scores the entire question, the second allows you to allocate scores to individual image/hot spot combinations

- Click the image icon to select image(s) from the available resources. This will be the background image. You can change the size of the image by entering new Width and Height values (but see Notes above).
- Hotspots are added by clicking the tool for a rectangular, circular or many-sided hotspot. For the first two you then drag out a shape, for the third you then click to add each vertex and click the first vertex again to close the shape. When no tool is selected the first two hotspot types can be dragged into new positions and proportions
- Each time you add a hotspot a new Destination line appears.
- In the Text column enter a name for the hotspot. Candidates will not see this.
- You can delete a hotspot altogether by clicking the red minus icon at the right.
Repeat steps 6-8 for each hotspot required
- Enter a Source item: click in the Image box then insert the resource.
- Set the minimum and maximum number of times that it can be matched with a hotspot in Min Choices and Max Choices. Candidates cannot submit their response until the minimum is reached. After the maximum number is reached the image disappears from the area above the background image, although existing images can still be repositioned. If Min Choices or Max Choices are left blank the functionality will be unregulated.
- Click and select the correct hotspot(s) from the from the drop-down box.
- You can delete a Source item altogether by clicking the red minus icon at the right.
Repeat steps 10-13 for each Source item.
- Select Save Test Question.

You can preview the question in the Test Player by selecting Preview from the Question header bar.
This will appear as:

In this example, the candidate has obviously placed the lungs in the wrong location and s/he can continue to drag further copies of it (but not the kidney) onto the image because of its Max Choices settings.
Select Point Interaction
In a Select Point Interaction question type, candidates click to create one or more points on a background image and they are able to move these points once they have been created. They can create as many points as has been specified in Max choices (see below) and more than one of them can be a correct answer. The answer is correct if it is within a defined hotspot that has been set as correct.
This question is very similar to Hotspot Interaction except that here the hotspots that have been set up by the question author are not visible to the candidate.
Scoring
This question type is marked automatically. Score allocation is set by the author at the time of authoring.
Steps
Navigate to Design > Questions and select Add Test Question from the Actions drop down menu.
- Fill out the form details including the Discipline and Module you want the question to belong to. Create an Identifier for the question.
- Enter the question into the Question Stem field.
- Select Hotspot Interaction from the Question Stem field
- Select either Correct/Incorrect or Per Distractor from the Scoring Type field. The first option scores the entire question, the second allows you to allocate different scores to different pairing

- Click the image icon to select image(s) from the available resources. This will be the optional background image.
- Hotspots are added by clicking the tool for a rectangular, circular or many-sided hotspot. For the first two you then drag out a shape, for the third you then click to add each vertex and click the first vertex again to close the shape. When no tool is selected the first two hotspot types can be dragged into new positions and proportions
- When the first hotspot is created (step 6) two new fields appear. Max and Min choices can be used to set the minimum and maximum number of selections a candidate can make. Candidates cannot submit their response until Min Choices is met. If the fields are empty this will be unregulated.
- Each time you add a hotspot, a new line also appears with required fields in red
- Enter a value in the Label column for the hotspot name
- Identify whether this hotspot is a correct answer by checking the box beside it in the Correct column
- You can delete a hotspot by clicking the red minus icon to its right. You can move the place of a row in the list by dragging the plus icon
Repeat steps 8-10 for each hotspot
- Select Save Test Question

You can preview the question in the Test Player by selecting Preview from the Question header bar.
This will appear as:

Short Answer
A Short Answer question asks candidates to write an extended amount of text in their own words. This question can be used for answers that vary from a single sentence to a full essay. The word count can be specified and certain actions can be set to occur when a word limit is reached.
Scoring
This question type cannot be marked automatically and must be scored manually.
Steps
Navigate to Design > Questions and select Add Test Question from the Actions drop-down menu.
- Fill out the form details including the Discipline and Module you want the question to belong to. Create an Identifier for the question.
- Enter the question text in the Question Stem field. You can include resources in this question type.
- Select Short Answer from the Type field.

- Enter the number of lines the text box will show on the screen in Line Count
- Optionally enter the maximum number of words allowed in Word Limit
- In Word Limit Action you can choose what will happen if the word limit is met:
- Ignore – ignore any word limit and not place restrictions or send messages to the candidate
- Advise – advise the candidate how many words they have remaining of the word limit. This is displayed under the text box
- Restrict – restrict the candidate from going over the word limit. This will not allow the candidate to add any words past the set limit
- Add Resources to the question if desired by clicking the arrow and following the instructions
- Select Save Test Question

You can preview the question in the Test Player by selecting Preview from the Question header bar.
This will appear as:

Note that the candidate is offered a Rich Text editor, as specified in the question.
Slider Interaction
A slider question requires candidates to choose a correct value by dragging a slider to the correct position. They can select a numerical value between lower and upper boundaries.
This question type can optionally create defined numerical steps and also limit candidate responses to be between boundary values.
Scoring
This question type is marked automatically. Score allocation is set at the time of question design.
Steps
Navigate to Design > Questions and select Add Test Question from the Actions dropdown menu.
- Fill out the form details including the Discipline and Module you want the question to belong to. Create an Identifier for the question.
- Enter the question into the Question Stem field.
- Select Slider Interaction from the Type field.

- Select the Orientation of the slider, either horizontal or vertical.
- Normally the lower bound is shown on the left or the bottom. If Reverse Orientation is checked the lower bound is on the right or top.
- Select either Correct/Incorrect or Per Distractor from the Scoring Type field. The first option scores the entire question, the second allows you to allocate scores to individual answers
- If Allow floating point numbers is checked then partial numbers (numbers that are not integers) can be a correct response. For example, 10.5.
- Set the number of Decimal Places required.
- In Lower Bound set the lowest possible response (inclusive).
- In Upper Bound set the highest possible response (inclusive). Of course it must be larger than the lower bound.
- In Step set the smallest increment that the slider control moves. For example if the step is 2, then the allowable responses are 0, 2, 4, (within the two bounds of 0 and 4). If not specified, then the step is 1 for non-floating point numbers, and continuous for floating point numbers.
- If Show Step Labels is checked candidates will see the step increments as a line.
- Correct Answer – Indicate the correct answer.
- Add Resources to the question if desired by clicking the arrow and following the instructions
- Select Save Test Question button.

You can preview the question in the Test Player by selecting Preview from the Question header bar.
This will appear as:

Text Spot Interaction
Text Spot Interaction question type asks a candidate to select one or more parts of a text. The author has specified the parts of the text that can be selected and which of those are correct answers. When displayed to the candidate, the potential answers are displayed as selectable buttons. There is also an option to make those buttons invisible, so that candidates don’t know where they are.
Scoring
This item type is marked automatically. Score allocation is set by the item author at the time of authoring.
Steps
Navigate to Design > Questions and select Add Test Question from the Actions drop-down menu.
- Select the Discipline and Module that the question will belong to. Create an Identifier for the question
- Enter the question into the Question Stem field.
- Select Text Spot Interaction from the Type field.
- Select either Correct/Incorrect or Per Distractor from the Scoring Type field. The first option scores the entire question, the second allows you to allocate scores to individual hot text spots.
- Select either Visible or Hidden from the Spot Visibility field. This controls whether candidates can see that parts of the text have been made into text hotspots. Hidden hotspots will still be highlighted when clicked.

- Enter the text that a candidate will interact with in the Interaction Body section.
- In the same section, select a piece of text (for example, a word) and right-click. Select Insert text spot. This adds a hot text spot that also appears in the list of Answers underneath the Interaction Body.
- Check the Correct box beside the correct answers for the question. In this example it is the misspelled words.
- If Per Distractor was selected for the Scoring Type field (see 4.), you will also see a Scoring area where you can set scores for individual pieces of text.
- Add Resources to the question if desired by clicking the arrow and following the instructions
- Select Save Test Question

You can preview the question in the Test Player by selecting Preview from the Question header bar.
This will appear as:

Text Spot
A Text Spot question type asks a candidate to select one or more parts of a text. The author has specified the parts of the text that can be selected and which of those are correct answers. When displayed to the candidate, the potential answers are marked with an arrow.
Scoring
This question type is marked automatically. Score allocation is set by the author at the time of authoring.
Steps
Navigate to Design > Questions and select Add Test Question from the Actions drop-down menu.
- Fill out the form details including the Discipline and Module you want the question to belong to. Create an Identifier for the question.
- Enter the question text in the Question Stem field.
- Select Text Spot from the Type field.
- Enter the possible answers in the Answer section
Use the code text to create text spots.
Each answer will be concatenated to the previous one, unless you enter
to create a new line. The example below adds two line breaks between answers.
- Select the check box next to the correct answer(s)
- You can delete an answer by clicking its minus icon
- Add Resources to the question if desired by clicking the arrow and following the instructions
- Select the Save Test Question button.

You can preview the question in the Test Player by selecting Preview from the Question header bar.
This will appear as:

True/False
In a True/False question type a candidate is asked to choose whether something is true or false. It is similar to Yes/No and Multiple Choice question types in that there is only one answer a candidate can select and only one answer can be correct.
Scoring
This question type is marked automatically. Score allocation is set by the author at the time of authoring.
Steps
Navigate to Design > Questions and select Add Test Question from the Actions drop down menu.
- Fill out the form details including the Discipline and Module you want the question to belong to. Create an Identifier for the question.
- Enter the question text in the Question Stem field.
- Select True/False from the Type field.
- Select the radio button next to the correct answer.
- Add Resources to the question if desired by clicking the arrow and following the instructions
- Select the Save Test Question.

You can preview the question in the Test Player by selecting Preview from the Question header bar.
This will appear as:

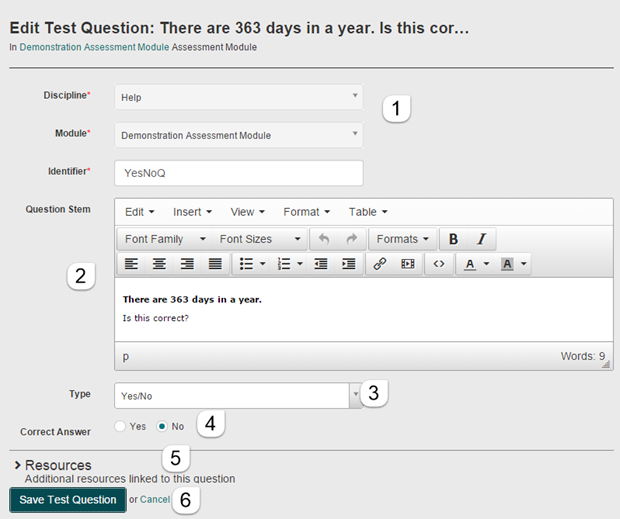
Yes/No
In a Yes/No question type a candidate is asked to answer Yes or No. It is similar to True/False and Multiple Choice question types in that there is only one answer a candidate can select and only one answer can be correct.
Scoring
This question type is marked automatically. Score allocation is set by the author at the time of authoring.
Steps
Navigate to Design > Questions and select Add Test Question from the Actions drop down menu.
- Fill out the form details including the Discipline and Module you want the question to belong to. Create an Identifier for the question.
- Enter the question text in the Question Stem field.
- Select Yes/No from the Type field.
- Select the radio button next to the correct answer.
- Add Resources to the question if desired by clicking the arrow and following the instructions
- Select the Save Test Question.
 You can preview the question in the Test Player by selecting Preview from the Question header bar.
This will appear as:
