Assessment Module Tests
Introduction
It is important to gauge the learners understanding of the content by providing the ability to test their acquired knowledge. The Janison platform provides a powerful interface that allows organisation to test and analyse results. There are many types of test options within the platform but all follow the same principles > Tests are linked to Questions that belong to the same Module
Tests can belong to:
Learning Modules
Tests linked to learning modules support limited question types.
You can read more about this on the topic of Tests and Learning Modules.
Assessment Modules
Tests linked to assessment modules support all question types.
You can read more about this on the topic of Tests and Assessment Modules.
Note: It is important to decide on how you want to deliver the test to the learner as this will determine what sort of test and module to create.
Search for Tests
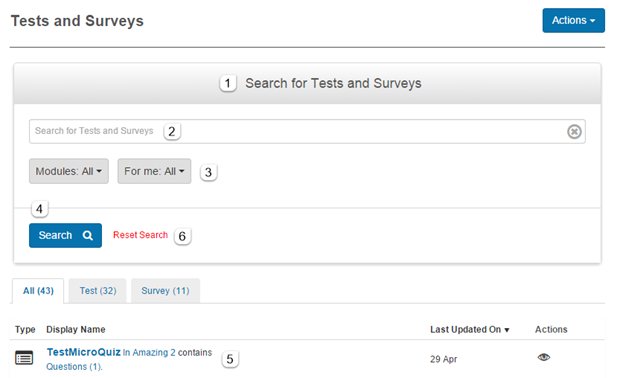
The search feature allows you to quickly find a Test.
To search for a test select Design > Tests and Surveys.
- Click Search for Tests and Surveys and a search field will appear.
- Enter search field.
- There are two filter options: searching within specific module(s) or searching for Tests created, edited or flagged by you.
- Select options and click Search.
- The search results will appear under the Display Name column.
- To perform another search click Reset Search.
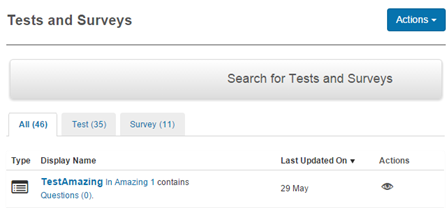
Inspect Test Details
To inspect a Test’s details navigate to Design > Tests and Surveys and select the desired Test.
Like all detail forms, the Tests and Surveys details form shows linked entities which are also clickable links. For Assessment Tests they might include linked Test Sections, Questions, Stimuli and Resources.
The widget bar at the top allows acces to:
- Tag -Tests can be tagged as a way of categorising them. They can then be located through these Tags, see Linking Tags.
- Administrators – this is used to set permissions against the particular Test, see Administrators Widget.
You can view (upwards) all Users that have permissions over the Test, including their role and the scope of this role. Note that while it is possible to configure permissions for a Test here, this can lead to confusion. For example, granting permission to edit a Test, including adding and removing questions, does not allow editing of any Questions that belong to the Test because Questions have a different scope. It may be more appropriate to manage permissions at the Module level, by selecting the Module that the Test and Questions belong to.
- Preview – this presents the Test in preview mode including Introductory Test Section sequences, see Preview a Test.
- Workflow – (if enabled) allows workflow management of the Test.

A number of windows (collapsed by default) can be found at the bottom of the details form:
- Timing Options – specifies the number of minutes available to the candidate for sitting the Test. This can be edited by clicking the pencil icon.
- Player Skin Settings – sets the visual design of the Test Player, including colours and layout. This setting can be edited by opening the window and selecting from the drop-down menu.
- Questions or Sections – if the Test contains multiple Sections, the heading will be Sections and Test Sections can be viewed and edited by clicking this window. Options such as Randomisation are found via a Test Section’s details screen.
If the Test does not contain multiple Sections, this heading will be Questions and the list of Questions linked to the Test can be viewed or edited by clicking to open the window. Randomisation options are located at the top of the window.
- Response Analysis – this gives details about attempts taken on the Test.
- Recent activities – displays any recent activity on the Test.

Preview an Assessment Test
Tests can be previewed at any time and you can see how they will appear to candidates in the Test Player. This includes Introductory Test Section sequences but any attempts at answering the Test Questions will not be saved.
To Preview a Test navigate to Design > Tests and Surveys.
- Select the Test you wish to view from the Display Name list, or search for it using the Search bar at the top of the page.
- Click its name.
- Click Preview at the top of its details screen. The Test player will open in a new window.


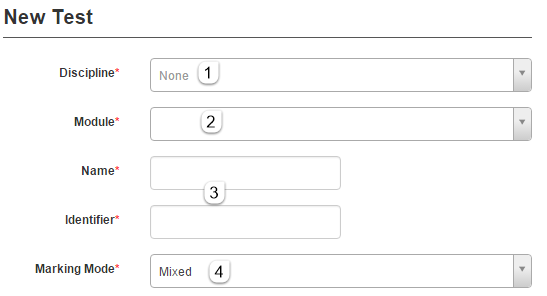
Create a Test
To create a Test navigate to Design > Tests and Surveys and select Add Test from the Actions drop-down menu.

Fill out the form details:
- Select a Discipline. Depending on the scope of your content permissions, you may not see all Disciplines in the drop-down menu.
- Select an Assessment Module in this Discipline that the Test will belong to. This cannot be changed once the Test is saved.
- Enter a Name and Identifier – these must be unique and a naming convention should be used.
- Question types in the CLS are either automatically marked, e.g. Multiple Choice questions, or manually marked, e.g Short Answer questions, see Assessment Question types for details.
Click and select a marking option for the Test from the drop-down list for Marking Mode:
Mixed: any marked Questions will be handled by the system. Manually-marked Question types will be displayed to markers for manual marking.
Automatic: all Questions will be automatically marked. The Test should not contain any manually-marked Question types.
Manual: all Questions will be manually marked.
Do Not Mark: the Test will not be marked.
- Use Multiple Sections – if this option is selected, Questions will be organised into multiple Test Sections, see Multi-section Tests. Note that once you save a Test with Multiple Sections, you cannot change the Test back to a Single Section Test later.
- Set pass/fail outcome – if this option is selected, then you can configure pass/fail rules at the Test’s details screen, see Pass/fail and attempts.
- Description – enter optional information about the Test.
- Click Save Test.

The Test has now been created, however it does not yet contain any Questions and there are more settings that you can specify.
From this point you can:
- Link Questions to the Test, both exisiting Questions and new ones.
- Add and edit Test Sections.
- Inspect and edit various timing, randomisation and pass/fail settings in the Test’s details screen.
Link Questions to a Test
On the Test details page there are three ways to add Questions to the Test:
- Add a new Question from the Actions drop-down menu. This loads the New Test Question form page and has already filled out the Discipline and Module (which need to be the same as the Test’s). For detailed instructions on how to create an Assessment Question, see Assessment Question Types.
- Add a new Question by clicking the + icon on the Questions window. Again this loads the New Test Question form page and has already filled out the Discipline and Module.
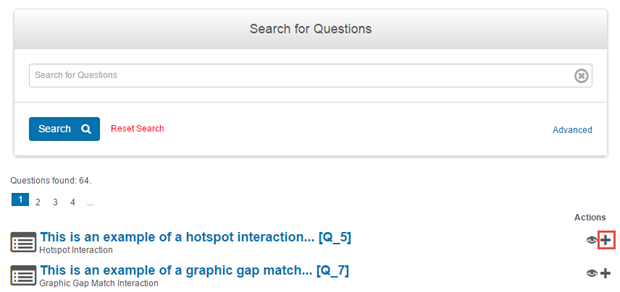
- Link an existing Question using the pencil icon on the Questions window. It is possible to re-use Questions as long as they belong to the same Module. Click the pencil icon and a search menu will load.

- Click or type a keyword into the search bar and click Search.
- Scroll through the list of available questions. Select the + icon to add the Question to the Test. If you need to view it first you can click the eye icon.
- Once the Question has been linked and appears in the list of Questions in the Test, additional settings are available.The Question can be allocated a relative Weight. A weight of 0 means that answers to the Question are not part of the Section/Test’s calculated mark.The Question can also be made Mandatory so that candiates cannot move to the next Section/Test until it has been answered. This is also relevant if you are offering students a random selection of Questions from this Test.
- The icons at the right under Actions can be used to preview, edit, unlink or reposition the Question in the list.

To complete the process, scroll down and click Save.
Note that if you are adding Questions to a Section of a Test, you need to inspect the Section details and locate the Questions window on the Section screen.
Edit Test
Once a Test has been saved, the Edit Test button is available from the Actions drop-down menu in the Test Details form.
Navigate to Design > Tests and Surveys and click the name of the Test that you want to edit. This takes you to its details screen.
- Click Edit Test from the Actions drop-down menu.

- Change details as required, see Create an Assessment Test for details, including whether the Test is active or inactive.
- Note that it isn’t possible to add Sections to a Test if you did not specify Use Multiple Sections when you first created it.
- Click Save Test.
Test Sections
By default the Questions in a Test are organised into a single section and the term is not displayed. However, when you create a Test you can choose to have it divided into multiple Sections. Each Section contains one or more Questions. A Multi-Section Test if: the Test is rather long; covers a number of different topics; randomisation options need to be restricted to groups of Questions within the Test; or introduction and exit sequences are required for the Test.
Single and a Multi-Section Tests appear differently in the Test details screen:
- A multi-section Test shows a list of Sections in a collapsible window. You inspect an individual Test Section’s details in order to locate its Questions.
- A single section Test shows a list of Questions in a collapsible window.
View, Edit or Add a Test Section
When a Test is created you can choose to have it divided into multiple Test Sections, with each Section containing a number of Questions. These Test Sections can also play different roles in the Test Player. For example, you can start the Test with an introductory Test Section, follow this with Test Sections containing Questions and then present different Test Sections to the candidate when they exit the Test depending on whether they passed or failed.
If you selected Use Multiple Sections when you created a Test, you will see the heading Sections, rather than Questions, in the Question’s details screen.
Edit or view Test Section
To view and/or edit a Test Section go to the details screen for the Test, see details screen.
- Scroll down and click Sections to open the collapsible window. Click the Section you want to edit. This takes you to the Test Section’s details screen.
- Click Edit Test Section if you want to edit them.

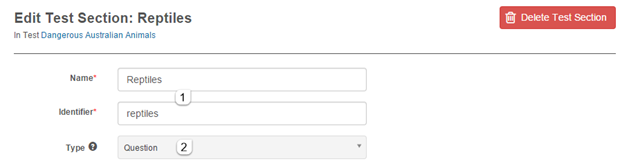
Sections contain the following information:
- Name and Identifier (must be unique) – ensure this follows a naming convention.
- Type is the type of Section. This determines the role that the Test Section plays in the Test Player and influences the types of Questions that can be linked to the test Section. There are several notable types:
Exit if failed – candidates will see this after they have exited and failed the Test.
Exit if passed – candidates will see this after they have exited and passed the Test.
Introduction – candidates will see this at the very beginning of the Test. You could use it to add a Comment Question Type containing instructions for the candidates.
Question – candidates answer Assessment Questions in this Test Section.
Survey – candidates answer Survey Questions in this Test Section.
Note that the Type cannot be changed once the Section has been created. If you do need to change it, delete the Section, then create it and re-link the Questions. Note also that deleting a Section does not delete its linked Questions.
- Use Icon, Hide from Dashboard and Thumbnail – these properties specify how the Section will appear as a tile in the Test Player.
Note that you should select Hide from Dashboard for Test Sections of type Introduction (see point 2 above).
- Description: a brief description about the Section can be added.
- Select Save Test Section.

Add Test Section
To add a new Section to a multi-Section Test, go to the Test’s details page and click to open the Sections collapsible window.
- Click the + icon.

- Fill out the form details as above.
- Select Save Test Section.
Pass/Fail and Attempts
An important component of CLS Tests is the ability to configure pass/fail rules and the number of times that a learner can attempt a Test. You will see this window if you checked Set pass/fail outcome on the Test Edit Form.
Navigate to Design > Tests and Surveys.
- Search for or select the Test from the Display Name list.
- Go to its details screen
- Click Pass/Fail and Resit Settings to open the window. Select the pencil icon if you want to make any changes here.

The following fields are available:
- Pass-mark – the percentage of correct marks required to pass the Test. this field is mandatory for automatically marked tests.
- Number of attempts allowed
- Resit incorrect questions only – this setting will only present the User with questions that were answered incorrectly in an earlier attempt.
- Feedback – the options to either give feedback about the Test attempt in various ways or to give no feedback.
Click Save to save any changes that you have made.
Be very careful changing these settings for Tests that are currently in use. If workflows are enabled, the workflow state will ensure that this information can only be edited in the correct states.
Timing Options
Timing options are provided to give a learner the freedom to decide when to complete a test. These are very useful when combined with Randomisation, Pass/Fail management and automatically marked Tests, because they simplify assessment delivery and reduce costs by allowing a candidate to complete the Test in their own time.
Timing options at a Test level are set at the Test details screen and specify how long a learner has to complete the Test. Note any scheduling information must be configured at the Assessment Event level.
Timing settings can be overridden at the Assessment Event Level and for individual Test attempts.

Randomisation and Optional Questions
You do not have to deliver the Questions in a Test in the same way for every Test candidate.
Firstly, when you create the Question you can specify that you want to randomise the order of distractors (possible answers) by clicking the Shuffle check box. This can be done for the following question types:
- Multiple Choice
- Order
- Drag n Drop
- Multiple Choices
There are other options that are specified for a list of Questions. In a Test or Test Section you can randomise the order that its Questions are presented to the candidate or randomly select the actual Questions that are presented.
You can also let candidates select from a pool of optional Questions if this section has optional questions has been set in the Test Designer settings.
If you set Enable Subsection Randomisation in the Test Designer settings you can divide the Questions into subsections and specify random selections from each Subsection.
Randomisation and Optional Questions
In a Test containing multiple Sections, you specify this within the Questions window in an individual Section, at the Section’s details screen.
In a Test without Sections, you specify this within the Questions window at the Test’s details screen.
At the top is a drop-down list next to Randomisation and optional questions. Your selection relates to all the Questions listed below it.
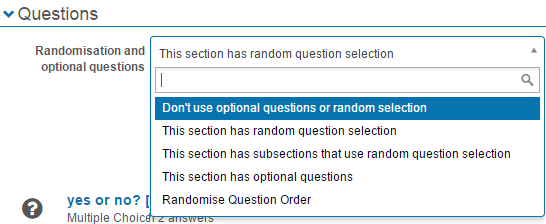
You can select from the following options:
- No randomisation – the Test is presented the same way for every candidate in every attempt.
- Randomise the Questions selected and presented to the candidate.
This involves specifying the number of Questions to be selected from the total. Note that this option will also randomise the order of the selected Questions.

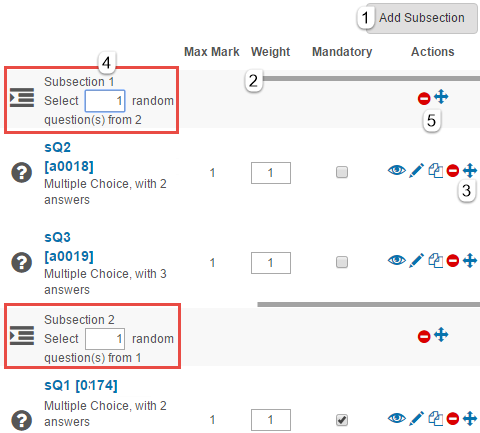
- Subsections with random Question selection – if enabled, you can create multiple Subsections, drag Questions into them and define random selections from each Subsection.
-
- Click Add Subsection to add another Subsection.
- The Subsection contains a list of Questions.
- A Question is dragged into a Subsection by dragging its crosshair icon.
- Specify the random selection to be made from the Subsection. Note that all Questions in the second Subsection will be selected and presented to candidates.
- Move a Subsection in the list using its crosshair icon. Delete it with its minus icon.
Note this option will randomise the order of the Questions selected from each Subsection but each Subsection will still be in the order that you set.
- Optional Questions – if enabled, you can specify the number of the Questions that candidates must answer.
Candidates can choose which Questions they answer as long as they answer the specified number.

- Randomise the order the Questions are presented to the candidate.
Some important notes about randomisation:
- Questions from the random pool must all have the same weighting.
- Questions from the random pool must all be either mandatory or not mandatory.
Using a Test
A Test is one of a number of Learning Assets in the CLS. Users cannot enrol in Learning Assets until they are enrolled in Catalogue Items, which typically happens at the end of the development cycle. Thus, Content Authors can work on Test development without needing to worry about exposing the content to Users before it is ready.
A Test from an Assessment module can be made available for enrolment in the following ways:
- Include it in a Program (multi-component Catalogue Item) which could also include other Learning Assets such as a survey, an Online Course, or a face to face workshop.
- Create a Catalogue Item for the Test. This means that it will be possible to enrol students into this Test however there is no option to schedule a specific window of time during which the Test is available. This approach is suitable for small-scale or on-demand test delivery.
- Create an Assessment Event linked to the Test. An Assessment Event is a scheduled instance of a Test, see Assessment Events.