Assessment Stimuli
Introduction
A Stimulus is a resource composed of one or more images, texts, videos, etc. Stimuli can be linked to Questions that are part of Assessment modules.
When a Stimulus is linked to a Question, some or all of it (depending on its setup) appears at the side of the Question along with two chevrons. The student clicks the chevrons to bring the Stimulus fully on to and off the Question screen.

A Stimulus can provide supplementary information, instructions, images, etc as desired. It can be composed of a number of resource types including audio, video, image, html etc, and one Stimulus can contain multiple items.
A Stimulus is linked to a Question through the Question’s details screen. Note that you can only link a Stimulus to a Question if they are both in the same (Assessment) Module.
There is only one copy of a Stimulus in the system so any changes made to it will be appled to all the Questions it is linked to.
You can customise your implementation of Stimuli at Stimulus Settings.
Stimuli are managed by navigating to Design > Stimuli

Add Stimulus
To add Stimuli navigate to Design > Stimuli > Add Stimulus.
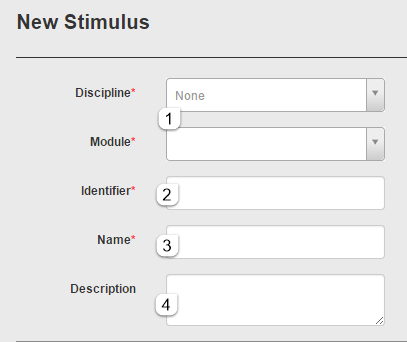
- Select the Discipline and Module where the Stimulus is located. Note that you can only link a Stimulus to a Question if they are both in the same Module.
- An Identifier will be automatically generated if the appropriate option has been enabled in Resource Settings. This cannot be changed. If auto-generation has not been enabled, create a unique Identifier for the Stimulus.
- Create a unique Name for the Stimulus.
- A brief Description about the Stimulus can be added but is not mandatory.
- Expanded – click to open the window and see the menu. Despending on what has been set at Resource Settings, you can select one of the three options:
- Free HTML
- Slideshow

- In this example Free HTML has been selected. There are a number of ways you can add information here.
- Text can be typed into the text box.
- The source button <> allows you to edit the HTML.
- Text or images resources can be added by clicking the Insert menu item.
- Audio can be added to the Stimulus by selecting from the drop-down box beneath the text box.

- Preview –this is where you specify how the Stimuli should appear to the student when it is at the side of the Question screen.
Click to open the Preview window. If you leave the Same as expanded stimulus option ticked, a smaller version of the Stimulus will be the preview for the Stimulus. If you uncheck this option and do not give an alternative (see below) the student will see no preview, just the chevrons at the side of their Question screen.
If you want to customise the preview, uncheck the option and use the same tools as in step 5 to create the preview. This is particularly useful if using a video Stimulus because you can select an image to be its preview screen rather than the default grey screen:

- Select Save Stimulus.
Search for stimulus
The search feature allows you to quickly find a Stimuli. Search is only required when there are a large number of stimulus in the list.
To search for a stimuli select Design > Stimuli
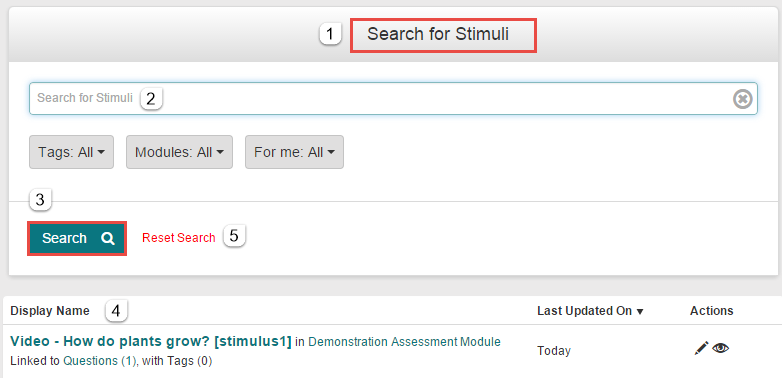
- Click Search for Stimuli and a search field will appear.
- Enter search word.
- Click Search.
- The search results will appear in the Display Name column.
- To perform another search click Reset Search.
Edit stimuli
Use this function when stimulus details need to be changed.
Select Design > Stimuli.
- Search for the required Stimuli using the search function. Or
- Select the required Stimuli from the Display Name List.
- Click Edit Stimulus

- Change details as required.
- Click Save Stimulus.