Test Panels in Learning Page Modules
A Test Panel type allows you to add a Test and Questions to your learning Module Page. You would do this to in order to make learning more interactive and engaging and to measure a learner’s progress.

There are a number of types of Test Panel. Each one has different characteristics and can only work with specific types of Questions. Most require interaction before the Page is considered complete and its thumbnail given a green tick. Most Panels also give some kind of feedback and there can be extra feedback built into the Question itself.
The Panel Types Micro Quiz (system) and Free Text (assessable) also require that the learner actually achieves a Test pass mark before the Page is considered complete.
All these details are included in the instructions in this section for the individual Test Panel Types.
Creating a Test Panel essentially involves:
- creating a Panel on a Page in a Learning Module.
- choosing one of the Test Panel types for the Panel from the Content Template drop-down menu. In the example below it is a Micro-Quiz (system).
- linking to a Test (which adds its linked Questions) using the Test drop-down menu.

Naturally the Tests in the drop-down list must be in the same Module as the Page. There can be one or more Questions in the Test.
You can also add a new Test and/or edit the selected Test through this screen.
Overall, there are five types of Question available in a Learning Module:
- Match
- Multiple choice
- Multiple Choices
- Sequence
- Short Answer
Note that for more serious assessment you should create an Assessment Module Test where there is an assessment infrastructure and a much larger number of Question types.
Creating Questions for Panels
When a Question appears in a Learning Module, it can only do so as part of a Test Panel type, for example a Micro-Quiz. The Question appears on the learner’s screen because it is linked to a Test that functions with one of these Test Panel types. And this Panel may be arranged on the screen in combination with other Panels, in an infinite number of possible configurations.
Thus, when we show a Question preview here, this is only the way the Question would look as a stand-alone. The Question will almost certainly look different in the Course Player, depending on the particular Panel layout it occurs in.
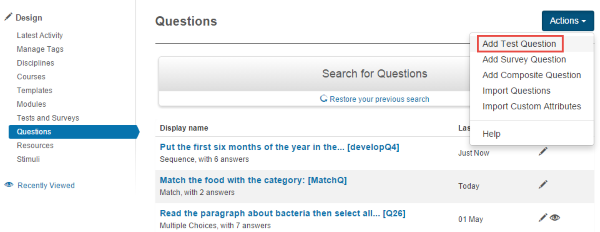
To create a new question select Design > Questions
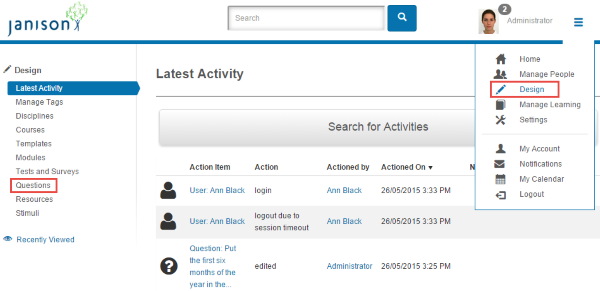
Select Add Test Question from the Actions drop-down menu.
There are a number of Question Types that you can select:
Match
Match Questions are made up of one or more sets of:
- a word or statement, and
- a set of possible answers that might match the word/statement.
The candidate selects the correct match answer from a drop down list.
If you include more than one set, each one must be answered correctly for the candidate to correctly answer the whole question.
Scoring
This question type is marked automatically. Score allocation is set at the time of question design.
Steps
Navigate to Design > Questions and select Add Test Question from the Actions drop-down menu.
- Fill out the form details including the Discipline and Module you want the Question to belong to. Create an Identifier for the question.
- Enter the explanation for the Question into the Question Stem field.
- Select Match from the Type field.

- Enter a match word or sentence under Match
- Enter the possible answers under Answer
- You can delete a possible answer by clicking the delete icon
- Select the radio button next to the correct answer
- You can delete the match word/sentence by clicking delete match
You can enter more than one sets of Match and Answers if desired
- Click Save Test Question

Preview
You can preview the Question in the Test Player by: selecting Preview from the Question header bar.

Note that you may need to click More actions first in order to see the Preview option:

Preview will show:
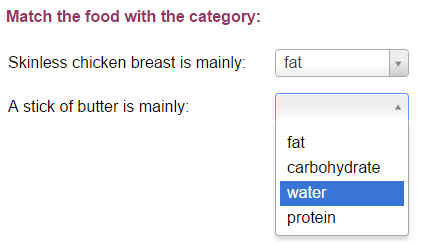
By the way, do you think this candidate is correct?
Multiple Choice
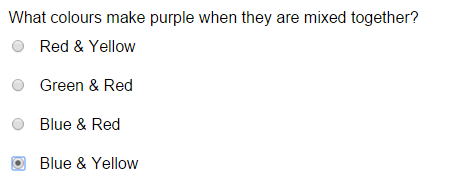
In a Multiple Choice Question type a candidate is asked to choose one answer from of a set of options. The options can be text (as in the example below) or pictures.
This Question type is similar to Yes/No and True/False Question types in that there is only one answer a candidate can select and only one answer can be correct. In contrast, in a Multiple Choices Question more than one answer can be correct.
The standard presentation for a Multiple Choice Question is a list of options with radio buttons.
Scoring
This question type is marked automatically. Score allocation is set by the author at the time of authoring.
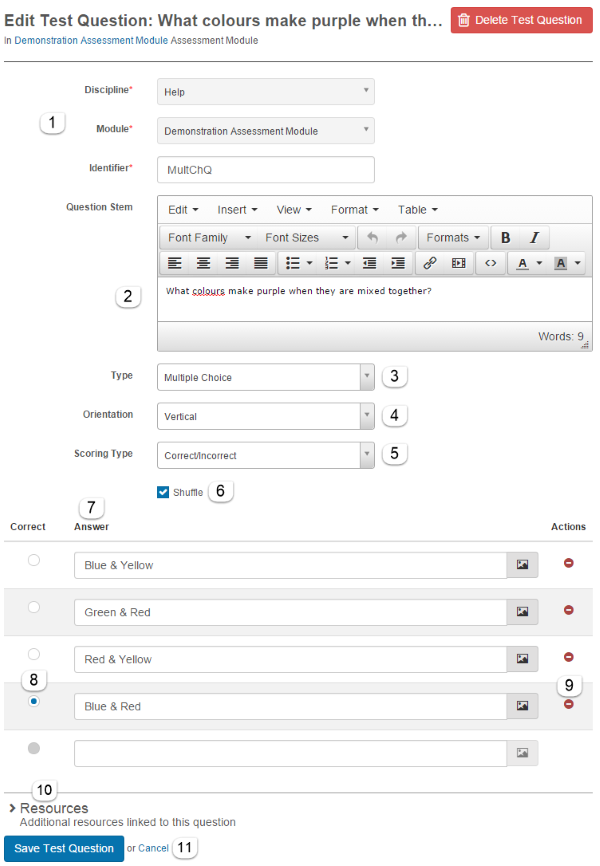
Steps
Navigate to Design > Questions and select Add Test Question from the Actions drop down menu.
- Fill out the form details including the Discipline and Module you want the Question to belong to. Create an Identifier for the Question.
- Enter the question text in the Question Stem field.
- Select Multiple Choice from the Type field.
- Orientation of the answers is not applicable in a Learning Module.
- Select either Correct/Incorrect or Per Distractor from the Scoring Type field.
- Shuffle is not applicable in a Learning Module.
- Enter the answers in the Answer section. The answer can be a text (as in this example) or a picture. For the latter, click the text box and then click the picture icon to insert the resource.
- Select the radio button next to the Correct answer.
- You can delete an answer by clicking the red minus icon at its right
- Add Resources to the question if desired by clicking the arrow and following the instructions
- Select Save Test Question.
Preview
You can preview the Question in the Test Player by: selecting Preview from the Question header bar.
Note that you may need to click More actions first in order to see the Preview option:
Preview will show:
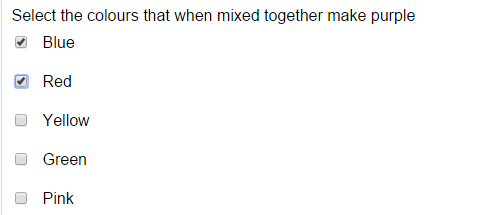
Multiple Choices
A Multiple Choices Question type allows the author to specify multiple answers that can be correct. The options can be text (as in the example below) or pictures. This Question type is different from a Multiple Choice question, where there are multiple answers but only one can be correct.
The standard presentation for a Multiple Choices Question is a list of options and checkboxes. Note that if Scoring Type is set to Correct/Incorrect (Point 5 below), the candidate must select all of the correct answers to be marked correct. If this is not desired, then set the Scoring Type to Per Distractor and adjust appropriately.
Scoring
This Question type is marked automatically. Score allocation is set by the author at the time of authoring.
Steps
Navigate to Design > Questions and select Add Test Question from the Actions drop-down menu.
- Fill out the form details including the Discipline and Module you want the question to belong to. Create an Identifier for the question.
- Enter the Question text in the Question Stem field.
- Select Multiple Choices from the Type field.
- Orientation is not applicable in a Learning Module
- Select either Correct/Incorrect or Per Distractor from the Scoring Type field.
- Shuffle is not applicable in a Learning Module.
- Enter the answers in the Answer section. Note that the answer can be a text (as in this example) or a picture. For the latter, click the text box and then click the picture icon to insert the resource.
- Select the Correct check box for each correct answers. You can have any number of correct answers.
- You can delete an answer by clicking the red minus icon at its right
- Add Resources to the question if desired by clicking the arrow and following the instructions
- Select Save Test Question.

Preview
You can preview the Question in the Test Player by: selecting Preview from the Question header bar.
Note that you may need to click More actions first in order to see the Preview option:
Preview will show:
Sequence
A Sequence question type asks the candidate to put information in the correct sequence or order.
Scoring
This question type is marked automatically.
Steps
Navigate to Design > Questions and select Add Test Question from the Actions drop-down menu.
- Fill out the Discipline and Module you would like the Test Question to belong to and create a unique Identifier
- Type the instructions for your Question in the Question Stem.
- Select Sequence from the Type drop-down menu.
- Type the information to be ordered in the Answer column.
- Enter value(s) in Display Order if you want to change the order of the answers on a candidate’s screen. If the field is blank the answer will be positioned as it is in the list.
- Click the minus icon to delete an answer
- Click Save Test Question.

Preview
You can preview the Question in the Test Player by: selecting Preview from the Question header bar.
Note that you may need to click More actions first in order to see the Preview option:
Preview will show:

Short Answer
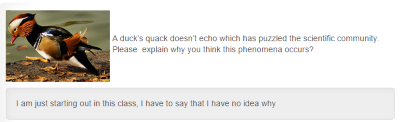
A Short Answer question asks candidates to write an extended amount of text in a text box. This Question can be used for answers that vary from a single sentence to a full essay. The word count can be specified and certain actions can be set to occur when the word limit is reached.
Scoring
This question type cannot be marked automatically and must be scored manually.
Steps
Navigate to Design > Questions and select Add Test Question from the Actions drop-down menu.
- Fill out the form details including the Discipline and Module you want the question to belong to. Create an Identifier for the question.
- Enter the question text in the Question Stem field. You can include resources in this question type.
- Select Short Answer from the Type field.
- Enter the number of lines the text box will initially show on the screen in Line Count.
- Optionally enter the maximum number of words permitted in Word Limit
- Word Limit Action is not applicable in a Learning Module
- Rich Text Editor is not applicable in a Learning Module.
- Code Editing is not applicable in a Learning Module.
- Word Count is not applicable in a Learning Module.
- Select Save Test Question

Preview
You can preview the Question in the Test Player by: selecting Preview from the Question header bar.
Note that you may need to click More actions first in order to see the Preview option:
Preview will show:

Micro-Quiz (system)
A Micro Quiz (system) Panel works with a Test that includes either Multiple Choice or Multiple Choices question types.
Settings required for the Test are:
- Marking Options must be set to Automatic.
- a Pass mark needs to be entered or a completion will not be registered
- all other settings at the Test level can be left as default.
There are several options for feedback for the Test Questions:
- Single- enter a string of text that the learner sees if they are correct or incorrect.
- CorrectAndIncorrect- enter a string of text for correct and a string for incorrect. Learners receive the appropriate response.
- Per Distractor- enter feedback for each possible answer (distractor). Regardless of whether they are correct/incorrect they will receive the feedback corresponding to their response.
- None- screen will display default text: Correct or Incorrect.
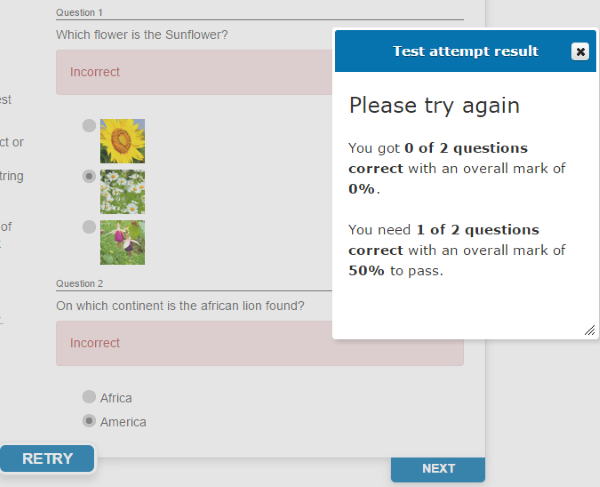
In the Course Player, learners selects the option(s) they think correct and click Submit. They receive the feedback that has been specified for each Question. The Page is not marked as completed until they have clicked Retry and selected enough correct answers for the pass mark to be achieved. Once the Page is complete, the green tick will appear on the navigation thumbnail for it.
Free Text (assessable)
The Free text (assessable) Panel works with a Test that includes one or more Short Answer Questions where learners write text that cannot be automatically marked. Thus, the Test must have its marking option set to Manual and a Pass mark set.
In the Course Player, the learner writes text in the Question box and clicks Submit. A message then appears indicating that this has been submitted for marking and to await feedback from the marker.
Once the Test has been marked the message will change and reveal the outcome of marking. If it’s a pass, the green completion tick will appear on the navigation thumbnail for this Page

Quiz with Pagination
The Quiz with Pagination Panel works with a Test that includes one or more Multiple Choice, Multiple Choices or Short Answer Questions. The Test requires the marking options set to Automatic and a Pass Mark to be set. All other settings at the Test level can be left as default. The Question supports all Feedback Types.

In the Course Player, learners see the each Question in the Test on a separate screen. They submit answers and the system provides feedback so that they know which answers are correct and which are incorrect. The Test is completed when correct responses are provided for all Multiple Choice and Multiple Choices questions. Short Answer questions are automatically marked as correct as soon as a response is entered. The Page is complete once the learner has answered the Questions, regardless of whether they are correct or incorrect.
Free Text
The Free Text panel works with a Test which includes one or more Short Answer questions. The purpose of this type of test is self-reflection rather than assessment.

In the Course Player, the learner writes text in the Question box. There is an option to save the text entered into the text box but the Question is not submitted or marked. The Page is complete once the learner has entered some text.
Free Text Review
The Free Text Review panel is not assessable and gives learners a read only summary of the response previously entered for that Question in a Free Text Panel. The purpose is self-reflection, as learners have the opportunity to reconsider their earlier understandings.
When selecting the Test from the drop-down menu, be sure to select a Test linked to a previous Free Text Panel.
In the Course Player, the learner sees in a read-only text box what s/he previously wrote. The Page is complete once the learner has answered viewed the Page.
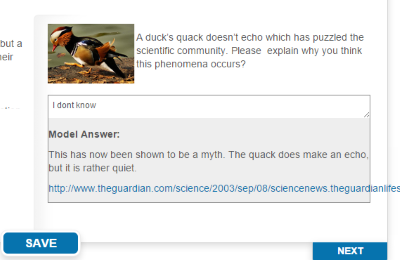
Model Answers
The Model Answers panel is like a Free text Panel in that it works with a Test that includes one or more Short Answer Questions. However, in this Panel type, a model answer can be set for each Question so that learners get an indication of the correct answer. All settings at the Test level can be left as default.
The Model Answer for each Question is entered in the Marking Rubric field in the expandable Marking section. All other settings for the Question can be ignored.

In the Course Player, the learner enters and saves a response and text entered in Marking Rubric displays on the screen under the heading: Model Answer. The Page is complete once they have entered some text.
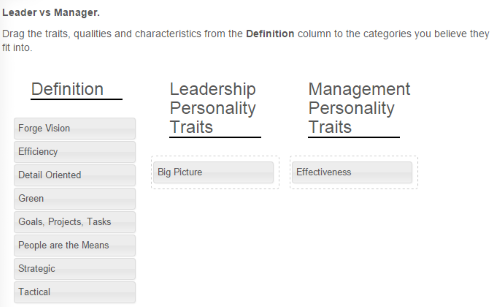
Match Drag-n-Drop
The Match Drag-n-Drop panel works with a Match Question type. The learner drags and drops items from a column labelled Definition into the appropriate second and third columns defined by the Match field of the Question. There is no correct or incorrect answer to the Question, once again the aim is reflection. All other settings at the Test level can be left as default. The Page is complete once the learner has interacted with it.
In this example, the Match Question below is linked to a Match drag-n-drop Panel type:

In the Course Player, a learner can drag all of the items under Definition and in this example has already dragged two of them:
SCORM
The SCORM panel is used to display simple SCORM courses within the course player. This panel should be used for simple SCORM courses designed to enhance the learning aspects of a Janison course. The SCORM courses placed into a panel should be kept simple and not be concerned with storing progress within tests or questions. You will need to create a SCORM course in a third party application such as Articulate.

To apply a SCORM to a course panel:
- Enter a Title for the Panel.
- Select SCORM from the Content Template option.
- Select your desired SCORM course from the SCORM Course option.

You will need to create a SCORM course beforehand to link it to a Course Panel.
- Select Edit metadata.
- Enter an optional Description for the SCORM course.
- Enter optional Text Alternative.
- Optionally, Enter a new Width and Height for the SCORM course within the Panel.
- Select Save.

Sortable Quiz
The Sortable Quiz panel works with a Test that includes a Sequence Question. Marking Options must be set to Automatic and a Pass Mark needs to be entered. All other Test settings can be left as default.
In the Sequence Question, set the Display Order for the Answers to be the order you want learners to see them in the Panel.

In the Course Player, learners see this:

They drag the boxes to create an order and click Submit. They are given feedback on their choices. If they are incorrect they can click Retry, reposition the boxes and submit again. They can make an infinite number of retries until they get the Question correct. The Page itself is complete once the learner has submitted one answer, correct or incorrect.
Poll Quiz
The Poll Quiz panel is designed for learner self-reflection rather than gathering survey information. It works with a Test that includes one or more Multiple Choice questions. Other Test question settings can be left as default. The Page is complete once the learner has answered the Questions.
In this example, the Multiple Choice Question below is linked to a Poll Quiz Panel type:

Learners see this device in Course Player:

They click in the box to extend the grey shape to their choice of location.
Survey Quiz
The Survey Quiz Panel is a tool for collecting feedback from learners. Instead of a Test, it works with a Survey, containing one or more Multiple Choice or Short Answer questions.
In the Course Player, learners enter answers and click Submit. The system acknowledges this, thanks them and the Page is marked as complete.
