Competencies
Competency can be defined as the ability of an individual to do his or her job properly. Every organisation has its own collections of defined competencies that are important for the performance of the different kinds of work that the organisation does. On a national or international level, a set of recognised competencies is called a qualification.
Competencies can be either
- Nationally recognised competencies, as per TGA at http://training.gov.au/Home/Tga
- In house competencies which relate only to an organisation
In the CLS, Competencies are linked to Catalogue Items containing learning assets such as courses or training events. Competencies can also be linked directly to Courses and Assignments. A User acquires Competencies through enrolment in and completion of these learning assets.
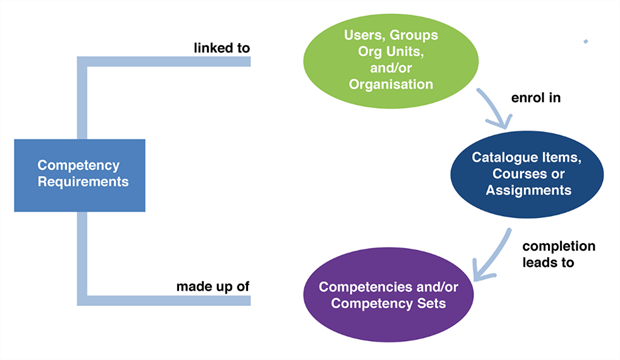
Competencies can be defined as permanent or as only lasting for defined periods of time. They can also be collected into functional units called Competency Sets.
Competency Requirements are collections of Competencies that are set up so that Users are required to acquire these competencies. Managers can run various reports to determine compliance with specified Competency Requirements amongst staff.
Note that in a MOOC environment, Endorsements work alongside Competencies and give learners the opportunity to recognise the skills of their peers.
Manage
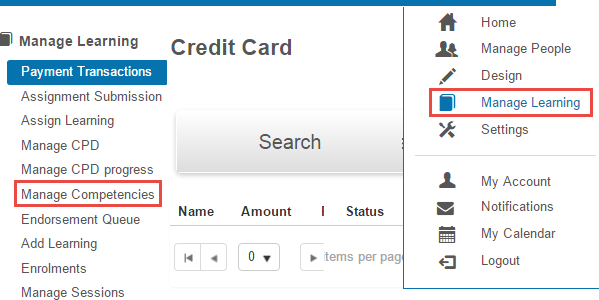
To manage Competencies select Manage Learning > Manage Competencies.
You will be directed to the Manage Competencies screen.
- Existing Competencies are divided by tabs into Active and Inactive Competencies.
- You can search for a particular Competency or Competency Set by selecting Search for Competencies and Sets .

Add a competency
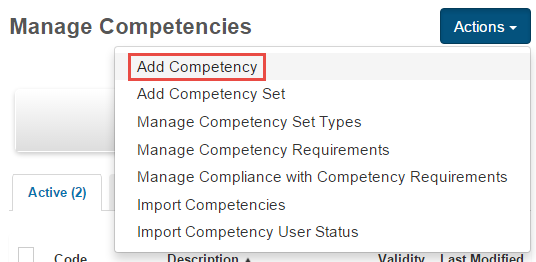
To add a Competency select Manage Learning > Manage Competencies and select Add Competency from the Actions dropdown.
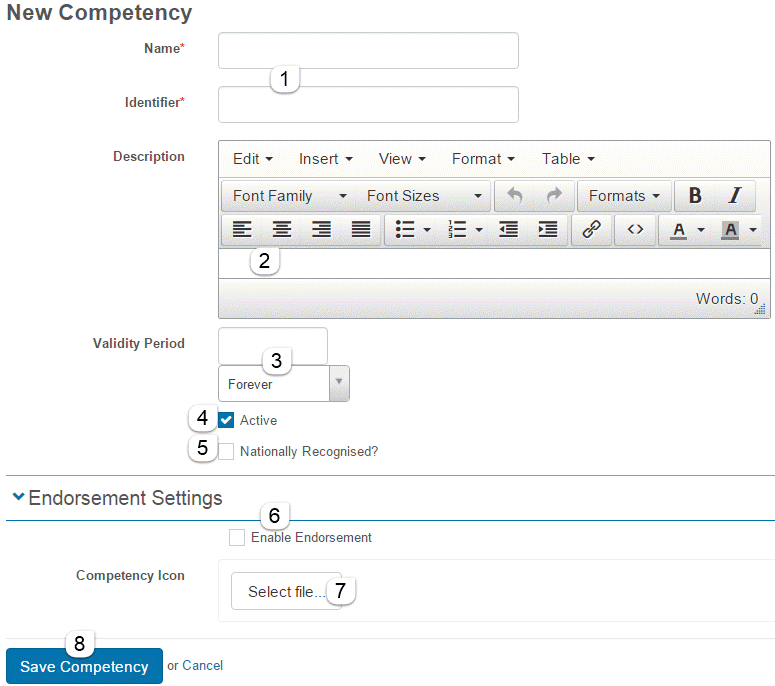
- Add a Name; the Identifier will be entered automatically.
- Enter a Description if desired.
- Set the Validity Period by first selecting an option from the second dropdown. You can choose Forever or else one of Days, Months or Years, in which case you must also enter a number in first box.
- Check the Active box to create an active Competency.
- Check the Nationally Recognised box if applicable.
- If Endorsements had been previously enabled in Settings, you will see an extra area, Endorsement Setting, where you can set up Endorsements for this Competency.
- You can select an image that represents the Competency Icon or use the default icon. This is usually referred to as a Badge. Users will see this Badge if Endorsements are set up.
- Select Save Competency
Extra Note about Validity:
If a Competency is defined as being valid for a certain period of time, it expires after this period is over. This period of time is measured from the date the User completes the linked learning asset and acquires the Competency.
Thus, a User holding a Competency will lose the Competency after the validity period is over.
Archive, Delete or Edit
To delete or archive Competencies select Manage Learning > Manage Competencies. You will see a list of the existing Competencies and Competency Sets.
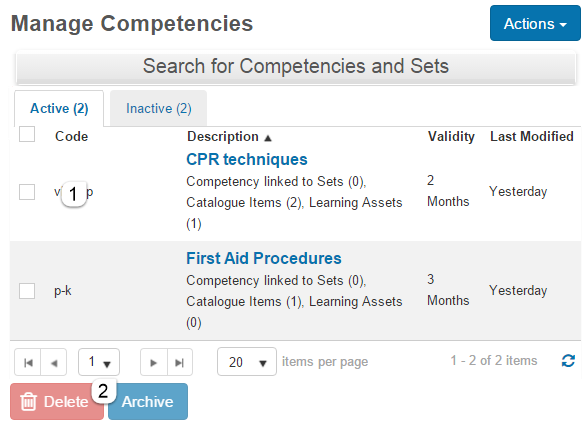
To Delete or Archive a Competency or Competency Set:
- Select the check box to the left of its name.
- Select Delete or Archive as required
To perform this action on all Competencies and Competency Sets, select the Code check box, then select Delete or Archive as required.
Note:
- Archiving takes the Competency out of activity but it does not delete it.
- You cannot Archive or Delete a Competency that is in use, for example, linked to Learning Assets or Competency Sets.
Edit a Competency
To edit a Competency select its name. This takes you to its details page, where you can select Edit Competency.
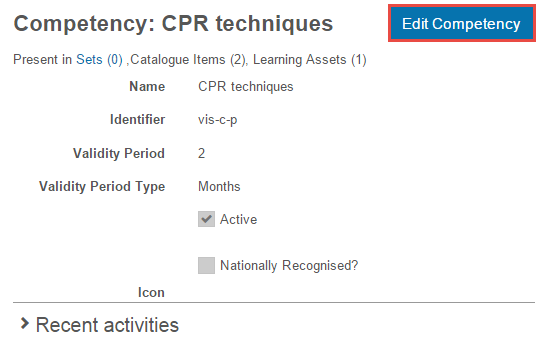
Editing a Competency allows you to change any of the values that were entered when the Competency was created. See Add a Competency for details.
Note
- you can change the name and/or identifier of the Competency and all of its existing relationships (such as membership of a Competency Set, link(s) to a Catalogue Item, etc) will be retained.
- if you update a Competency after a User has acquired it, the changes will affect that User’s Competency.
Link to Learning
You can link Competencies to Catalogue Items, Courses and Assignments. The first of these is the most common.
A User acquires one or more Competencies or Competency sets when they complete the learning that has been linked to them.
Link Competency to a Catalogue Item
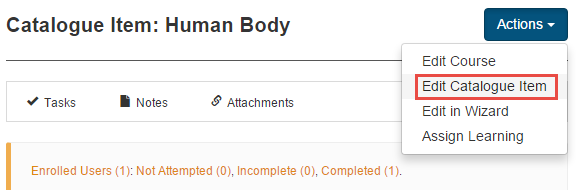
To link Competency to a Catalogue Item navigate to Manage Learning > Manage Catalogue, locate the required Catalogue Item and select it.
Select Edit Catalogue Item from the Actions dropdown.
Select the Competencies collapsible window to open it.
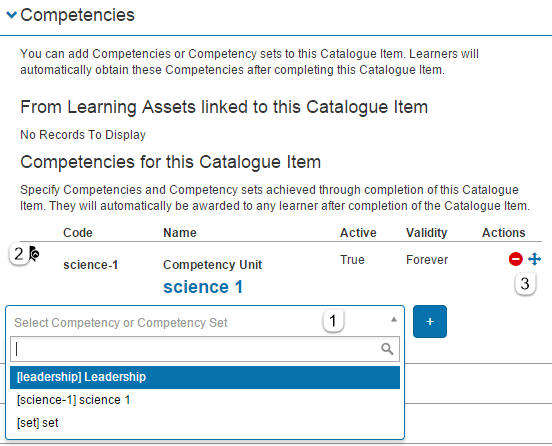
- Select a Competency or Competency Set from the dropdown then select the + icon at the right.
Note that there is no indication whether a list item is a Competency or Competency Set.
- Once you have linked the item, you will see it listed under Competencies for this Catalogue Item.
- You can unlink it by selecting the red minus icon. You can move its position in the list by dragging the crosshair icon.
Select Save Catalogue Item when you have finished.
Note:
- If you link a Competency to a Catalogue Item after a User has completed their enrolment in the Catalogue Item, they will not receive the Competency. If this is required, then the enrolment can be edited to add the Competency.
Link Competency to a Course
To link Competency to a Course follow the steps to edit the Course and select Competencies to open the collapsible window.
Follow the steps 1-3 for linking Competency to a Catalogue Item and save the Course.
Link Competency to an Assignment
To link Competency to an Assignment edit the Assignment and select Competencies to open the collapsible window.
Follow steps 1-3 for linking Competency to a Catalogue Item.
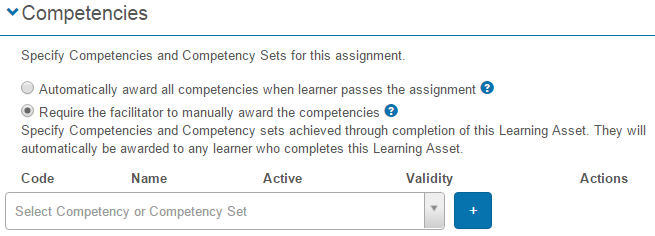
There is an additional option for Assignments where you must specify whether to automatically award Competencies when the learner passes the Assignment or whether the facilitator manually awards the Competencies if they were demonstrated in the Assignment.
Save the Assignment.
Renewing a Competency
If you link learning to a Competency that is not valid forever, the Competency needs to be renewed periodically. Thus, the Catalogue Item (or Catalogue Item that the Learning Asset is linked to) must allow re-enrolments so that Users can re-enrol in the Catalogue Item and re-acquire the Competency.
You can link Competencies to Catalogue Items, Courses and Assignments. The first of these is the most common.
A User acquires one or more Competencies or Competency sets when they complete the learning that has been linked to them.
Link Competency to a Catalogue Item
To link Competency to a Catalogue Item navigate to Manage Learning > Manage Catalogue, locate the required Catalogue Item and select it.
Select Edit Catalogue Item from the Actions dropdown.
Select the Competencies collapsible window to open it.
- Select a Competency or Competency Set from the dropdown then select the + icon at the right.
Note that there is no indication whether a list item is a Competency or Competency Set.
- Once you have linked the item, you will see it listed under Competencies for this Catalogue Item.
- You can unlink it by selecting the red minus icon. You can move its position in the list by dragging the crosshair icon.
Select Save Catalogue Item when you have finished.
Note:
- If you link a Competency to a Catalogue Item after a User has completed their enrolment in the Catalogue Item, they will not receive the Competency. If this is required, then the enrolment can be edited to add the Competency.
Link Competency to a Course
To link Competency to a Course follow the steps to edit the Course and select Competencies to open the collapsible window.
Follow the steps 1-3 for linking Competency to a Catalogue Item and save the Course.
Link Competency to an Assignment
To link Competency to an Assignment edit the Assignment and select Competencies to open the collapsible window.
Follow steps 1-3 for linking Competency to a Catalogue Item.
There is an additional option for Assignments where you must specify whether to automatically award Competencies when the learner passes the Assignment or whether the facilitator manually awards the Competencies if they were demonstrated in the Assignment.
Save the Assignment.
Renewing a Competency
If you link learning to a Competency that is not valid forever, the Competency needs to be renewed periodically. Thus, the Catalogue Item (or Catalogue Item that the Learning Asset is linked to) must allow re-enrolments so that Users can re-enrol in the Catalogue Item and re-acquire the Competency.
Add a Requirement
Competency Requirements are collections of Competencies that are set up so that Users are required to acquire the Competencies. Completion of the appropriate learning has to be done periodically for Competencies that are only valid for a fixed period.
To manage Competency Requirements select Manage Learning > Manage Competencies and select Manage Competency Requirements from the Actions dropdown.

You will be directed to the Manage Competency Requirements screen.
To add a Competency Requirement, select Add Competency Requirement from the top of the page.

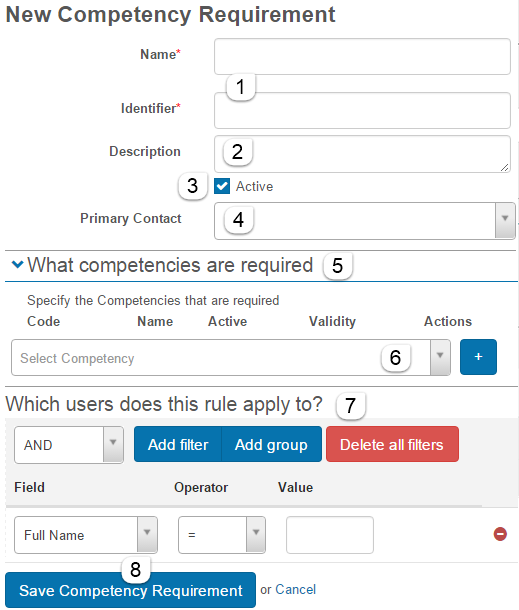
You will be directed to the New Competency Requirement screen.
- Enter a name for the Competency Requirement. The identifier will be created automatically.
- Enter a short Description if desired.
- Check the Active box to create an active Competency Requirement.
- Select a User from the Primary Contact dropdown.
- Select the What competencies are required collapsible window to open it.
- Select a Competency from the dropdown and select the + icon.
This adds the Competency to the list. You can do this multiple times.
- Under Which users does this rule apply to? specify the Users that this Competency Requirement applies to.
Rather than selecting multiple User names from a dropdown, you create rules to define the Users who this Competency Requirement apples to. These rules are called filters. They can be very specifically targeted and are combined using Boolean logic. This will be best understood by someone who is comfortable with:
- Boolean operations (AND, OR, NOT),
- its language (e.g. “!” means “NOT”), and
- how nesting affect scope.
Clear, detailed instructions about how to set these up are found at Building Filters.
Follow these instructions to create filter(s) to specify the required Users.
- Select Save Competency Requirement.
Important Note:
The Competency Requirement that you just created has not actually been applied to the Users you specified until you Run Requirements and link all active Competency Requirements to their Users.
Run Requirements
A Competency Requirement is not actually linked to the Users it specifies until you Run Requirements.
To do this select Manage Learning > Manage Competencies and then select Manage Competency Requirements from the Actions dropdown.
This takes you to the Manage Competency Requirements screen.
Select Run Requirements. This will process all active Competency Requirements.

After you have Run Requirements, you should notice that the number next to Affects Users has changed for new Competency Requirements, because Users have just been linked to the Requirement.

Important Note:
If you have edited a Competency Requirement so that Users who were previously selected by filter(s) are no longer selected, then after you Run Requirements those Users will no longer have the Competency Requirement attached to them. The same applies if you remove Competencies from the Competency Requirement. In other words, Run Requirements always starts from scratch.
Edit a Requirement
To edit a Competency Requirement select Manage Learning > Manage Competencies.
Select Manage Competency Requirements from the Actions dropdown.
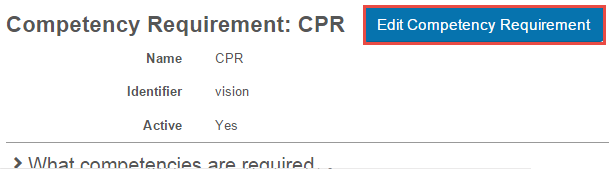
Select the name of the Competency Requirement you want to edit. This takes you to its details screen.
Select Edit a Competency Requirement.
This takes you to the edit screen where you can change any of the values entered when the Competency Requirement was created. See Add a Competency Requirement for details.
Notes
- You can change the name and/or identifier of the Competency Requirement and all of its existing relationships (such as a link to a Catalogue Item) will be retained.
- The edited Competency Requirement is not actually applied to the relevant Users until you Run Requirements for that Competency Requirement. See Run Requirements
- If you have edited the Competency Requirement so that Users who were previously selected by filter(s) are no longer selected, then after you Run Requirements those Users will no longer have the Competency Requirement attached to them. The same applies if you remove Competencies from the Competency Requirement.
Delete a Requirement
Follow the steps to edit a Competency Requirement and then select Delete Competency Requirement.

Manage Compliance with Requirements
You can view User compliance with active Competency Requirements. The information is displayed as charts, lists and numbers and can be subdivided as required into data about particular Users, Organisation Units, Organisations, Groups and Competencies, as explained below.
To see this information select Manage Learning > Manage Competencies and select Manage Compliance with Competency Requirements from the Actions dropdown.

Compliance is divided into one of four categories, with Risk levels applied when nearing the expiry of a Competency, see Compliance classifications for details.
These categories are shown by colours:
 = Compliant
 = Low Risk
 = High Risk
 = Non-Compliant
Data is displayed about the Users who have Competency Requirements (CR) applied to them. Data is collected as requirements for Competency, i.e. the number of different Competencies involved and User Competency requirements, i.e. the number of separate requirements of a User for Competency.
To explain the screen display, we are using two examples here. In the first example, it is February the 29th and there is one User with one CR applied to her. This CR contains three Competencies. One Competency lasts forever and the other two have expiry dates. The User acquired all the Competencies in February, just before the Manage Compliance with Competency Requirements screen was produced.
Thus, there are three separate User Competency requirements in the active CR system because the User is required to have three Competencies. As there are three Competencies in the active CR system, there are three requirements for Competency. Do not confuse this with the fact that there is one active Competency Requirement (CR).
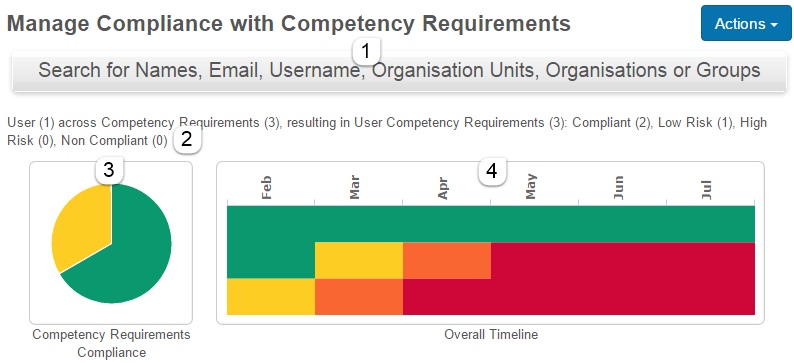
This screenshots below show all Users and all Competencies involved in active CRs:
- The search bar allows you to narrow down this screen to specified User(s), Organisations, Organisation Units or Groups.
- The description indicates what is displayed:
- The totals of: Users (1), requirements for Competency (3) and User Competency requirements (3).
- The User Competency requirements are divided into the totals for: Compliant (2), Low Risk (1), High Risk (0) and Non-Compliant (0).
- A pie chart visualises the totals of the four categories of User Competency requirements.
- This data is also mapped in a timeline that shows how today’s data would be affected over time, with one row per User Competency requirement.
Moving the cursor over the timeline creates popups showing how compliance data changes over time as the Competencies approach their expiry dates.
We can see below that in April, one User Competency requirement is Compliant (green), one High Risk (orange) and one Non-Compliant (red).

Remember that the User acquired all three Competencies in February but each one has a different validity period, as we will see below.
- To study the situation in more detail select the Details (by User) collapsible window to open it.
- The pie chart shows that the User is Compliant at the moment in two of her requirements and Low Risk for the other. Note that the timeline displays her overall status for February using the Competency that expires earliest.
- Selecting View More takes us to a screen providing details about each Competency.

In this simple example, the top half of the screen below does not give any extra information because there is only one User in the entire system. The Details area is more useful and shows the date that each of the User’s Competencies was acquired and its expiry date.
- The Orientation Competency is valid forever and represents the first green User Competency requirement line in the timeline.
- The First Aid Procedures Competency is valid for three months. As it was acquired on February 18 and it is now February 29, it is classified as Compliant because it will still be valid two months into the future, i.e. on April 29.
Next month it will be classified as Low-Risk, the following month it will be High Risk, and so on.
- The CPR Techniques Competency is valid for two months. Also acquired on February 18, it is classified as Low Risk because it will only be valid until 17 April, which is more than one month from now but less than two months from now.

The bottom part of the Manage Compliance with Competency Requirements screen summarises the data per Competency.
- Select Details (by Competency) to open the collapsible window. In this simple example we do not learn anything new because each Competency is only required by the same User we have just seen.

A more complex example
In a more complex example, it is still February but there are four Users with Competency Requirements (CR) applied to them.
There are three different CRs in this system, each with a unique Competency. So there are three separate Competencies involved and hence three requirements for Competency. As before, one Competency lasts forever and the other two have expiry dates. Users who have acquired their Competency did so in February.
In this example each CR is linked to one Competency and each User has only been linked to one CR. Thus per User, there is only one User Competency requirement, giving a total of four User Competency requirements in the system.
The Manage Compliance with Competency Requirements screen shows all Users and all Competencies involved in active CRs.
- The description indicates what is included in this display:
- The totals of: Users (4), requirements for Competency (3) and User Competency requirements (4).
- The User Competency requirements are divided into the totals for: Compliant (2), Low Risk (1), High Risk and Non-Compliant(1).
- A pie chart visualises the totals of the four categories of User Competency requirements.
- This data is also mapped in a timeline that shows how today’s data would be affected over time, with one row per User Competency requirement.
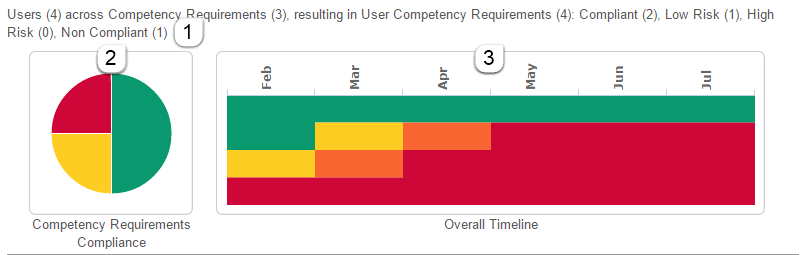
Remember that in this example all Users acquired their Competency in February but each of the three Competencies has a different expiry period.
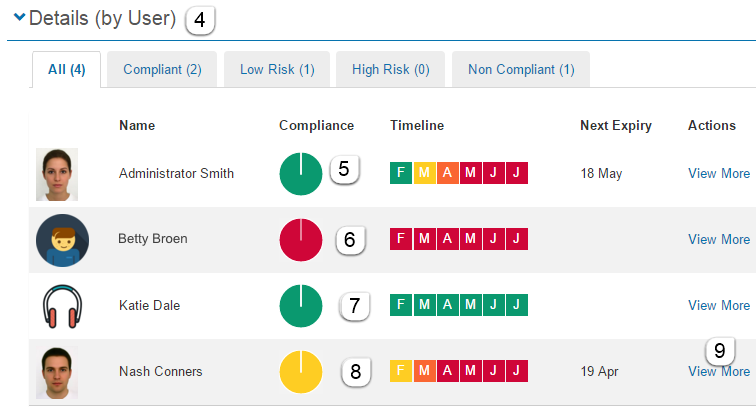
- The Details (by User) collapsible window shows the User data.
- Administrator Smith is Compliant with all her requirements (one, in this example). Her Competency is valid for three months. It is now February and she will be compliant for at least 2 months. She will become Low Risk next month in March, High Risk the following month (April) and Non-Compliant after that.
- In contrast, Betty Broen is Non-Compliant now and in the future. Her Competency has not been acquired.
- Katie Dale is Compliant now and this will not change over time. Her Competency is valid forever.
- Nash Connors is Low-Risk now, will become High Risk next month and Non-Compliant after that.
- Clicking View More displays more information about the User and the Competencies involved.
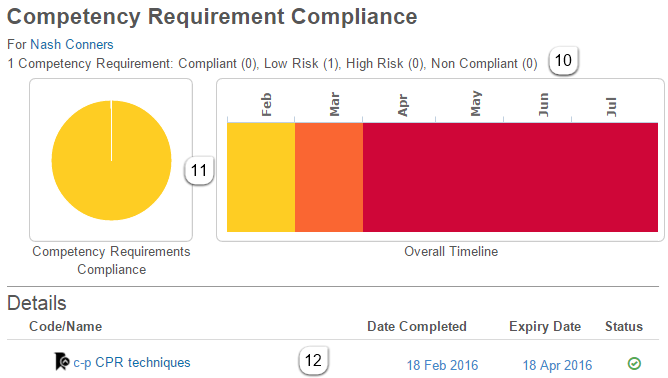
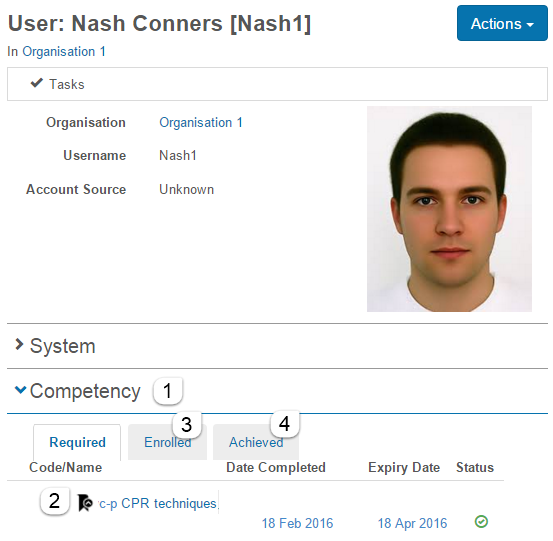
In the case of Nash Connors, View More shows:
- Only one Competency is required of him and he is considered Low Risk at the moment.
- This data is visualised as a pie chart and on a timeline.
- He acquired the CPR techniques Competency on Feb 18 and currently holds it. However it will expire on April 18, which is more than one month but less than two months from now and classifies the compliance as Low-Risk. It becomes High Risk in March, and so on.
- Select the Details (by Competency) collapsible window to open it and see the data about the Competencies involved.
- The identifier and name of each Competency is listed.
- The numbers of requirements of a User for each Competency in each of the four states is visualised as a pie chart. For example, every requirement to hold the Orientation Competency is compliant. However only half of those required to have the First Aid Procedures comply.

Notes:
- Remember that, if one User has one CR applied to them and it contains multiple Competencies, the system shows multiple requirements of one User for Competency, i.e. User Competency requirements.
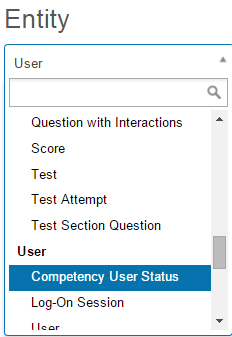
- This screen reports on Competency Requirements. If you require reports about Competencies only, go to Manage Learning > Customisable Reports and create a custom report on the Competency User Status entity.
Compliance classifications
A User is compliant in relation to a particular Competency – at a particular point in time – if they have a completed enrolment in the learning associated with the Competency and either:
- the Competency is valid forever, or
- the point in time for which we are calculating compliance is between the completion date and the expiry date (the completion date plus the Competency’s validity period).
The User is classified as Compliant when compliant in relation to the Competency and this will be true for 2 months or more into the future.
The risk classifications are defined as:
- Low Risk: User is compliant in relation to the Competency and this will be true for 1 month or more but less than 2 months into the future.
- High Risk: User is compliant in relation to the Competency and this will be true for less than 1 month into the future.
The User is Non Compliant when:
- they do not have the Competency at all, or
- they had it but the Competency has expired.
Add a competency Set
Sometimes you need to create a set of Competencies, such as an in-house collection of competencies. These are called Competency Sets.
Notes
- A Competency must have already been created before it can be added to a Competency Set. Refer to Add a Competency for instructions on how to create Competencies.
- Competency Sets have a defined Set Type. You can choose from the default Set Types and any other Set Types that have been created in advance. See Manage a Competency Set Type for instructions.
To add a Competency Set, select Manage Learning > Manage Competencies and select Add Competency Set from the Actions dropdown.

- Select a Competency Set Type from the dropdown.
- Add a Name; the Identifier will be entered automatically.
- Enter a Description if desired.
- Check the Active box to create an active Competency Set.
- Check Nationally Recognised box if applicable.
- Select the Competencies collapsible section to open it.
- Select a Competency from the dropdown and select the + icon to add it to the set. It is added to the list of Competencies.
You can do this multiple times.
- Select Save Competency.

Manage competency Set Types
You may require more than the default Competency Set Type. If so, you can add new Set Types.
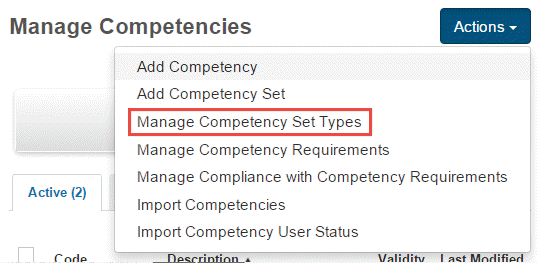
Select Manage Learning > Manage Competencies and then select Manage Competency Set Types from the Actions dropdown.
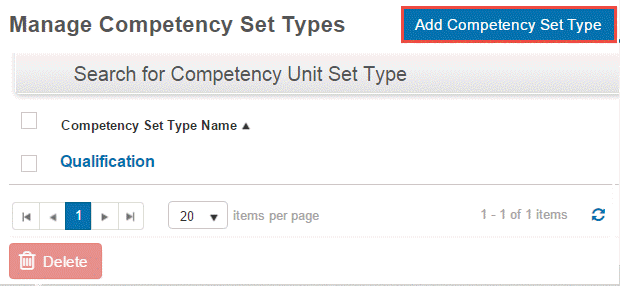
Select Add Competency Set Type.
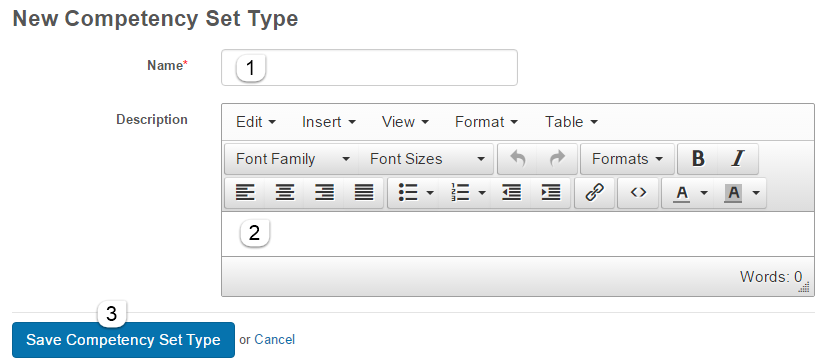
This takes you to the New Competency Set Type screen.
Add a Name and a Description for this Competency Set Type.
Select Save Competency Set Type.
Enable the Assign Wizard
The Assign Competency Wizard must be enabled before it can be used to assign competencies to users.
To enable the Assign Competency Wizard

- Navigate to Settings > Competency Settings.
- The Competency Management Settings screen will display. Select the Enable Assign Competency Wizard checkbox.
- Select Save Competency Settings. The Assign Competency Wizard can now be accessed by navigating to Manage Learning > Manage Competencies
Use the Assign Wizard
The Assign Competency Wizard can be used to assign one or more competencies to one or more users.
Note the following prerequisites:
- The required competencies and users must already exist in the system before they can be selected in the wizard. See the help content on competencies and users for more information.
- The Assign Competency Wizard must be enabled before it can be used.
To assign a competency using the wizard

- Navigate to Manage Learning > Manage Competencies.
- The Manage Competencies screen will display. Select Actions > Assign Competency Wizard.
The wizard will guide you through the following steps.
Step 1 – What Competencies are you assigning?
- Search for the required competency. The search will be run on only the text entered and will return results that contain that exact text.
- Select the add icon next to each required competency in the search results to add it to the Added Competencies list.
- Repeat steps 1 and 2 as needed to add any additional competencies.
- Competencies already added to the list will still display in the search results, but will be greyed out.
- Select the remove icon next to any competency to remove it from the Added Competencies list.
- Select one of the following:
- Next to save and continue.
- Cancel to exit the wizard without saving.
Step 2 – Who are you assigning?
- Search for the required recipient of the chosen competencies. The search will be run on only the text entered and will return results that contain that exact text.
- Only users you have scope over will be returned in the results.
- Searching can be can only be conducted by user and not by organisation, organisation unit or group.
- Select the add icon next to the user in the search results to add them to the Added Recipients list.
- Users who have already been added to the list will still display in the search results, but will be greyed out.
- Select the remove icon next to any to user to remove them from the Added Recipients list.
- Repeat steps 1 and 2 as needed to add any additional recipients.
- Select one of the following:
- Next to save and continue.
- Back to return to the previous step. The selections you have made so far will be saved.
- Cancel to exit the wizard without saving.
Step 3 – Details
- (Optional) Set a default Completion Date. This will set the chosen date as the date the competencies being assigned were achieved, and is useful if you are assigning one or more competencies to several users who achieved a competency on the same date.
- Future dates cannot be selected, the date must be current or past.
- The completion date for each user’s individual competencies can be changed on the next screen.
- Select one of the following:
- Next to save and continue.
- Back to return to the previous step. The options you have chosen so far will be saved.
- Cancel to exit the wizard without saving.
Step 4 – Review & Assign Competencies
Each competency being assigned to a user will be listed under Competency Details. Any expiry date, as specified in the competency’s settings, will be shown.
- Review the details and make edits to the following, if needed:
- Update the completion date for a competency. For example, a particular recipient may have achieved a specific competency on a different date from other recipients.
- Select the comment icon next to a user’s competency to add a comment that will be attached to the competency record activity log.
- Select the remove icon next to a user’s competency and confirm on the pop-up to remove that specific competency. This will stop the competency being assigned in the next step.
- Select one of the following:
- Finish to save the details and assign the listed competencies.
- Back to cancel any edits made and return to the previous step.
- Cancel to exit the wizard without saving.
Step 5 – Finish
The details of the competencies that have been assigned will be listed. No notifications are sent when competencies are assigned.
User Experience
Competencies achieved can be visible both to learners and to their managers.
View Competencies as a learner
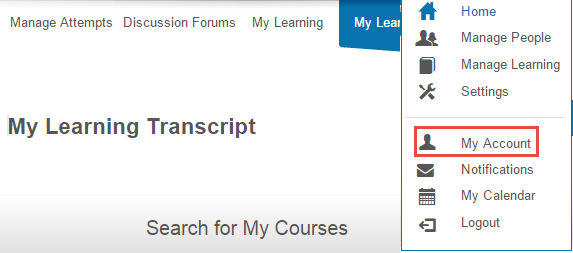
To view their Competencies a learner selects My Account and follows the steps below.
- Select the Competency collapsible window to open it.
Three tabs appear: Required, Enrolled and Achieved.
- Required lists the Competencies that are required through Competency Requirements(s).
If a Competency has been acquired the Date Completed and Expiry Dates are shown and the Status icon is a tick.
If it has not been completed, these dates are blank and the Status icon is red with a crossbar
- Enrolled lists Competencies linked to Catalogue Items the learner is or has enrolled in and their completion data.
- Achieved lists Competencies linked to Catalogue Items the learner has completed and their completion data.
View Competencies as a manager
Under specific circumstances a User can see the Competency Requirement status of their staff on their My Learning screen.
To enable this:
- The User must be established in the system as a direct manager of these staff through a Position to Position management relationship.
- The Smart Tile setting must be checked at global level for the tenant.
When these are set, a Competency Requirement tile appears at the bottom of the screen:
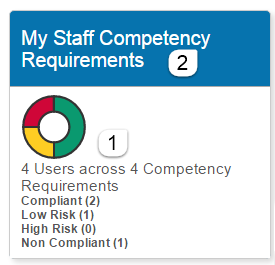
- Compliance data for all staff directly and indirectly reporting to the User is summarised on the tile.
- My Staff Competency Requirements is a link to the Manage Compliance with Competency screen where the data is displayed in detail.
Note: If you have set this up correctly and do not see the tile, contact Support for help.
Import competencies
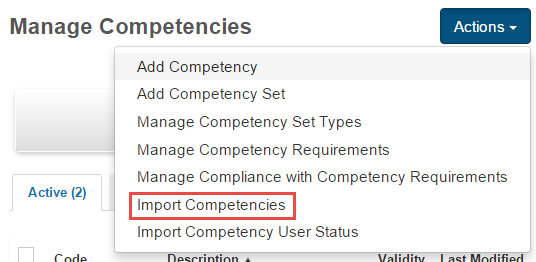
Rather than entering Competencies into the CLS system one at a time using Add a Competency, you can import a batch of Competencies using a spreadsheet.
To do this, select Manage Learning > Manage Competencies and select Import Competencies from the Actions dropdown.
- Download the default spreadsheet template, populate it with your data and save it on your local storage. Alternatively, create your own spreadsheet with the same columns as the template.
- The default template has a column labelled Linked Set Id. If you check the Add competency set requirement check box, a new Competency Set will be created for any values in that column in your spreadsheet that are not found in the CLS system.
- Select an email address where the import summary will be sent.
- Locate and select your spreadsheet from your local storage.
- Click Import and email result.

Import User Status
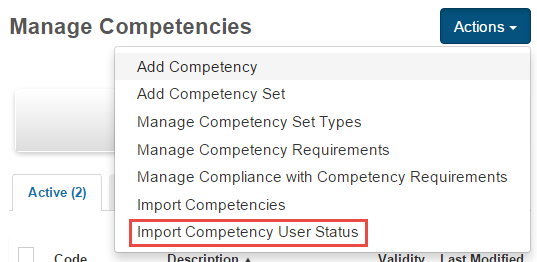
You may have information about when Users acquired certain Competencies and you wish to import it into the CLS system. This can be done using a spreadsheet.
To do so select Manage Learning > Manage Competenciesthen select Import Competency User Status from the Actions dropdown.
- Download the default spreadsheet template, populate it with your data and save it on your local storage. Alternatively, create your own spreadsheet out with the same columns as the template.
- Select an email address where the summary of import is sent.
- Search for and select your spreadsheet from your local storage.
- select Import and email result.
