Tags and Tag Types
Introduction
A Tag is a kind of linked keyword that has a number of uses in the CLS.

Broadly speaking, one or more Tags are linked to teaching and learning assets in the CLS and used by Learner Users and administrators as part of viewing, searching for and reporting on these assets. Tags also have a specialised role in Continuing Professional Development (CPD).
Tags can also be organised by membership of Tag Types. When a Tag is a member of a Tag Type this is shown as:
Tag – Tag Type.
Thus, in this example, the Tag Grammar has a Tag Type of English:

Tags can be created before being attached to something or they can be created when they are needed and attached on the spot.
Tags can be attached to:
- Catalogue Items
- Courses
- Modules
- Providers
- Questions
- Resources
- Tests
The uses of Tags in the CLS are:
- Categorising and finding related items:
Once learning materials have been linked to Tags (and optionally, Tag Types), items can be located via the Tag/Tag Type at Manage Tags/Manage Tag Types.

- Reporting:
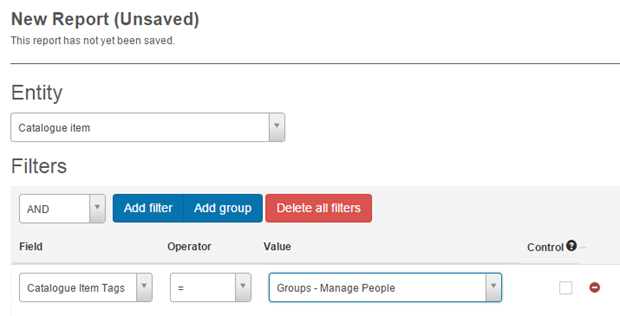
Customisable Reports includes an option where Tags can be reported on. One option is to use Tags to filter the data reported, e.g. only report on Catalogue Items or Questions with certain linked Tag(s) or Tag Type(s). See Customisable Reports for details.
- Categorising learning assets in Browse Learning:
The settings in Settings > Browse Learning Settings can be used in conjunction with Tags and Tag Types to control the layout and search functionality offered the User.

- Customising Browse Learning for a learner:
Using Catalogue Access Settings, Catalogue Items can be made available to or hidden from Users by means of Tags.

- CPD (Continuing Professional Development):
In CPD a User needs to complete a set number of Points associated with a topic. Users choose Catalogue items linked to those topics and hence accumulate their points. The purpose of Tags in CPD is to put names to the CPD Points, see Continuing Professional Development for details.
Tag Management can be accessed from both the Design section and the Manage Learning sections of the CLS. Both lead to the same Tag functionality. In these examples we will go via Manage Learning.
To manage Tags select Manage Learning > Manage Tags.

Manage and Inspect Tag Types
Tags can be grouped by Tag Type. For example, Tags such ‘Spelling’, ‘Punctuation’, ‘Grammar’, etc could be collected together and accessed via a Tag Type of ‘English’. In the example below, the Tag ‘Grammar’ has a Tag Type of ‘English:
NOTE: Although the system will permit you to create Tags without assigning them to a Tag Type, it is recommended to always assign your Tags to Tag Types. This will give you greater flexibility in certain circumstances. An example of this is you can only show Tags on the Browse Learning tile if they are linked to Tag Types.

The CLS allows administrators to inspect Tag Types and check the items they are attached to. To manage Tag Types select Manage Learning > Manage Tags and click Manage Tag Types.

The Manage Tag Types screen shows a list of all the Tag Types.
- Individual Tag Types can be located in the list or by clicking Search for Tag Types to search within it.
- The list can be ordered by Name or Update date by clicking on the heading. A black triangle indicates which of these currently determines the ordering.
- The information for each Tag Type includes the numbers of Tags with this Tag Type.
Each one is also a link to a list of those Tags, in the same format as the Manage Tags screen. Thus, it is possible to ultimately inspect and/or edit details of and enrolments in all the learning material in the CLS with this Tag Type.
- Click Add Tag Type to add a new Tag Type

Inspect a Tag Type
To inspect a Tag Type select Manage Learning > Manage Tags and click Manage Tag Types. Click the name of the Tag you want to inspect.
The inspection screen shows:
- The name of the Tag Type
- The number of Tags with this Tag Type. This is also a link to a list of those Tags
- Click the arrow to the left to see the Applicable Documents (see Adding Tag Types for details)
- Click Edit Tag Type to edit this Tag Type

Add Tags
To add a Tag select Manage Learning > Manage Tags and then click Add Tag.

To create a new Tag:
- Enter the Tag Name
- Click and select an existing Tag Type if desired
- Enter a number in Sort Order. This number will be compared in relations to adjacent items.
- Enter a Description
- Select an image to set as a thumbnail if desired.
- The Tag is active by default. Check the Inactive box to reverse this if desired.
- Click Save Tag.

Edit Tags
To edit a Tag select Manage Learning > Manage Tags and click the name of the Tag you want to edit. From the inspection screen click Edit Tag

You can edit all the fields in the subsequent, see Adding Tags for details of the fields.
Import Tags
Select Manage Learning > Manage Tags and then click Import Tags.

- Click Select File to browse your local storage for the required CSV file.
- Alternatively modify the sample Excel template by clicking on Template, populating the spreadsheet with data, saving, and selecting it from your local storage.
Click Upload.

Sample Template:

Manage and Inspect Tags
The CLS allows administrators to inspect Tags and check the items they are attached to. To inspect Tags select Manage Learning > Manage Tags.
- The Tags screen is divided into Active and Inactive (Archived) Tags. Click the tab to see the members of that kind of Tag.
- Individual Tags can be located in the list or by clicking Search for Tags to search within it.
- The list can be ordered by Name or Update date by clicking on the heading. A black triangle indicates which of these currently determines the ordering.
- The information for each Tag includes the numbers of items in each relevant category in the CLS that have this Tag attached.
Each one is also a link to a list of the members of this category of items, thus making it possible to ultimately inspect and/or edit details of and enrolments in the members of this category.

Add Tag Types
Select Manage Learning > Manage Tags > Manage Tag Types.
- Select Add Tag Type.

- Enter a name.
- Optionally, enter a Description.
-
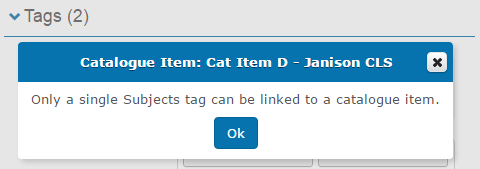
Optionally, select One tag link only per entity. If enabled, only one tag from this tag type can be linked to an entity (e.g. catalogue item). If an attempt to add more than one tag is made, a popup will be displayed.
- Select an image. This file will only display in specialised situations and is generally not required.
- To add tags to this tag type enter a tag.
- Select the
 icon.
icon.
Tags can be removed by selecting the
 icon and edited by selecting the
 icon.
icon.
- Select Save Tag Type.

Archive Tags
To archive a Tag select Manage Learning > Manage Tags.
Click the checkbox to the left to the Tag you want to archive and click Archive.
The Tag will be moved from the Active to the Inactive list.

Link Tags to Catalogue Items
Tags can then be linked to: Catalogue Items, Courses, Modules, Questions, Resources and Tests once they have been created
As an example, to link a Tag to a Catalogue Item, select Manage Learning > Manage Catalogue. Click the name of the Catalogue Item which takes you to its inspection screen.

Click the arrow to the left of Tags and then click the pencil to edit the Tags linked to this Catalogue Item.
- The box next to Link existing tag shows the Tags already linked to the Catalogue Item.
To link another existing Tag, click in the box and select Tag(s) from the drop-down list.
Remove a Tag by clicking the cross to its left.
To link new Tags that you create on the spot:
- Select a Tag Type from the drop-down box if desired
- Enter the name of the New Tag
- Click Link new Tag to save it. It will be added to the list of Existing Tags (1)

Display Tags on Tiles in Browse Learning
Tags can be displayed to Users on Catalogue Item tiles when they are self-enrolling from Browse Learning. For this to be possible the Tags must be linked to a Tag Type.

- To enable the tags to appear on the tiles Browse to Settings > Browse Learning Settings and open the Catalogue Appearance section.
- Under Side Filters select a Tag Type and an option to Show on Tile will be available.
- Check the box next to the Tag Types you would like to appear on your tiles.

Link Tags to a Course, Module, Question, Resource or Test
Tags are added to all these items in the same way. The first step is to go to the Management screen for that kind of item:
| Courses | Design > Courses |
| Modules | Design > Modules |
| Questions | Design > Questions |
| Resources | Design > Resources |
| Tests | Design > Tests and Surveys |
Click on the item name to inspect its details screen and then look at its Tag widget. If there is a number in brackets next to it, this tells you how many Tags are already linked.
As an example, select Design > Courses. Click the name of the Course to inspect its details screen.
- Click the Tag widget
The existing linked Tags will be displayed.
- A Tag can be deleted by clicking its minus icon

- Click Change to link new tags . The Add Tag window opens up:
Click and start typing in the Add Tag box. If your typed characters match parts of the names of Tags already in the CLS these options will pop up and you can select them. Otherwise keep typing to add a new Tag.

- Click the plus icon to link that Tag. This action will also close the window.
- Click Close to close this window if necessary
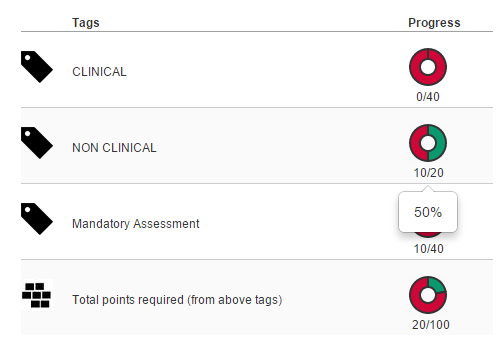
CPD Tags
Tags are essential for allocating Continuing Professional Development (CPD) points and must be created before the rest of the CPD setup. The purpose of Tags is to put names to the CPD Points.
Tags are linked to Catalogue Items related to specific CPD topics. A User needs to complete a set number of points associated with that topic, so they choose Catalogue items with the relevant Tags.
See Continuing Professional Development for details.