Learning Plans
Introduction
A Learning Plan is a kind of enhanced learning journal for an individual. Learning Plans are often established for a particular period of time and can be subject to administrator involvement.
The plan starts with an analysis of the knowledge and skills the learner needs in order to achieve career and personal goals. The most important components of the plan are a series of entries describing specific learning objectives and logging their achievement. These entries can optionally be linked to learning inside or outside the CLS. The plan also contains space for a number of personal comments and linked professional documents.
Thus, a Learning Plan is personal to the learner and contains:
- an introduction by the plan’s creator;
- a statement about the learner’s broad goals and direction;
- a number of Learning Plan Entries: sets of specific learning objectives and activities; and
- a journal made of a number of different kinds of comments.

Learning Plan Objectives
In Learning Plan Entries the learner details a number of specific objectives that they would like to accomplish. Each entry has a number of parts:
- a description of the learning objective.
- the action the learner will take to meet that objective.
- a date by which the learner would like to meet that objective.
- (possibly) the date on which the learner says that s/he has met that objective.
- (possibly) links to Catalogue Item(s) the learner will complete or has completed to help meet this objective.
- (possibly) links to external learning conducted outside the CLS.
- an indicator of the completeness of the entry.
Learning Plan Entries
Learning Plan Entries can be added or removed by the learner as desired, unless they have been made mandatory, see Default Learning Plan Entries. The creator of a Learning Plan can add entries and Tag Types to the plan in order to direct and guide learning. S/he can also add new entries to a plan within its duration in order to respond, for example, to a change in professional expectations.
When a learner completes a Catalogue Item this information can be linked back to the plan. If the learner undertakes learning or professional development outside the Janison CLS, they can get credit for that too using the Log external learning feature.
The comments journal serves three functions:
- a way for learners to record different kinds of comments, e.g. questions and answers, as part of their learning process.
- a place for learners to reflect on the learning they have undertaken and how effective it has been.
- a place for the learner to upload documents that are valuable artefacts for future job applications, professional development audits etc. These might include a CV, letters of reference, certificates and qualifications.
Note that:
- Learners complete a Learning Plan Entry when they enter its completion date. They can do this whenever they choose and regardless of how far they have progressed through any linked Catalogue Item(s).
- At this stage dated Learning Plans (as opposed to continuous plans) can be set to a completed status by learners whenever they choose. This can occur regardless of the dates set for the plan’s duration and of whether the Entries and/or linked Catalogue Items have all been completed.
Thus, the plan is very much a tool that can be shaped by the plan’s designer but whose execution is in the hands of learners. It could be used, for example, to more overtly steer learners through CPD or Competency frameworks or through a huge catalogue of potential learning. Its mandatory items can be updated on-the-fly in order to respond to changes in the learner’s professional environment.
In terms of the CLS, Learning Plans function in almost all respects like any other Learning Asset in the CLS. They can:
- be added to Catalogue Items.
- be enrolled in.
- be completed.
- be subject to enrolment rules and group enrolments.
Learners can have more than one plan at once, provided the Learning Asset is added to more than one Catalogue Item – you cannot have more than one enrolment in the same Catalogue Item at once.
Note that administrators can only delete a learner’s enrolment in a Learning Plan if all of the Comments have been deleted.
Setting up for a Learning Plan
In order for Learning Plans to function in the CLS there are a couple of dependencies that require enabling or configuration.
Required plugins
You will require the following plugins enabled:
- Plans.
- Other Learning (If you are using the Log external learning feature).
Note: Please contact your Janison support team or account manager for further information.
Learning Plan links to External Learning
To allow a learner to link the Other learning type to their plan it must be enabled within the learning asset
- Go to Manage Learning > Manage Learning Assets
- Search for and select the required Other Learning asset
- Click Edit Other Learning
- Check the Allow learner to link to learning plan entry box
- Click Save Other Learning

Additional information prior to setup
Before your users can have a learning plan, you need to do some set up work. Firstly, ask yourself some questions.
Do I want my users to link their learning plans to a particular set of professional standards or similar?
If so:
- The administrator:
- will need to set up a Tag for each standard and group them into one or more Tag Types.
- can connect one or more Tag Types to a plan.
- The learners:
- can link one or more of the Tags in these Tag Types to an individual entry.
This also filters the list of possible Catalogue Items that they can link to that entry.
- can link one or more of the Tags in these Tag Types to an individual entry.
Do I want to manage their learning in any way?
- Some organisations want learning grouped into learning areas or need to record which competency certain pieces of learning relate to.
- This is particularly relevant if your learners need to meet CPD requirements.
- If so, you need to set up CPD points and link them to Tags and Catalogue Items beforehand so that learners can log the points acquired.
Do I want my users to be able to record learning they have done outside the CLS against their learning plans?
If so, you will need to set up a learning asset of type Other Learning and link it to a Catalogue Item.
Important note: this catalogue item should only contain one learning asset of type Other Learning.
Create and Edit a Learning Plan
Note: Learning Plans don’t count as learning for the purposes of learning transcripts.
Steps to Creating learning plans
Step 1: Creating a learning plan
- Browse to Manage Learning > Manage Learning Assets
- Click Add Learning Asset
- Select New Plan
- Complete form details:
- Name of the learning plan
- Identifier this is auto-populated by the name
- Description of the plan
- Click Save Plan.
Note: Once you Save the plan in step 5 above you are presented with the plan details screen. In this screen you specify the plan’s settings in a number of separate categories. Click the chevron next to the category to view what has been specified; click the pencil to edit it and then click Save. These categories include:
Step 2: Introduction text
If you have a way you’d like learners to use learning plans, specific instructions or other information you’d like to convey to learners when they are creating their plans, include it here. The editor allows for rich text so you can link a video presentation or other media if you want to. Whatever you enter here will be presented to every learner at the top of their main learning plan screen.
Step 3: Plan Settings
If you want your learners to link Catalogue Items to the entries in their learning plans check this option. Your learners can then link particular Catalogue Item(s) to an entry and will be presented with a link taking them to that particular learning item. Once the learning is complete your learners will get an acknowledgement within the entry tile when they have completed it:
Note also that when you can edit this setting when a plan is already under way and remove the option to link to Catalogue Items; references to Catalogue Item(s) are then removed from existing plans.
Step 4: Completion Rules
There are three main options in this area:
Completion Rules (Entire Plan)
Here you determine how your learner can complete their entire learning plan and what happens next.
The options are:
- No Completion – the plan is continuous. The learner cannot change the plan’s status indicator from In Progress.
- Completion controlled by learner – the learner can complete the plan by changing its status.
Item Completion Rule (Items within the Plan)
Here you determine how your learner can complete the items within a learning plan.
The options are:
- User can complete – the user can complete the learning item
- Completion requires approval – the learner can complete the item but must be approved for final completion.
Additional Completion Options
Additional options related to plans that can be completed are:
- Enable Rollover – Rollover enables a learner to create a new plan from the current one with the option to carry forward incomplete items. Rollover will also complete the current plan.
- Can edit after completion – allows a learner to edit a plan once it has been completed.
Step 5: Start and End Date rules
This area allows administrators to set and configure Start and End dates for the plan if required. The following options will be used when learners are first enrolled into this plan.
There is one option available in this section which is Allow Start/End Date.
- When this is Not Selected the plan is labelled a continuous plan and there will be no start/end dates on the plan.
- When this is Selected then a number of options appear in the settings.
- Allow learners to control dates
- Start Date Rule – the options in this item are:
- Not Set
- Enrolment created date – the plan starts on the day the learner is enrolled in it.
- Day of current calendar year – the plan starts on a particular day of the current year (even if that day is in the past).
- Day of year from today – the plan starts on a particular date when it next occurs. For example, if today is 15th March 2018 and you select 1 May, the plan will start on 1 May 2018. However, if you choose 1 March, the plan won’t start until 1 March 2019.
- End Date Rule
- Not Set – there is no end date to the plan
- Number of days after a start date – specify a numerical value in days, weeks or months after the user has started.
Step 6: Plan Entry Tag Types
If specified, learners can link one or more tags to a plan entry. The list of tags for selection are filtered by the tag type selections specified in this area.
The Tags in the Tag Type(s) that you choose will appear to the learners as options when they create or edit learning plan entries.
Step 7: External Learning
This is for learners to record learning that happens outside the CLS.
When you click in the Link catalogue item box, a list of Catalogue Items that contain only one “Other Learning” asset will appear. Choose the ones that you would like the users to use when recording their external learning.
If you can’t see your Other Learning item here, check the following:
- Is it actually in a Catalogue Item, not just a Learning Asset?
- Did you check Allow learner to link to learning plan entry in the Other Learning set-up? If you didn’t, it won’t be visible to you.
- Is there another Learning Asset in the same Catalogue Item as the Other Learning asset? If so, it won’t be visible to you here. The Other Learning asset needs to be the only asset in the Catalogue Item for it to be used this way.
Step 8: Default entries
A learning plan is designed ultimately for the learner. However, you can add default entries to a plan for all users to complete.
Note: These default entries can be made mandatory if required
Steps to creating a default entry
- Go to Manage Learning > Manage Learning Assets
- Search for and select the required plan
- Scroll to and expand the Default Entries section
- Click the + Add Default Entry
A popup box is presented - Complete the form details:
- Learning Objectives – what is the specific objective of this entry? E.g. to improve my knowledge of leadership principles.
- Default Behaviour:
- Pre-populated – this is the default and is not mandatory
- Mandatory – can be made a mandatory item
- Planned Activities – What actions will you take to achieve this objective? E.g. attend a conference
- Catalogue Items – Select catalogue item(s) to help meet this objective
- Click
Save
Note: To add more than one default entry repeat the steps above.
Editing and deleting Default Learning Plan Entries
Once you have created a default entry there are options to either edit or delete the entry.
- Go to Manage Learning > Manage Learning Assets
- Search for and select the required plan
- Scroll to and expand the Default Entries section
- Click the Edit pencil on the entry you want to edit
- Once in edit mode you can:
- Change details within the entry and click Save or
- Click Delete to remove the entry

Sorting learning plan entries
Learning plan entries are sorted automatically using these three rules
- Items with a completed date are put to the end of the list; then
- Items with a planned completed date are put in order by that date ascending; then
- Items are sorted by Learning Objective in alphabetical order.
If you would like to put entries in a certain order for a learner to follow, give them objective names in alphabetical order. The easiest way to do this is to put a number (1, 2 etc.) as the first part of the objective text.
Learner Experience
Learning Plans offer a versatile and intuitive way to plan and record learning.
- They can start from a blank learning plan or use a template that has been provided (from a rollover or a default entry).
- They can have more than one learning plan running concurrently.
- They can choose and link courses from the CLS to help meet learning goals or undertake learning outside the CLS and record it against their plan manually.
- Remember, they can enrol in more than one Learning Plan from the catalogue, they just can’t enrol in the same plan a second time until they have completed the first enrolment or rolled it over.
Starting a new plan
Accessing a Learning Plans operates like the access to any other Catalogue Item in the CLS. The learner must be enrolled to access the content. When they open a new Learning Plan they see:
- The name of the plan.
- Completion status indicator
- Plan dates if applicable, otherwise the text continuous plan is displayed
- The status widget
Note that if the plan is continuous and does not have an end date then the status widget cannot be changed. - The introduction text as written by the plan’s creator.
- Text field to enter the overall goals of the plan.
- Dates, if applicable.
- A tile for Learning Plan Entry creation and any default plan entries
- A comments section that opens when the chevron is clicked.

Populating the plan
When the learner launches and accesses the plan they can:
Add Overall Goals
This is a free text field for them to outline, at a high level, what their goals and direction are for this plan.
- Click in the Overall Goals text field
- Add goals as required
- Click the tick to the right of the entry to save goals.

Note: To edit the goals click the edit pencil.
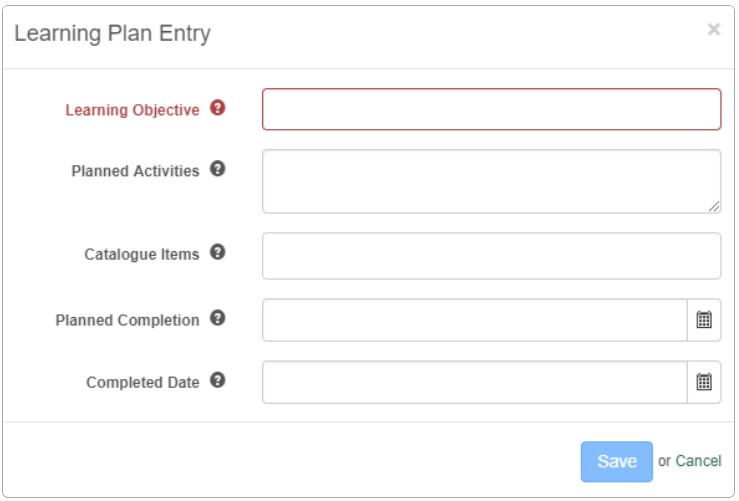
Add Learning Plan Entries
These are the specific learning objectives that they have for this plan.
- Click the + Add Learning Plan Entry
A popup box is presented - Complete the Learning Plan Entry form
- Learning Objectives
- Planned Activities
- Catalogue Items
- Planned Completion
- Completed Date
- Click
Save
 Notes:
- If they would like to edit existing entries, use the pencil icon on the top right of the tile.
- If they would like to delete an entry, click the pencil in the top right to edit then select Delete in the bottom left. If Delete is missing, it has been disabled by the administrator.
Log External Learning
When this feature has been enabled there is an additional link on all Learning Plan entries called Log External Learning.
- Click on Log External Learning
- Click the presented option
A popup window is presented - Complete the External Learning form:
- Plan Entry – a drop menu where you can select the plan entry to log external learning against
- The validation field – this will depend on options in the configuration
- Learner Submission Notes
- Click
Save
If the administrator has implemented Points for the external learning they will see some extra fields in this screen: the categories of points that are involved with CPD Plans.
They enter the number of points they earned from this learning into the relevant category or categories.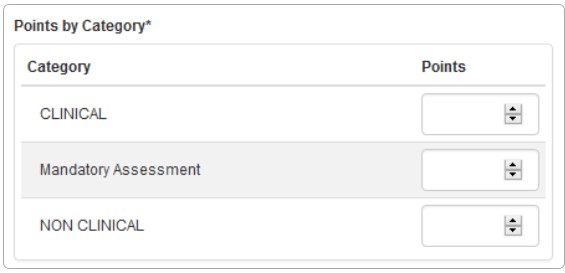
Make Comments
This is a journal that is specific to this plan. Only they can see what they write in this journal. They can use it for any purpose desired, including:
- Add a new message
The learner can Add a new message including reflections, questions and answers on any learning they’ve undertaken, They can also include file attachments in this area. - Add a comment
The learner can add a comment to an existing message.

Completing their plan
When the learner deems that they have completed all requirements of the plan they can elect to complete or rollover the plan.
- Go to the Learning Plan
- Click the In Progress widget
- Select either:
- Complete – this will complete the plan but not any entries associated with the plan
- Rollover – this will complete the plan and create a new plan. The new plan will automatically contain any incomplete plan entries.
