Manage Catalogue
Introduction
The CLS supports a number of learning assets including courses, tests, discussion forums, and face to face events. A learner does not enrol in these directly, but instead enrols in a Catalogue Item that is linked to the learning asset.
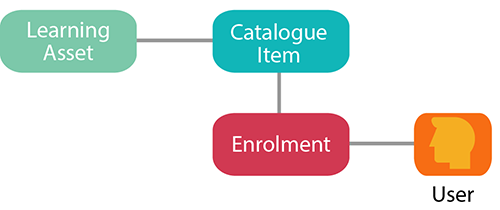
A catalogue item is the container for learning assets and has many settings and features. The features available within a catalogue item depend on the plugins enabled on your site. For example you will not see the competencies section if you do not have the competency plugin active. There are also settings available which provide options to change the way catalogue items display and function. See the document on catalogue item settings for further information.
If a catalogue item contains only one linked learning asset, it is referred to as a catalogue item. If the catalogue item contains more than one learning asset it becomes known as a Program.

The icon in the Type column of the catalogue manager represents the type of learning asset linked to the catalogue item. Hovering over the icon will generate a pop-up with the learning asset type, e.g. Janison Course.

The icon changes when more than one asset is added .
.

Catalogue management can be reached by browsing to Manage Learning > Manage Catalogue.

Add Catalogue Item
Browse to Manage Learning > Manage Catalogue
- Select Add Catalogue Item.
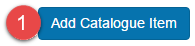
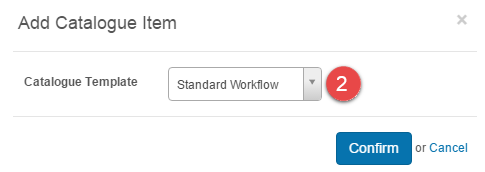
The Add Catalogue Item popup will be displayed.
- Select a Catalogue Template. Read more about catalogue item templates.
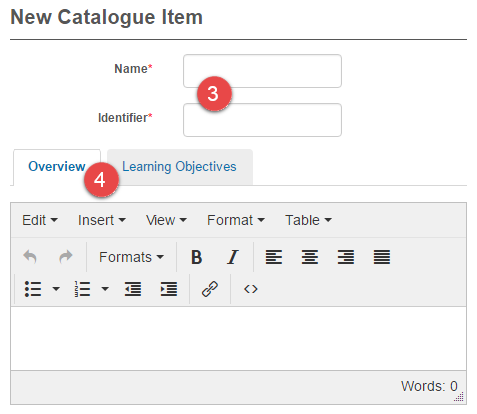
- Enter a Name and Identifier.
- Optionally, enter an Overview and the Learning Objectives. These fields will appear on the browse learning tile and the information page when the catalogue item is launched.
Basic settings is covered in detail below.
- Select a Component using the
 icon.
icon.
Select Save Catalogue Item.

Basic settings
The settings in this section are optional. When populated, some setting information will appear the information page when the catalogue item is launched. Some information will appear on my learning transcript. Read more about my learning transcript.
- Select Change to access the Add Catalogue Item popup where a different template can be selected.
- Select a Provider Providers can be created in Settings > Providers.
- Enter a non-system Author or select a system Author.
- Enter an Accreditation Number recognised by your institution.
- Enter a time the learning should take to complete in Approx Duration.
- Select a Primary Contact.
- Select a date when the catalogue item will automatically move to a status of archived.
- Enter the cost of the learning. This setting works in conjunction with other payment settings. Read more about payment settings.
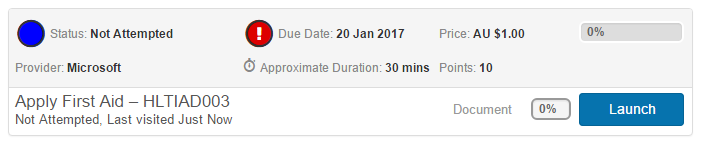
- This will indicate how long learners have to complete the catalogue items after enrolment. When re-enrolling into a completed catalogue item, the due date for the new enrolment will be set to the expiry date of the previous enrolment if their most recent completion expiry date is greater than the new enrolment due date. Once enrolled, learners will see the due date on the catalogue item tile on the my learning page.
- Points relate to continuing professional development. Read more about continuing professional development.
- If activated this setting will link a certificate to the catalogue item which will learners will be assigned on completion. Read more about certificates.
- This will generally be left unselected, a selection will only be made in special circumstances. Read more about program templates.

Add Learning Wizard
Catalogue items can be added using a wizard. You can find out more about this feature in our document on add learning wizard.
Catalogue Item Components
Learning assets are added to catalogue items in this section. Functionality is available to be optionally set here.
- Learning assets are added to the catalogue item using the
 icon.
icon. - Learning assets can be set as prerequisites for other learning assets so that a learner must complete one item before consequent items can be accessed. Read about prerequisites within catalogue items.
- The Weight is the relative importance of the component.
- The most common use is to set a higher weighting for items that will be more time consuming to complete.
- Weight can be used to make a component optional. If the Weight = 0 then the component does not need to be completed for the catalogue item to be completed.
- Weight can be used to make one test worth more than another test.
- Share Progress applies to learning assets that exist in more than one catalogue item. The option needs to be checked in each catalogue item to function. The result is that the learning asset completed by a learner in catalogue item one will be automatically set to complete in catalogue item two.
- Select the
 icon to remove a component and the
  icon to reorder the components.

Catalogue Component Grouping
Component Grouping provides a way to organise learning assets in a catalogue items into groups.
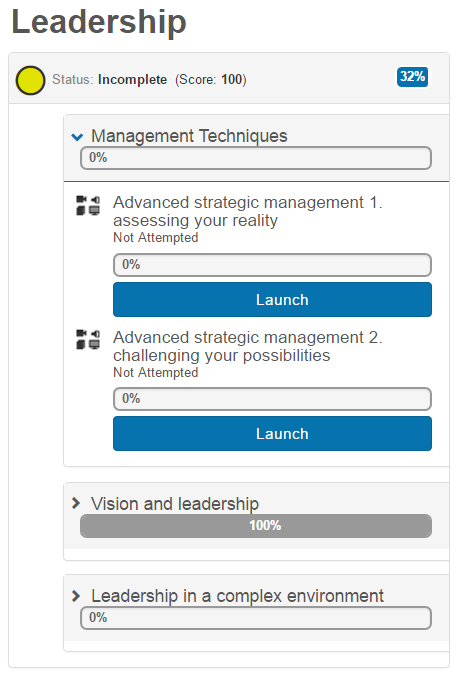
In the example below there are three groups of learning assets:
- Management Techniques.
- Vision and leadership.
- Leadership in a complex environment.
Learners expand these sections to view and launch the learning assets.
Enable Component Grouping
The option to group components is not available unless activated. Browse to Settings > Catalogue Item Settings.
- Open Authoring Settings.
- Check the option Enable Component Grouping.

Select Save Settings.
Grouping components
Open the catalogue item in edit mode.
- In the Components section, select Group (Level 1)
- Select the
 icon.
icon.

It will add a group to the components.
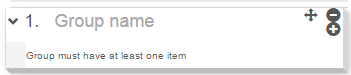
- Enter a Group name.
- Add learning assets to the group by selecting them from the dropdown and then selecting the icon.
They will appear below the group name.

In this example, three groups have added, each containing two learning assets.

You can re-order the groups using the icon and remove groups using the
 icon.
icon.
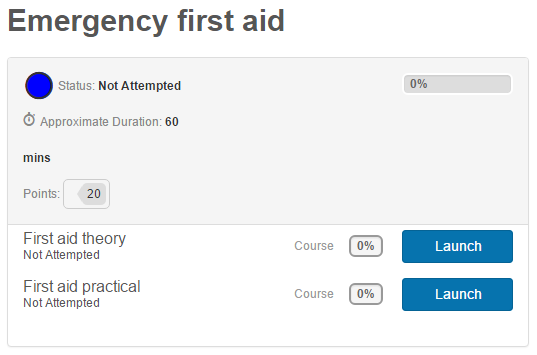
Learner Experience of the Catalogue Item
Learners will view the catalogue item as below with access to launch the assets from the Launch buttons.

Setting the Component Groups as nested items
Components groups can be nested within other components groups. There are two methods:
- Select the icon next to the group that you want to nest and drag it onto the name of the group where it should be nested.
- Select the
 icon next to a group to create a new, empty nested group within it.
In the example below, the group Management Techniques has been dragged in to the parent group, Vision and leadership and Leadership in a complex environment has been dragged into Management Techniques.
They will be presented to learners as nested items, as shown below.

Component Equivalency Groups
This feature provides functionality to specify a number of learning assets within the group that need to be completed. In the example below there are three learning assets in the group but a learner only has to complete one to meet the completion requirements.

Enabling equivalency groups
The ability to add Component Equivalency Groups will only become available in the catalogue item if the setting is enabled. Browse to Settings > Catalogue Item Settings.
- Under Authoring Settings, Select Enable Component Equivalency Groups.
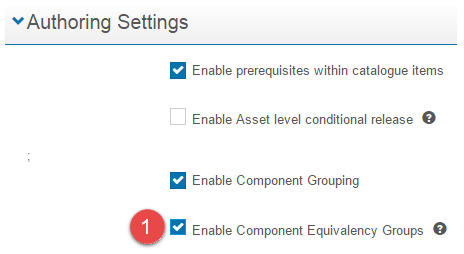
- Select Save Settings.

Adding equivalency groups to the catalogue Item.
Open the catalogue item in edit mode.
- Select Equivalency Group.
- Select
 .
.

An equivalency group will be displayed.
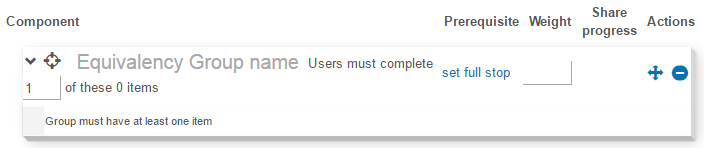
- Enter the Equivalency Group name.
- Select Learning Assets from the drop down and select .
- Specify the number of components that are required to be completed.

- Select Save Catalogue Item.

When a learner opens the catalogue item, a notification with the number of components they need to complete will be displayed.
Multiple equivalency groups can be added to a single catalogue item, alongside other components. In the below example two equivalency groups have been added.

Prerequisites and equivalency groups
Prerequisites can be set between the equivalency groups. See the document on prerequisites within programs for further information.
In the below example Leadership 101 has been set as a prerequisite for Leadership 102, therefore the Launch buttons for Leadership 102 will stay inactive until the required components in Leadership 101 have been completed. An inactive launch button will have a lighter background colour.

Equivalency groups and catalogue component grouping
Equivalency groups can be added within Catalogue Component Groups. See the document on Catalogue Component Grouping for further information.
The opposite is not possible, Catalogue Component Groups cannot be added inside Equivalency Groups.

It will be presented to learners as below.

Some additional points about equivalency groups
- Resource Sets cannot be added to Equivalency Groups.
- Weight is set for an Equivalency Group not for each asset inside the group.
- The same asset can be added within different equivalency groups within a catalogue item but they will have only one progress record. The exception is for surveys.
Inspect Catalogue Item Details
Inspecting a Catalogue Item gives you access to view information about it and allows you to edit some sections. The screen also offers the opportunity to edit more details about the Catalogue Item by selecting Edit Catalogue Item from the Actions drop-down menu, see Edit Catalogue Item.

To inspect a Catalogue Item select Manage Learning > Manage Catalogue and select the required Catalogue Item.
Data about enrolled Users is displayed:

- Enrolled Users in the Catalogue Item
- Users who have Not Attempted the Catalogue Item
- Users who have not completed the Catalogue Item (Incomplete)
- Users who have Completed the Catalogue Item
Each piece of data is a link to the Enrolments section of the CLS where the appropriate selection of Enrolments in the Catalogue Item will be listed. If required these enrolments can be modified.
Instalaunch link
The Instalaunch link is a link that can be copied and sent to learners via email or other means. When the learner clicks the link they will be taken to the login screen of the site. Once they have logged in they will be directed to the Catalogue Item and enrolled automatically.

NOTE: There are two requirements to make the Instalaunch link available to learners:
- The learner must have an account in the system.
- The Default Enrolment Method in Self Enrolment Settings must be set to Self-enrolment (Free) or one of the No Approval options. If these enrolment methods are not set the link will not appear on the Catalogue Item.
Setting the Catalogue Status from within a Catalogue Item
The Catalogue Status controls enrolment access to the Catalogue Item.

Make Private removes the item from Browse Learning. Although it will not be possible for learners to find the Catalogue item. They can still be enrolled in it, for example manually by an administrator or via an enrolment rule.
Make Public adds the item to the catalogue. Learners will see the Catalogue Item in Browse Learning.
Archive will remove the Catalogue Item from Browse Learning as well as restrict any further enrolments.
Link to learning Asset
The Learning Asset linked to this Catalogue Item is listed in this screen. The name of the asset is a link to the asset.

Metadata
This section provides information on workflow approval, the ability to add tags and gives you access to custom pages.

Information to support workflow approval
This feature can be used to gather information about a catalogue item so that when an approver views the catalogue item they can use this as criterion for approval. For example, a catalogue item developer may be required to check a box to confirm that they have permission to use the content in their catalogue item.


This section is only displayed if a catalogue item template is used which has a custom attribute set selected in the custom attributes section.

You can find out more about this feature in our document on catalogue item templates.
Tags
The main purpose for tagging catalogue items is to categorise them and make them searchable, especially in browse learning.
Browse learning is a page available to learners where they can browse the learning assets available to them. By default the learning assets are listed on the page without any categorisation. See the documents on Browse Learning and Tags and Tag Types for further information on these topics.
Tags can be controlled in many ways in catalogue item templates. For example you can set tags that the catalogue item will be automatically tagged with, mandatory tags and tag restrictions. You can read more about this topic in our document on catalogue item templates.

Select the icon to edit and link new tags.
- Start to type the tag name to link to existing tags to the catalogue item. Multiple tags can be added.
Steps 2-4 are optional and only required if new tags are required. - Select a Tag type.
- Enter a New Tag.
- Select Link New Tag.
- Select Done.

Below is an example of how the tags selected above can be used when the tag type is added as a top filter on the browse learning screen. See the document on Browse Learning for further information on how to set the filters up.

Tags can also be assigned to existing catalogue items in bulk. You can find out more about this feature in our document on Import Catalogue Item Tags.
Other information
Custom pages can be set here by using a custom attribute type of custom views. These pages can be used to gather information.
You can find out more about this feature in our document on custom views.
Catalogue Item – Point Allocation
Points are numeric values used to set and achieve Continuing Professional Development (CPD) requirements. This is explained in detail in the document on Continuing Professional Development.

Catalogue Item – Competencies
Competency can be defined as the ability of an individual to do their job properly. Competencies and competency sets can be linked to catalogue items so that they are achieved on completion of the catalogue item. See the document on competencies for further information.

To add or edit competencies you will need to edit the Catalogue Item.
Prerequisites Between Catalogue Items
Prerequisites between catalogue items prevent learners from accessing catalogue items until they have completed other specified catalogue items. They are managed using prerequisite groups. A learner must complete at least one Item from one or more groups before they can enrol in the catalogue item.
In the diagram below a learner must complete one catalogue item from group 1 and one item from group 2 before they can access Catalogue item F.

Prerequisite are set within a catalogue item in the prerequisites section.
Browse to Manage Learning > Manage Catalogue and open the required catalogue item.
- Select the
 icon.
icon.
A blank group will be displayed.

- Select inside Group 1. A list of catalogue items will be displayed. If the list is long, type the first letters of the catalogue item to navigate to the required one quickly. Add one or more catalogue items.
Note that steps 3 and 4 are optional. - Select Add a prerequisite group.
A second group will be added, Group 2. - Add one or more catalogue items.
Repeat steps 3 and 4 as many time as required. - Select Save.

Learner experience
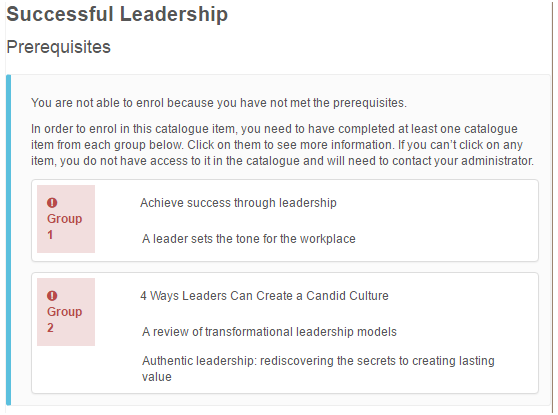
If a learner has not completed the relevant prerequisites for a catalogue item, they will not be permitted to enrol. When they attempt to self-enrol, they will encounter the below screen. The items in the groups are links to allow easy access to the prerequisite items.
Bypassing Catalogue Item prerequisites
Catalogue item prerequisites only apply when a learner self-enrols. When administrators enrol learners into a catalogue items directly, this bypasses the prerequisite requirements. The following methods also bypass the prerequisites requirements, as they directly enrol the user in the catalogue item:
- Assign learning
- Enrolment rules
- Enrolment imports
Prerequisites Within Catalogue Items
Prerequisites within catalogue items prevent learners from accessing learning assets within a single catalogue item, until they have completed other specified learning assets.
In the diagram below, a learner must complete component 1 before they can access component 2.

A setting must be activated before this feature can be used.
Enable prerequisites within catalogue items
Browse to Settings > Catalogue Item Settings.
- In Authoring Settings, select Enable prerequisites within catalogue items.

- Select Save Settings.

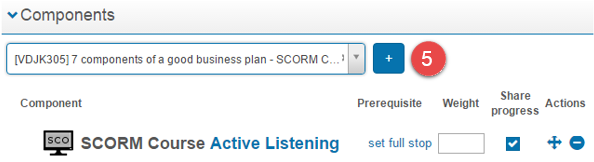
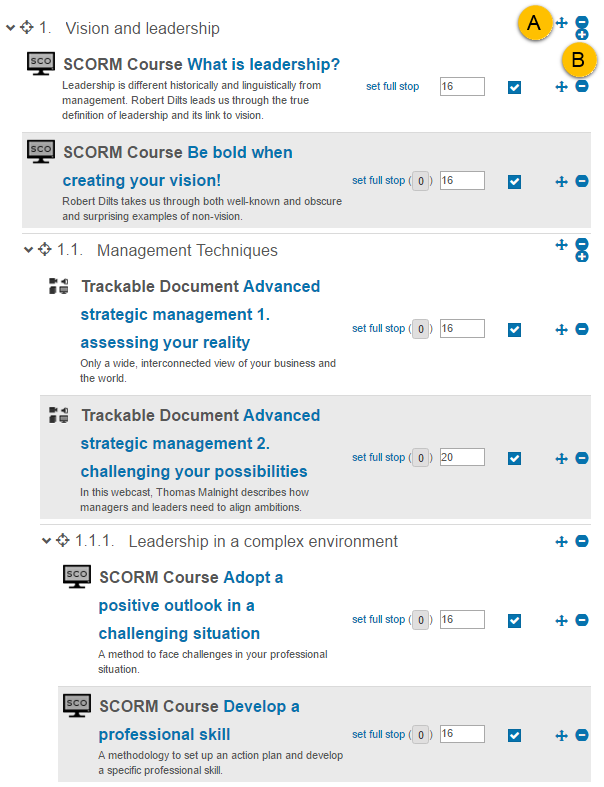
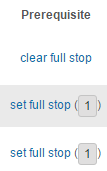
Prerequisites are controlled using the set full stop and clear full stop links in the components section of the catalogue item.
- Set full stop means “set a prerequisite for this component“.
- Clear full stop means ‘remove the prerequisite from this component’.
Browse to Manage Learning > Manage Catalogue and open the required catalogue item in edit mode.
- On the component you would like to set as a prerequisite, select set full stop. The text will change to clear full stop.
A number in brackets appears on the component below. This means that the component, in this case Break down the project, is now the prerequisite for the component below, in this case Assigning roles in the project. Break down the project must be completed before Assigning roles in the project can be accessed.
The next steps, 2 and 3 are optional. - Select the number to view the prerequisite. The prerequisite can be removed by unchecking the box .
- On the next component select set full stop. The text will change to clear full stop.
Repeat steps 2 and 3 as required.
To remove a prerequisite select clear full stop.

- Select Save Catalogue Item.

Note that the order of a component in the list is important: you can only set a component as a prerequisite to another component if it comes before that component in the list. Thus, the first component has no number in brackets because it can’t have a prerequisite component.
When you subsequently edit a Program and view its previously created prerequisites, all the links will reset to set full stop however the list of prerequisites that you set for each component remains the same as before.
Learner experience
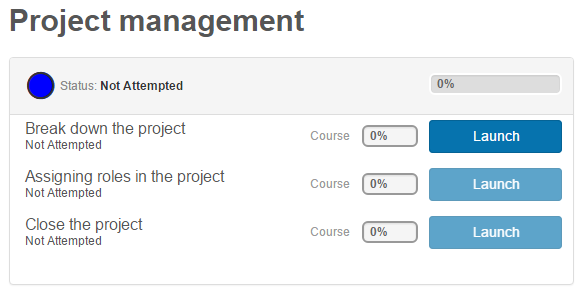
In this example, Break down the project is set as a prerequisite for Assigning roles in the project. The launch button for Break down the project is active but the launch button for Assigning roles in the project is inactive.
Active buttons are a dark shade and inactive buttons are a light shade.
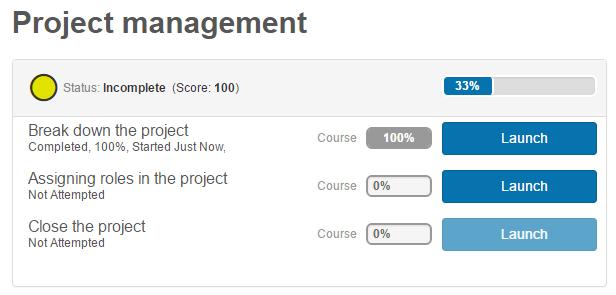
In the same catalogue item below, the learner has now completed Break down the project.
Assigning roles in the project is set as a prerequisite for Close the project. The launch button for Assigning roles in the project is now active while the launch button for Close the project will remain inactive until Assigning roles in the project is completed.
Catalogue Item – Thumbnails
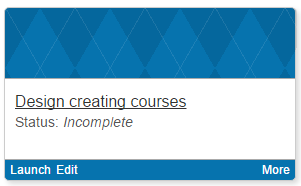
Large Thumbnail URL allows you to add an image to the Catalogue Item tile.

The Catalogue Item tile is displayed below does not have a thumbnail.
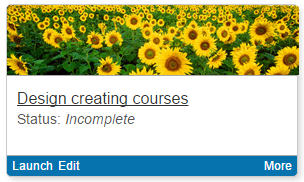
A thumbnail has been added to the Catalogue Item tile below.
Catalogue Item – Extended Information
The section will appear if a custom attribute is created and a Linked Object of type Catalogue Item is selected. See the document on Custom Attributes for further information. An example of a use of this is for an external course ID where the Janison Catalogue Item needs a second identifier to marry it to another system.

Catalogue Item – Self-Enrolment Settings
These section controls the way learners enrol in a catalogue item.

Enrolment Method
This will determine whether learners can automatically enrol or if they need to go through a workflow or payment gateway. See the documents on self-enrolment settings and payment settings – catalogue item configurations for details about the available options.

Enrolment Question Set
This drop-down can be used to select preconfigured questions which will be displayed to learners during the enrolment process. Their purpose is to collect information from users. See the document on custom attributes and self enrolment questions for details on how to create the questions.

The questions will be presented to the learner during enrolment.

Re-enrolment option
These options can be set to restrict re-enrolments

Never allow re-enrolment – Users will never be able to self-enrol a second time for this item. Note that administrators are not bound by this rule, and they can re-enrol users at any time.
Allow re-enrolment at any time – Users will be allowed to self-enrol any time after completing an enrolment.
Allow re-enrolment after a specified period – Users will be allowed to self-enrol a specified period after completing the preceding enrolment. Under this setting, users must still complete any earlier enrolments prior to enrolling again.
To set a time enter a number and select a unit of time from the drop-down box:

Additional Enrolment Settings

Notifications
If checked this setting will trigger an email notification to managers when learners self-enrol. The Message Template used for this notification is Enrolment-ManagerConfirmation.

Expiry
You can set an expiry date if learners must re-do learning in order to keep their learning up to date.
- Use this option if learning never expires.
- Use this option if the learning expires after a number of days, weeks or months.
- Use this option if the learning expires on a particular day of the year.

Expiry dates can be reported on using the customisable reports feature. The learner will see the expiry date on the catalogue tile when they access their My Learning page.

They will also see the expiry date on My Learning Transcript.

Access Rules
Sometimes it can be important to restrict the amount of time that a learner has to access content after they complete it. It is therefore possible to restrict access to content after a specified time.

Enrolment in a Catalogue Item
There are a number of ways that User enrolment in a Catalogue Item can take place. See the linked documents below for further details on each method.
- Self Enrolment Settings – controls whether learners are allowed to enrol or request enrolment.
- Assign Learning is a wizard with the facility to enrol one or many users into the catalogue Item.
- Manage Catalogue – brings you to the Enrolments section with the Catalogue Item.
- Importing Enrolments from an Excel spreadsheet See Import Learning History.
- Creating and running User Enrolment Rules. You can select specific Users and automatically enrol them in specific Catalogue Items in Settings > User Enrolment Rules.
See Enrolments for more general information about managing enrolments once they have been created.
Edit Catalogue Item
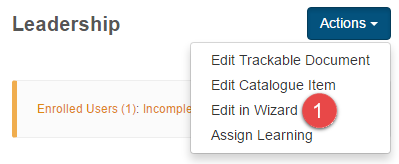
Some sections of catalogue items can be edited from the actions dropdown and other sections inline.
- If a section displays an
 icon, it can be edited inline.
 - Any other section can be edited by selecting Edit Catalogue Item or Edit in Wizard from the actions dropdown.

Edit Catalogue Item
Selecting Edit Catalogue Item will direct you to a similar screen as you would encounter when you create a catalogue item.
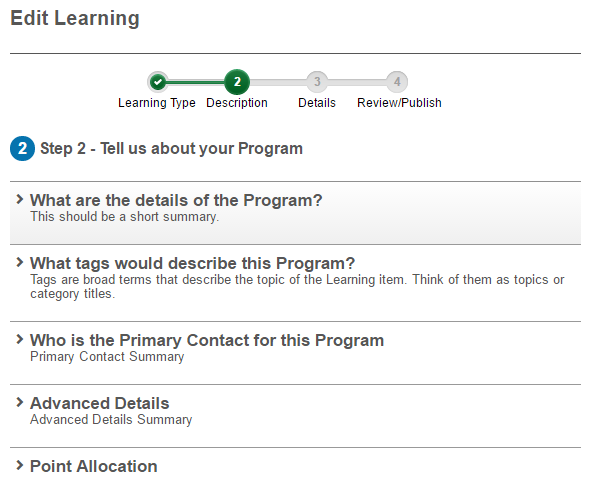
Edit in Wizard
Selecting the Edit in Wizard link will take you to step 2 of the add learning wizard. You can find out more about this feature in our document on add learning.
Copy and View Programs
Programs are catalogue items that have more than one linked component, that is, more than one linked learning asset.
Copy program
Programs can become quite complex structurally so the facility to copy them is available.
Browse to Manage Learning > Manage Catalogue and select a catalogue item you would like to copy.
- Select Copy Program.
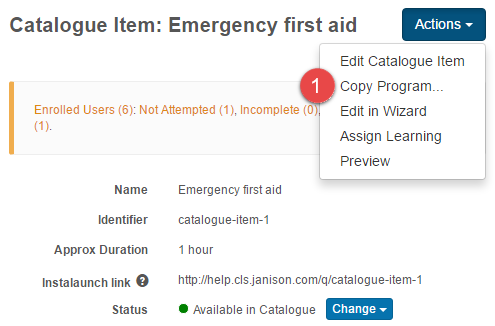
You will be directed to a New Catalogue Item screen with Copy appended to the original program name. You can optionally edit the details.

- Select Save Catalogue item.

Preview a program
You can preview a program as a learner would see it.
Select Preview from the Actions dropdown.

You will be taken to a separate window with the program displayed. The program will be fully functional so can be used for testing purposes.
Catalogue Manager
The catalogue manager provides access to manage catalogue items.
Browse to Manage Learning > Manage Catalogue.
Catalogue items are filtered into several tabs:
- Available in Catalogue – the catalogue item is public and searchable in the library. Setting a catalogue item to Make Public will make it available in catalogue.
- Not in Catalogue – The catalogue item is private and is not searchable in the library. Previously enrolled users will still have access to the item but new users cannot self enrol in the item. Users can be enrolled in the catalogue item by an authorised user. Setting a catalogue to Make Private will add it to this tab.
- Draft – A newly created catalogue item will be placed into a draft status.
- Archived – Archiving makes the catalogue item unsearchable and unavailable for enrolments.
- Pending Approval – This is a workflow status of pending endorsement on a catalogue item. You can find out more about this feature in our document on catalogue item workflows.
- Declined – This is also a workflow status which is detailed in the document on catalogue item workflows.
- All – Catalogue items of all statuses are listed under this filter.

Manage catalogue statuses in the catalogue manager
The statuses of catalogue items can be set in bulk or individually.
Set statuses in bulk
- Select one or more catalogue items in the left column. Selecting the top check box will select all catalogue items.
- Select one of the buttons at the bottom of the list.
The buttons will vary for each filtered tab.

Set the status on a single catalogue item.
If a catalogue item is opened, the status can be changed using the dropdown.

Details of the status change can be viewed by hovering over the icon.
icon.

Assign Learning
The assign learning wizard is a setup assistant that offers authorised users a series of dialog boxes to complete the steps required to enrol users in one or more catalogue items.
To run the asign learning wizard:
Browse to Manage Learning > Manage Catalogue and select the required catalogue item.
- Select Assign Learning.
This directs you to step 1 of the assign learning wizard. As you have been directed here from the catalogue item, the content has already been added and will appear in the Added Content section. You can find out more about this feature in our document on assign learning.

Import Catalogue Item Tags
Tags can be added to individual catalogue items at a catalogue item level. You can find out more about this feature in our document on Metadata. In the situation where you need to add tags in bulk, you can import them from the spreadsheet.
Browse to Manage Learning > Manage Catalogue.
- Select Import Catalogue Item Tags.

You will be directed to the Add Catalogue Items with Tags from spreadsheet screen.
- Download the Template and populate the required details. View the Supported Attributes tab for more details about the fields.
Note that if you do not have custom attributes, you will need to delete the Custom columns, or you will encounter an error when running the upload. - Select the check boxes to create new tag types and tags (optional).
- Enter an Email Address. The import log will be sent to this address.
- Select your Spreadsheet File.
- Select Import and email result.

You will be directed to a screen where feedback will be displayed.
If issues exist, an error message will be displayed.

If no issues exist, the following feedback will be displayed.

An email will then be sent with further feedback about the import.

Consequent Enrolment Changes
This feature enables an administrator to designate specific catalogue items for consequent enrolment changes. These either create or expire enrolments, once a learner completes an enrolment in the catalogue item.
To activate this feature, a setting in the catalogue item template needs to be turned on. You can find general information on catalogue item templates here.
1. Open the template and expand the Optional Inclusions section.
2. Select Consequent Enrolment Changes.
3. Select Update.

This will activate a section, Consequent Enrolment Changes, in catalogue items using that template.
Two options are available to control enrolment changes.
- Once a learner completes this catalogue item, it will automatically enrol them in the catalogue item or items selected here. The enrolment that is created is not automatically completed. In the case of accreditations, the completion is automatically triggered.
- Once a leaner completes this catalogue item, it will automatically expire the catalogue item or items selected here.
