Locations
Introduction
A Location is a physical place. At this place there may be one or more Venues. Thus, one Location can be linked to multiple Venues.

In the CLS face to face training is provided through Sessions. In most circumstances, Sessions are assigned a Venue and this Venue is linked to a Location, see Add Session for details. In order to provide maps and location instructions to Session attendees, the Venue must be linked to a Location that has been defined with a physical address.
There are a number of ways to set up Venues and Locations:
- Create a Venue and create or edit its Location on the same screen.
- Create a Location, then create a Venue and link it to the Location.
- Use the QuickAdd Venue feature when you are creating a Session. You can also create a Location at the same screen if required.
Manage Locations
To manage Locations navigate to Settings>Locations

There are two tabs: Active and Inactive. Click the tab to view the members of that list.

Archive a Location
You can change a Location from active to inactive and vice versa. Select Settings > Locations and find the Location name in either the Inactive or Inactive list.
In the list of active Locations click the check box at the left of the Location and click Archive. This makes the Location inactive and moves it to the Inactive list.
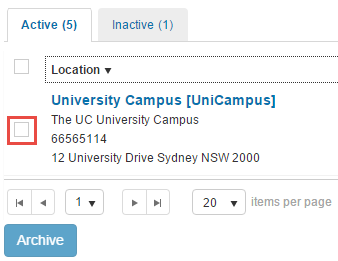
Conversely, in the list of inactive Locations click the check box at the left of the Location and click Unarchive. This moves it to the active list.
An inactive Location cannot be linked to a Venue.
Note that if you make a Location inactive and it is linked to a Venue, it remains linked to the Venue but is marked as inactive in the Venue’s edit form. The Venue remains in the system and available for allocation to a Session.

Add Location
To create a Location select Settings > Locations > Add Location.

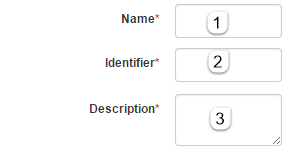
The first three fields must be filled in.
- Enter its Name
- Enter the Identifier
- Enter the Description
This address details are essential if you want map and location details to be available for a Session with a Venue at this Location.
- Enter the address details and other details as required.
- Click Save Location.

Inspect Details
To inspect a Locations details navigate to Settings > Locations and click the name of the Location. The screen shows:
- The Location name and Identifier
- The Address if entered.
- Whether the Location is active. You change this using the Archive function or by editing the Location.
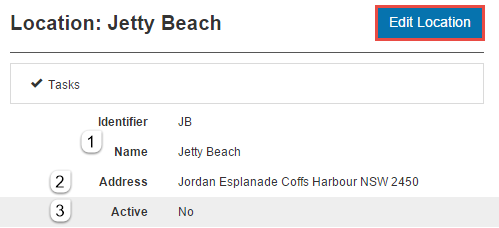
- The Description
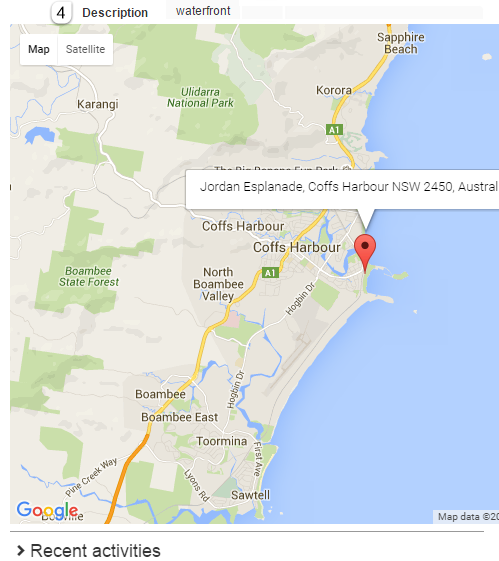
If Google maps can use the address, a map will be displayed.
Edit a Location
To edit a Location navigate to Settings > Locations and click the name of the Location to get to its details screen. Click Edit Location.

You can edit the same fields as when you add a Location. There is one new field: you can change whether the Location is active or inactive.
