Tenant Settings
Introduction
There are a range of settings available on this page used to control behaviour of a Tenant. This screen can be accessed by navigating to Settings > Tenant Settings.

Login
Custom Login URL

Custom Login URL provides the ability to have a custom login page with Janison CLS authentication embedded into it. This is usually a page that has been created using a Custom Page.
If you require this feature please contact the Janison Helpdesk for further details.
Note: Inserting a subdomain or URL in this field which does not have Janison CLS Authentication can result in the site becoming inaccessible until the URL is removed from the database.
Display Remember Me Checkbox

Ticking this option will activate a checkbox on the Login page that will allow the user to save their login details for future sessions.

Hide Forgot My Password Link

Checking this option will remove the Forgot your Password link from the Login Authentication box. If this link is hidden users will no longer have the ability to trigger the email allowing them to reset their passwords.

Note: If a User enters a Username that does not exist in the system, for security purposes the system returns a generic error message regardless of whether the user ID or password is incorrect.

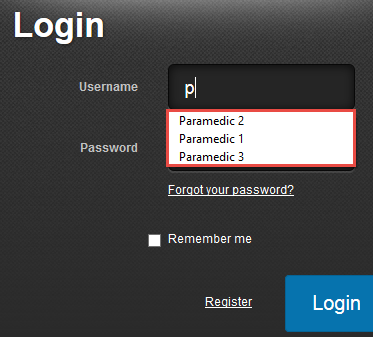
Disabling Auto-Complete for Username and Password

This functionality works with your browser’s cache to fill in the Username and Password once it recognises a returning users. The below screenshot shows the behaviour when the option is left unchecked.
Reset Password On First Login

If this option is enabled Users will be prompted to reset their password on first logon.
Password Reset emails if email address not found

If a User clicks the Forgot your password link and enters an email address as the Username and that email does not exist in the system, the following email will be sent to that User. This email is configurable in Settings > Message Templates.

Allow One Logon Session at a Time

This limits a session for a single account to one session at a time. For example if User A is logged in with a certain account and User B logs in using that same account, User A will automatically be logged out.
No locking no message

When this option is selected the CLS will never lock a user out for entering the incorrect password. It will give the user unlimited login attempts.
Lock account

This option controls 3 aspects of account locking.
- Number of Consecutive Failed Logons – set the number of failed login attempts before the CLS will lock the User out.
- Number Of Minutes To Lock Account For – after the User account is locked, set the time it will remain locked for.
- Lock Message – the message that is shown when the CLS locks out as shown in the screenshot.

Session Timeout

Session Timeout is the length of time a user can remain inactive in the system for before it logs them out. Enter the number of minutes you would like the system to stay active before the it times-out. This applies to all Roles but can be configured differently per role.
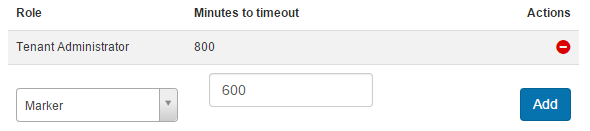
- In the drop-down select a role you would like to adjust the timeout for.
- Enter the minutes for timeout and click add.
Forgot Password re-submit wait period (min)

This option is used to set the time a User must wait before they can reset their password after their previous password reset.
Welcome Tours
Show Welcome Tour
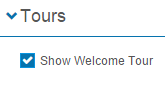
Checking this option gives a new User the opportunity to view a Welcome Tour the first time they logon.
- Start Tour… will take the User on a tour of the CLS. The text and appearance of this pop-up can be customised using the message template System-WelcomeTour.
- No Thanks will close the option to start the tour.
- Maybe Later will force the Welcome Tour into inactivity for 24 hours and then prompt the user once more.
- Closing the Welcome Tour away will make the tour prompt the user every time they refresh a page in the CLS.

Organisations

Display hover-over user Tooltips

When this option is enabled, links to Users in the User list generate a pop-up with additional information about the user.

Relationship Management Type:
This setting determines the management hierarchies that can be set up in the CLS. Further information on these systems can be found in the document on Positions.
- Positions – The entities in the hierarchy are Positions, e.g. the Factory Position reports to the Factory Manager Position, thus User(s) with the Factory Position report to User(s) with the Factory Manager Position.
- Report to User – The entities in the hierarchy are Users, e.g. User B reports to User A.
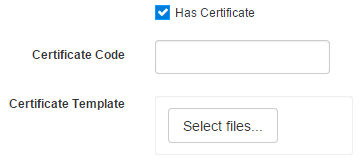
Certificate Templates
If Certificates have been enabled for a Catalogue Item they are generated whenever a User successfully completes it. A certificate is based on a PDF template. The CLS populates this PDF template, that is, it enters the appropriate data into the matching fields in the template. Thus, the template can be customised for each User, for example with the addition of the User’s name and their completion date.
Further information on how to create and use certificates can be found in the document on Certificates.

A field Has Certificate exists in the catalogue item and if it is checked, fields to configure the Catalogue certificate will appear.
Security
HTTPS Options allow the administrator to select whether they want their site to be secured or not.
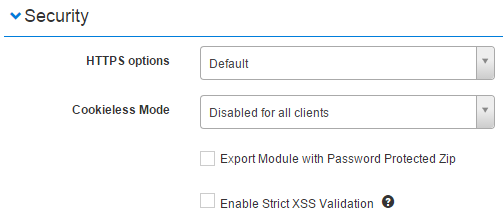
HTTPS Options

The following options exist:
- Default: Will default to the option set on the global tenant.
- Force All HTTPS: Will force all of your subdomains into HTTPS.
- Selective: This is the regular HTTP option, if you think HTTPS is enabled on the Global site you can choose selective to disable this specifically for your own tenant.
Cookieless Mode
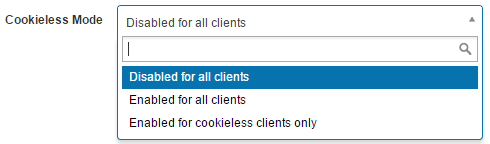
Cookieless Mode is an option that control whether the CLS sends cookies to a browser.
- Disabled for all clients – Cookies will be stored.
- Enabled for clients – Cookies will not be stored.
- Enabled for cookieless clients only- If a browser is configured not to store cookies the CLS will recognise this setting and not send cookies.
Export Module with Password Protected Zip

This is a security option which will set a password on exported modules.
Enable Strict XSS Validation

When enabled this prevents potentially harmful data from being processed by the CLS, in order to prevent the chance of malicious scripts and all manner of cross-site-scripting (XSS) attacks from being effective. Enabling this will render many of the CLS’s advanced authoring features unusable.
Time Zone
The CLS can be set to different time zones to suite the country where the user base predominantly exist.

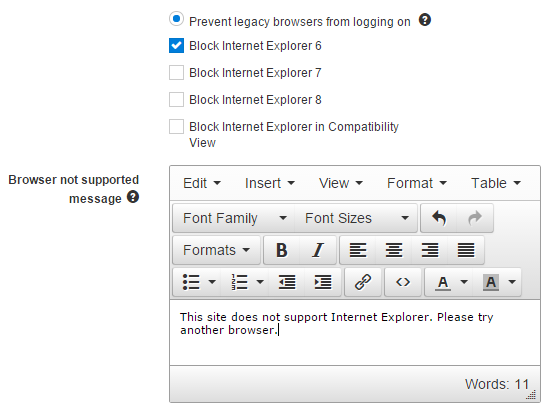
Block Browser
This option allows you to control whether some of the older browsers can log onto the CLS.

Allow Legacy Browsers to Logon
This option does not restrict any browser.
Prevent Legacy Browsers from Logging On
This gives you the choice to prevent any or all of the listed browsers from logging onto the CLS. When selected an editor will appear with the option to enter a custom message which will appear to Users attempting to log on with any of the blocked browsers.
Miscellaneous

Use Points

Points can be used for Continued Professional Development (CPD) functionality, or as its own CLS value for catalogue items. For further information please see the documents on CPD.
Hide Unauthorized Workflow State Transitions:

This option is used when an area of the CLS is transitioning through a workflow such as marking an Assignment, or Test Attempts. If a user does not have right access to a point in the workflow, it will hide that transition.
Restrict Input ASCII Characters to 33-126

This restricts the input of ASCII 33 to 126 into the CLS. Please refer to this table: http://ascii.cl
Show Widget Toolbar
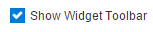
If this option is ticked the Widget Toolbar will appear in places such as the details of a User.

Show Recently Viewed

If this option is ticked the Recently Viewed link will appear under the left hand menu. It will list items you have most recently viewed in the system.

Max size of uploaded file, Mb

This will set a limit on the size of the files Users are able to upload to the system. If this file size is exceeded the User will be presented with an error as shown below. Please note that the message that users see is a String Resource and it will need to be adjusted if the value is adjusted.

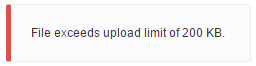
Max size of uploaded profile photo file, Kb

This will set a limit on the size of the image Users are permitted to upload as their profile picture. If this file size is exceeded the User will be presented with an error as shown below. Please note that the message that users see is a String Resource and it will need to be adjusted if the value is adjusted.
Enable RPL

This will enable the Recognition of Prior Learning (RPL) system which allows a manager to mark a User as complete if the User has achieved training outside of the CLS. For further information please see the document on Recognition of Prior Learning.

Enable Tag Type
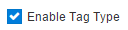
Tags provide a way to categorise items in the CLS such as Catalogue Items and tests. If Tag Types are enabled, an additional option, Manage Tag Types, will appear in Manage Learning > Manage Tags. Tag Types provide a way to categorise Tags. For further information please see our documentation on Tags.

Assessment Monitor Server URL

This field is specifically for the Assessment Event functionality, it allows you to create a custom monitoring screen. Contact Janison Staff for details/availability on this option.
Enable Notifications

This option enables Email Notifications which exist in several areas of the system such as Discussion Forums and Catalogue items.
In addition to enabling them here you will also have options to enable or disable specific notifications in Settings > Email settings.
In some cases they are also configured from the learning asset, for example notifications in Discussion Forums can be controlled from within the discussion forum.
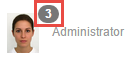
The Notifications icon will appear on the top of the User Profile Picture with the number of Notifications. Notifications sent in emails can also be accessed here by clicking the number.

Enable Help
A Help link will appear in selected Action menus when this option is enabled. The Help link will point to CLS courses.

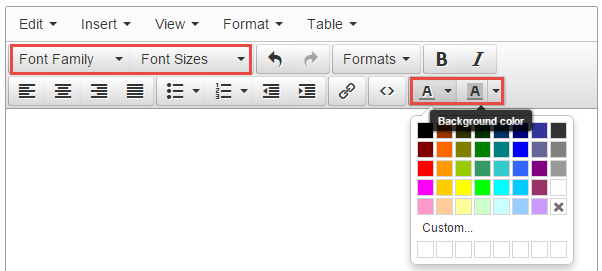
Enable Font and Colour in Rich Text Editor:

Enabling this setting will add 4 additional options to the Rich Text Editors as highlighted in the screenshot below; Font Family, Font Sizes Text colour and text background colour.
Enable Calendar
Enabling this option will add a My Calendar link to the Home dropdown. This calendar will shows Users all the upcoming events and milestones that they should be aware of.
