Scheduling
Introduction
This feature allows you to schedule different job types to run at set times or at regular intervals. For example, you could email a custom report to someone every day or update users on a weekly basis. The types of jobs that you will have access to will depend on the way your site is setup.
Browse to Settings > Scheduling.

Schedule a Job
- Select Schedule a Job

The Schedule a Job screen will be displayed.
- Enter a Job Name.

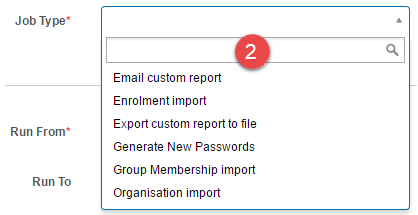
- Select a Job Type.
Note: The options available in the dropdown may differ from the list below depending on the configuration of your site. Additional fields will be displayed depending on the selection made. Job types will be covered in detail below.
- Set the timing options and select Save Scheduled Job.

Timing options
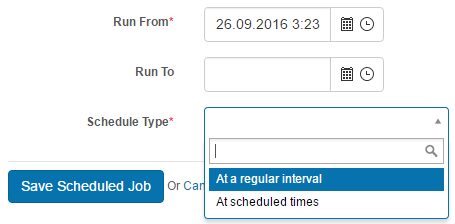
Two types of Schedule Types are available, At a regular interval or At scheduled times.
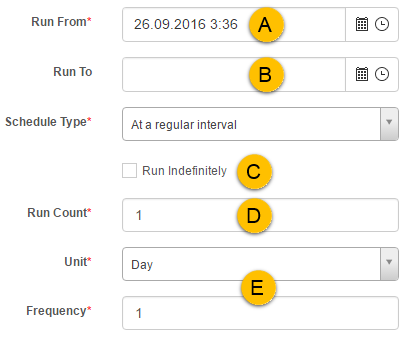
At a regular interval
There are several options available.
- A – Run From date determines the date the schedule will begin.
- B – Run To is optional and will determine when the schedule ends.
- C – Run Indefinitely will set the schedule to run with no end time. Run Count will be disabled if this option is checked.
- D – Run Count will only be active if Run Indefinitely is unchecked. A number entered in this field will determine the number of times the schedule will run.
- E – Unit of time relates to the field below, Frequency. A common setting would be a unit of Day and Frequency of 1 which would translate to running once per day.
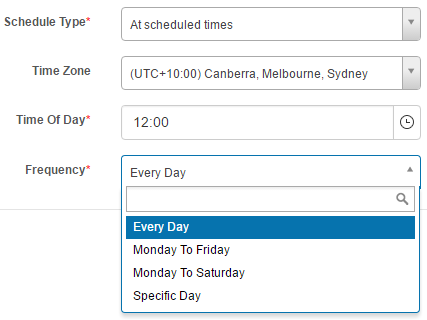
Scheduled times
The settings available at scheduled times are self-explanatory as highlighted in the screenshot below.
Email Custom Report
This job type gives you the option to send a custom report to a specific email address. You will need to create a custom report before you can schedule it. To read more on this topic view our document on Customisable reports.
- Enter a Job Name.
- Select Email custom report from the Job Type dropdown.
- Select a report from the Report Name dropdown.
- Enter the destination Email address.
- Select the required File Format. This is either CSV, PDF or Excel.

- Set the timing options and select Save Scheduled Job.

Enrolment Import
This job type allows you to schedule an enrolment import from a file that is placed in a directory on the system by a third party HR system. This schedule will automatically enrol users into one or more Catalogue items. An enrolment import template is available from the Add Enrolments from spreadsheet screen. To find out more view our document on Import Learning History.
Before scheduling can commence, you will need to contact the Janison customer support team who will arrange an account to access the hr directory.
- Enter a Job Name.
- Select Enrolment import from the Job Type dropdown.
- Enter an Import filename. For example, /hrdata/tenant/filename.csv
- /hrdata – this path will be the same for all clients.
- /tenant – this will need to be customised to match the name of your Tenant.
- /filename.csv – this will be the name of your import file. The file name must be lower case and cannot contain spaces. It can contain a wildcard, for example, filename*.csv. This provides the flexibility to add meaningful information such as a date. Therefore you could name your file ja2692016.csv and the system would still process the import.
- Enter an address where you would like an email log to be sent to.
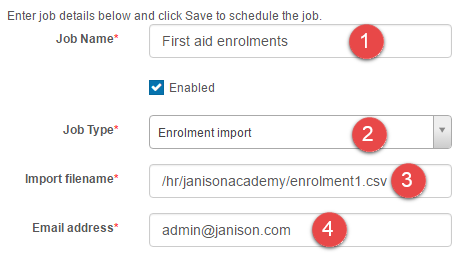
- Set the timing options and select Save Scheduled Job.

Export Custom Report to File
This job type allows you to schedule a custom report to be placed in a specific location in the system.
Before scheduling can commence, you will need to contact the Janison customer support team who will arrange an account to access the directory where the file will be placed.
- Enter a Job Name.
- Select Export custom report to file from the Job Type dropdown.
- Select a report from the Customisable Report dropdown.
- Enter an Email address.
- Select the required File Format. This is either CSV, PDF or Excel.

- Set the timing options and select Save Scheduled Job

Group Membership Import
This job type allows you to schedule a group membership import from a file that is placed in a directory on the system by a third party HR system.
A group membership import template is available from the Groups screen. You can read more about this feature in our document on importing group memberships.
Before scheduling can commence, you will need to contact the Janison customer support team who will arrange an account to access the hr directory.
- Enter a Job Name.
- Select group membership import from the Job Type dropdown.
- Enter an Import filename. For example, /hrdata/tenant/filename.csv
- /hrdata – this path will be the same for all clients.
- /tenant – this will need to be customised to match the name of your Tenant.
- /filename.csv – this will be the name of your import file. The file name must be lower case and cannot contain spaces. It can contain a wildcard, for example, filename*.csv. This provides the flexibility to add meaningful information such as a date. Therefore you could name your file ja2692016.csv and the system would still process the import.
- Enter an address where you would like an email log to be sent to.
- Check this box to inactivate existing group memberships not found in the imported file.
- Check this box to create groups if they do not exist.
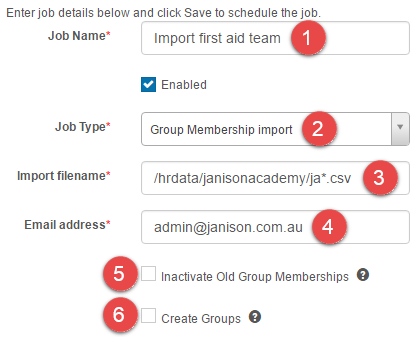
- Set the timing options and select Save Scheduled Job.

Organisation Import
This feature allows you to schedule a user (HR) import from a file that is placed in a directory on the system by a third party HR system. This schedule can automatically add or update users into the CLS.
A user import template is available from the Users screen. You can read more about this feature in our document on importing users.
Before scheduling can commence, you will need to contact the Janison customer support team who will arrange an account to access the hr directory.
- Enter a Job Name.
- Select Organisation import from the Job Type dropdown.
- Enter an Import filename. There are three parts to the file path and name, /hrdata/tenant/filename.csv
- /hrdata – this is a directory and will be the same for all clients.
- /tenant – this will need to be customised to match the name of your Tenant.
- /filename.csv – this will be the name of your import file. The file name must be lower case and cannot contain spaces. It can contain a wildcard, for example filename*.csv. This provides the flexibility to add meaningful information such as a date. Therefore you could name your file ja2692016.csv and the system would still process the import.
- Enter an address where you would like an email log to be sent to.
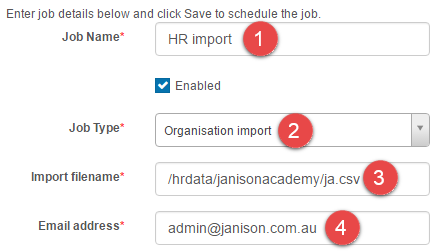
- Set the timing options and select Save Scheduled Job.
