Assessment events
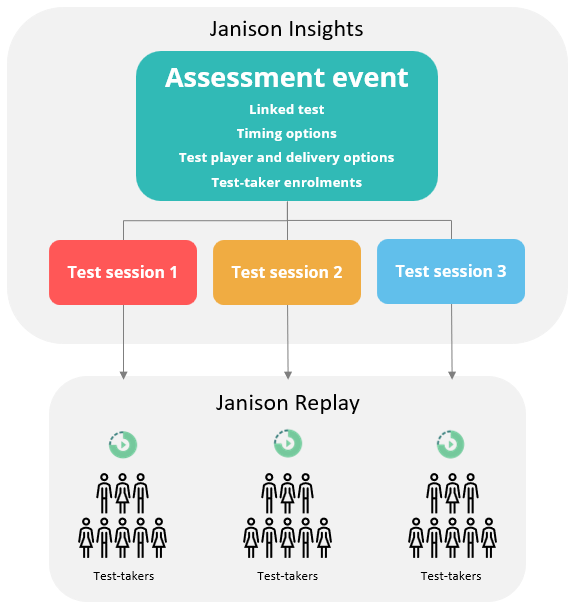
An assessment event is how you deliver a test to test-takers in Janison Insights. It links one test to a schedule, a set of delivery options, a marking mode and the test-takers enrolled to sit it.
Test-takers take the test in a test session, in Janison Replay or a supported browser. Invigilators run and monitor sessions from the test session administration screen, where they start sessions, track progress and manage test-takers.
Create an assessment event
- Go to Deliver > Assessment Events.
- Select Actions > Add Assessment Event.
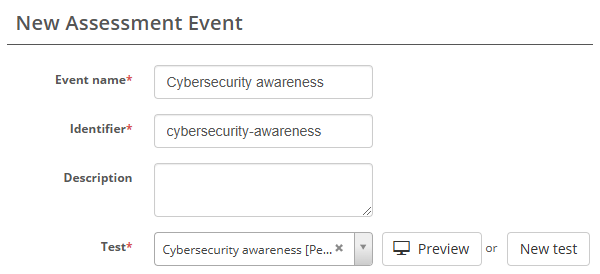
- Complete the New Assessment Event form.
- Set the timing options in the Schedule Event block. The next section explains them.
- Select Save Assessment Event.
The form has four fields:
- Event name — required. The identifier is generated from it as you type.
- Identifier — required, and unique across your site.
- Description — optional.
- Test — required. Select Preview to check the test first, or New test to create one without leaving the form. Some sites link an event to an assessment package instead of a test. See our guide on assessment packages.
A new event always starts in the Draft workflow state.
Schedule the event
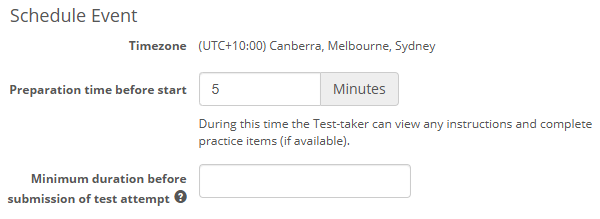
The Schedule Event block sets when test-takers can start. After you save, the same fields sit in the Timing Options panel on the event's details page.
- Timezone — your site's time zone, shown when the site is set to display it.
- Preparation time before start — minutes before the start time during which test-takers can read instructions and complete practice items. Appears only when the pre-start window is enabled for your site.
- Minimum duration before submission of test attempt — minutes a test-taker must spend on the test before they can submit. Invigilators can submit an attempt at any time regardless. Appears only when enabled for your site.
Scheduling mode decides how the start window works. You can change it only while the event is in Draft.
Specific date — test-takers start on one date and time. The window stays open for the test's duration, or for 90 minutes if the test is untimed.
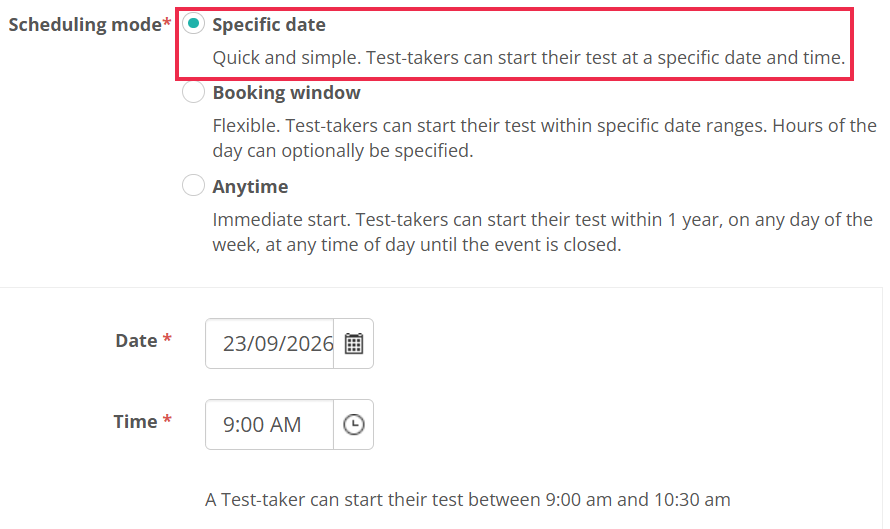
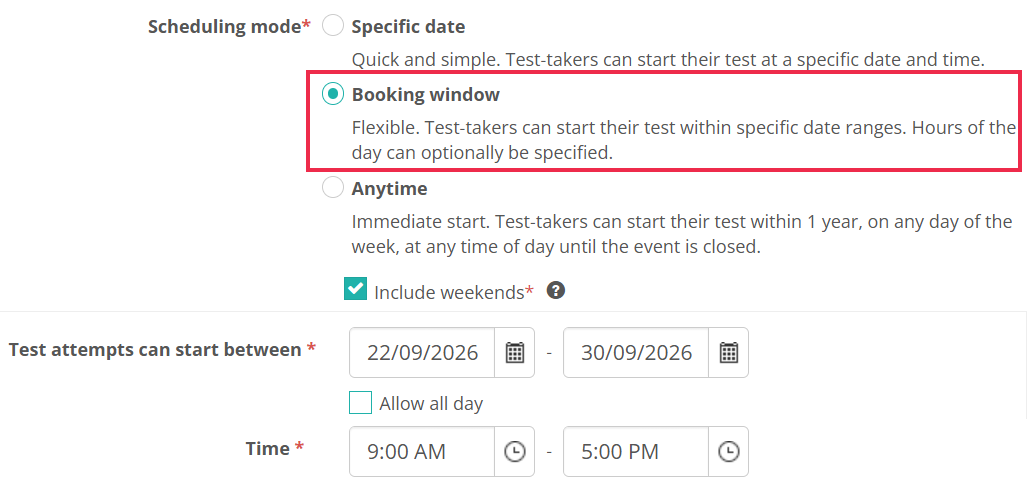
Booking window — test-takers start on any day in a date range. Tick Include weekends to allow Saturdays and Sundays. Leave Allow all day ticked, or untick it to set the hours of the day.
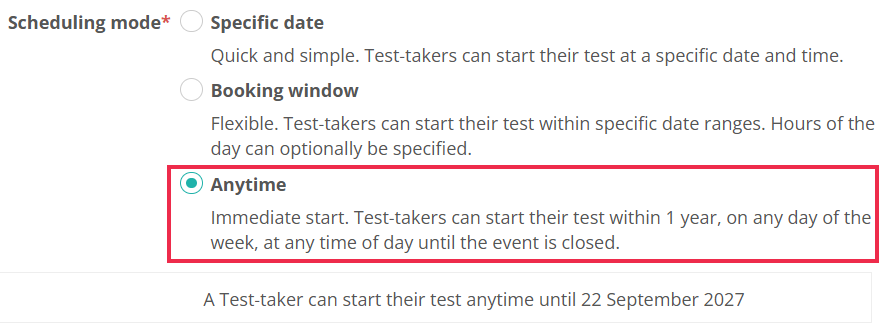
Anytime — test-takers start on any day, at any time, from the start date until one year later or until you close the event. The end date is set for you and can't be changed.
You can change the dates and times while the event is in Delivery. The panel warns you that attempts already underway are affected. Once the event is Closed, nothing in the panel can change.
The details page
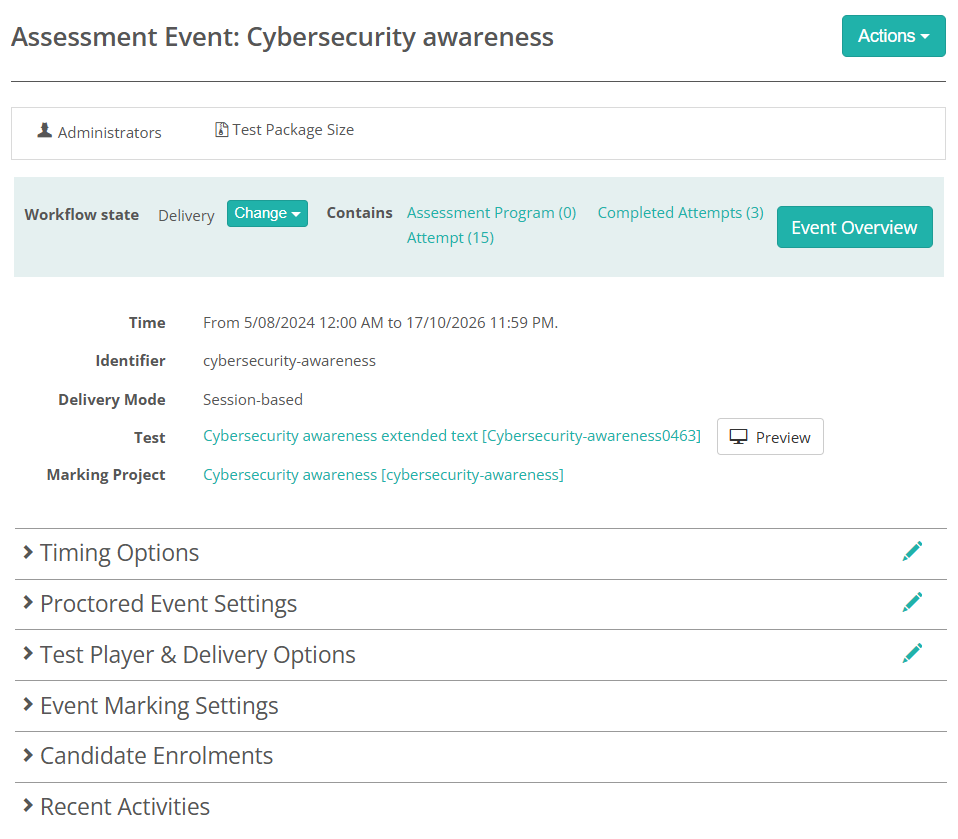
After you save, the event's details page opens. The header shows the Workflow state with a Change button, Contains (the attempt counts) and an Event Overview button. Below that are the Time, Identifier, Delivery Mode (Session-based or Sessionless), Test with a Preview button, Test Duration, and Marking Project once one is linked. Select Edit Assessment Event to change the name, identifier, description or test.
The rest of the page is a set of expandable panels:
- Timing Options — covered above
- Test Player & Delivery Options
- Event Marking Settings
- Candidate Enrolments
- Recent Activities — a log of recent changes to the event
Other panels depend on your site's settings and the event's state. They are Proctored Event Settings, Payment Options, Override Test Allocation, Onboarding And Event Readiness, Item Difficulty Calculation and Exam classes, summarised under Other panels.
Test player & delivery options
This panel has three parts: Test Player Display Settings, Sessionless Delivery Settings and Test Delivery/Replay Settings. It can be edited in Draft and Delivery.
Test player display settings
These settings control what the test player shows in its title bar: the test or event name, the running score and the item count.
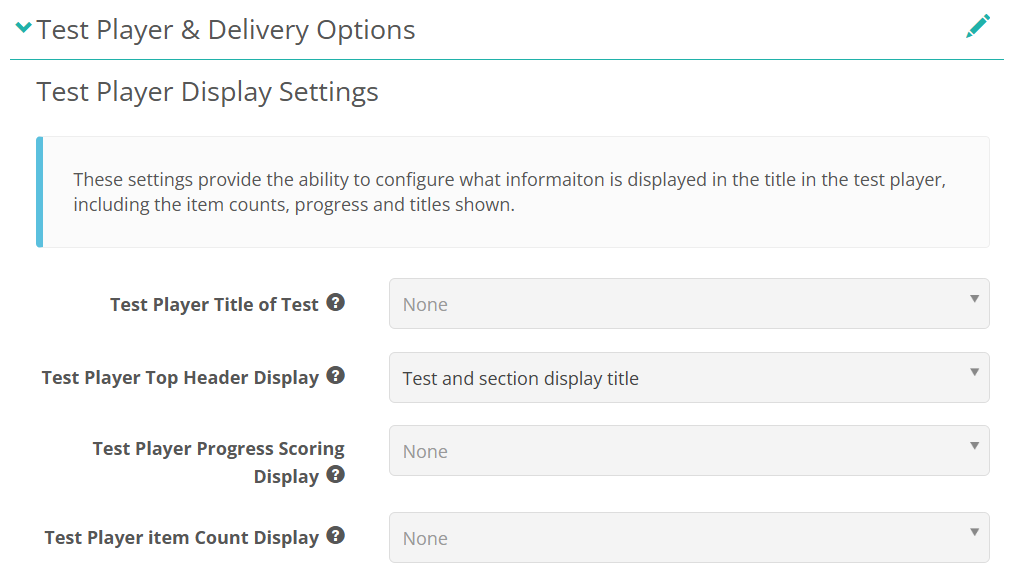
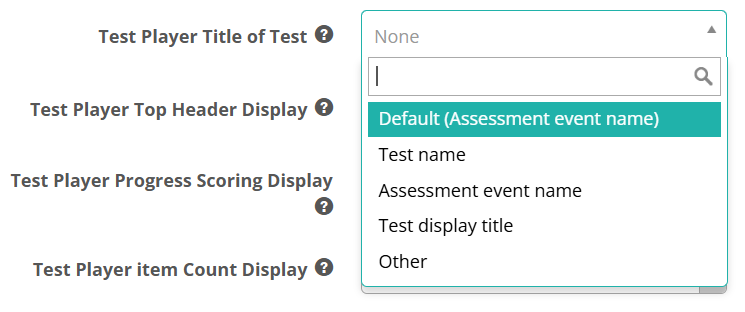
Test Player Title of Test — the name shown to the test-taker in the test player. The options are:
- Default (Assessment event name) — the bracketed text is your site's default
- Test name
- Assessment event name
- Test display title
- Other — a Player Display Title box appears for a name of up to 20 characters. Leave it blank to show no name at all.
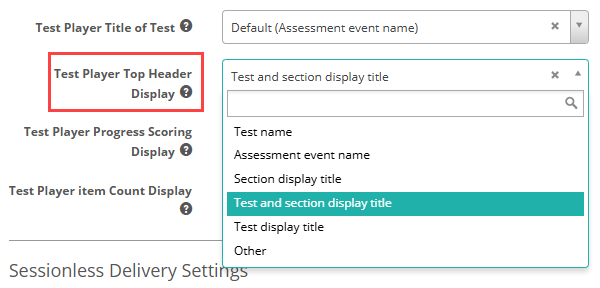
Test Player Top Header Display — what appears in the title bar. New events default to Test and section display title. The options are:
- Test name
- Assessment event name
- Section display title
- Test and section display title
- Test display title
- Other — a Player Display Title On Title Bar box appears for a title of up to 40 characters
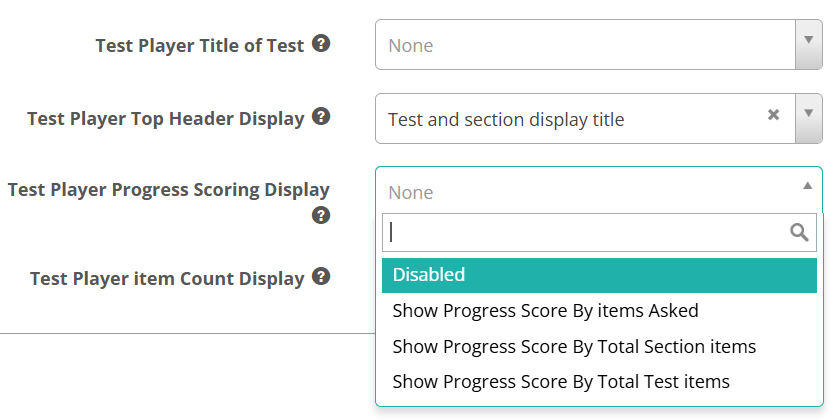
Test Player Progress Scoring Display — the format of the running score in the title bar. It appears only when live marking of items is enabled for your site and the test has a section that supports a running score. The options are:
- Disabled
- Show Progress Score By items Asked
- Show Progress Score By Total Section items
- Show Progress Score By Total Test items
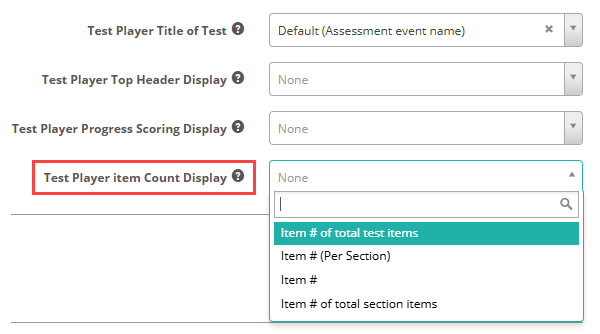
Test Player item Count Display — the format of the item number in the title bar. The options are:
- Item # of total test items
- Item # (Per Section)
- Item #
- Item # of total section items
If the event's test is an item adaptive test, only Item # (Per Section) and Item # are offered. The setting defaults to Item # (Per Section). A banner on the page tells you when this has happened.
Sessionless delivery settings
Tick Enable Sessionless Delivery for this Assessment Event to let test-takers enter with a one time code alone, with no session code. For this to work, your site's test-taker login must redirect to auth/opensession.
Two things follow from ticking it. Delivery Mode in the page header changes to Sessionless, and Allow re-entry to a test without needing to be unlocked is turned on and locked. You can't change the setting once the event is in Delivery.
For the full picture, see Sessionless delivery.

Test delivery/Replay settings
These settings set extra requirements for the test player. Which ones you see depends on your site's configuration. If a setting you need isn't visible, contact your Janison account manager. The settings are described below in the order they appear.
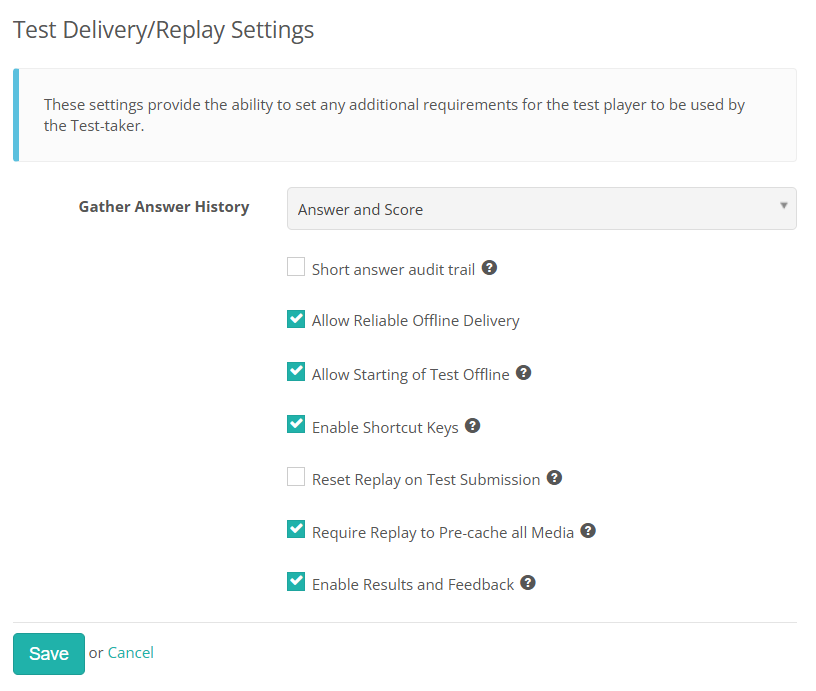
Gather Answer History — how much answer history to keep for each attempt: Off, Visit Only, Score Only, Answer Only or Answer and Score. Leave it blank to inherit your site's default. It can be changed only in Draft.
Short answer audit trail — stores a snapshot of the response every time an answer is saved. Appears only when the test contains short answer (extended text) items. When ticked, an Audit trail deletion date field appears; it must fall within 120 days of the event's closing date. You can view the trail from the test session screen or the Test Attempt modal. See Short answer audit trail.
Allow Reliable Offline Delivery — lets Janison Replay run the event partly or fully offline. New events take your site's default. It's disabled when the event's test is an item adaptive test, because offline delivery isn't supported for adaptive testing.
Allow Starting of Test Offline — when ticked, test-takers can start even if their device is offline. When unticked, they must reconnect before starting, once they have moved past any instruction pages and confirmed they are ready. Ticked by default. Available only when reliable offline delivery is ticked, and it has no effect in sessions with Allow unrestricted entry ticked or in sessionless events.
Enable Shortcut Keys — lets test-takers use any available keyboard shortcuts in the test player. Ticked by default. See Replay keyboard shortcuts.
Force Replay Lockdown — restricts the test to Janison Replay, so a normal browser can't be used. A test-taker's personal needs and preferences can opt them out. Appears only when Replay lockdown is enabled for your site, and only when reliable offline delivery is ticked.
Reset Replay on Test Submission — removes responses and test data from Replay after an attempt is automatically reconciled. Attempts that need manual reconciliation stay on the device. Available only when the matching site setting is on.
Require Replay to Pre-cache all Media — when the event moves to Delivery, every device with Replay must download and pre-cache a media update. This suits tests with rich media. Appears only when enabled for your site, and only when reliable offline delivery is ticked.
Allow re-entry to a test without needing to be unlocked — lets test-takers re-enter the test without an invigilator unlocking them. Appears only when enabled for your site. Forced on for sessionless events.
Enable Results and Feedback — lets test-takers see their results and feedback on the test-taker dashboard. New events take your site's default.
Event marking settings
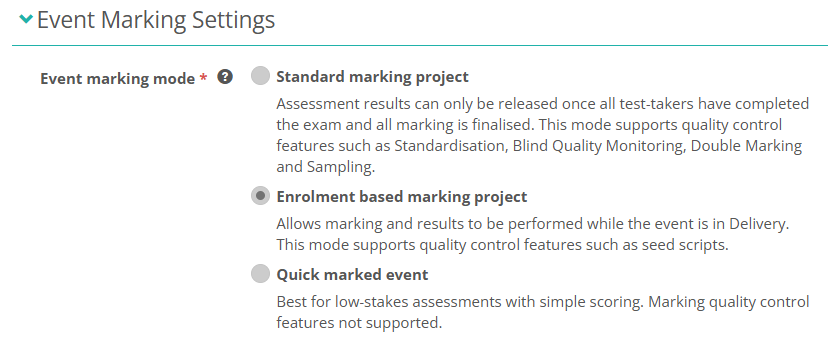
This panel sets how the event's manually marked responses are scored. Only one mode can be active, and you can change it only while the event is in Draft.
Event marking mode has three options:
- Standard marking project — results are released once all test-takers have finished and marking is finalised. Supports standardisation, blind quality monitoring, double marking and sampling. See Standard marking.
- Enrolment based marking project — marking and results can happen while the event is in Delivery. Early finishers get results while others are still testing. Supports seed scripts. See Enrolment based marking.
- Quick marked event — for low-stakes assessments with simple scoring. Marking quality controls aren't supported. See Quick marking.
When you choose Quick marked event, two more settings appear. Allow Group Type filtering lets markers filter responses by the group types you select. Enable AI Co-Marking appears where AI marking is enabled for your site.
Other panels
You may also see these panels, depending on your site's settings and the event's state:
- Proctored Event Settings — tick Deliver as Proctored Test to have the test player report to Janison Remote, so the audit shows the test ran under proctoring. Available before the event enters Delivery, on sites with proctoring enabled.
- Payment Options — Require payment for enrolments and Cost per enrolment (AUD). On sites with payments enabled; editable before Delivery. The event can't enter Delivery while payment is required but no valid amount is set.
- Override Test Allocation — for sites that allocate specific test versions to test-takers. Needs a separate permission.
- Onboarding And Event Readiness — the invigilation type, the device check before entry, the allowed device types and the onboarding entry time.
- Item Difficulty Calculation — a log and download for the difficulty calculation on an item adaptive event. Appears in Delivery, on sites using NoSQL delivery.
- Exam classes — manage the exam classes linked to the event. Appears once the event leaves Draft, on sites with exam class scheduling enabled. When it's on, the group options under Add Enrolments are replaced with a note directing you to the Exam Classes & Venues section.
Enrol test-takers
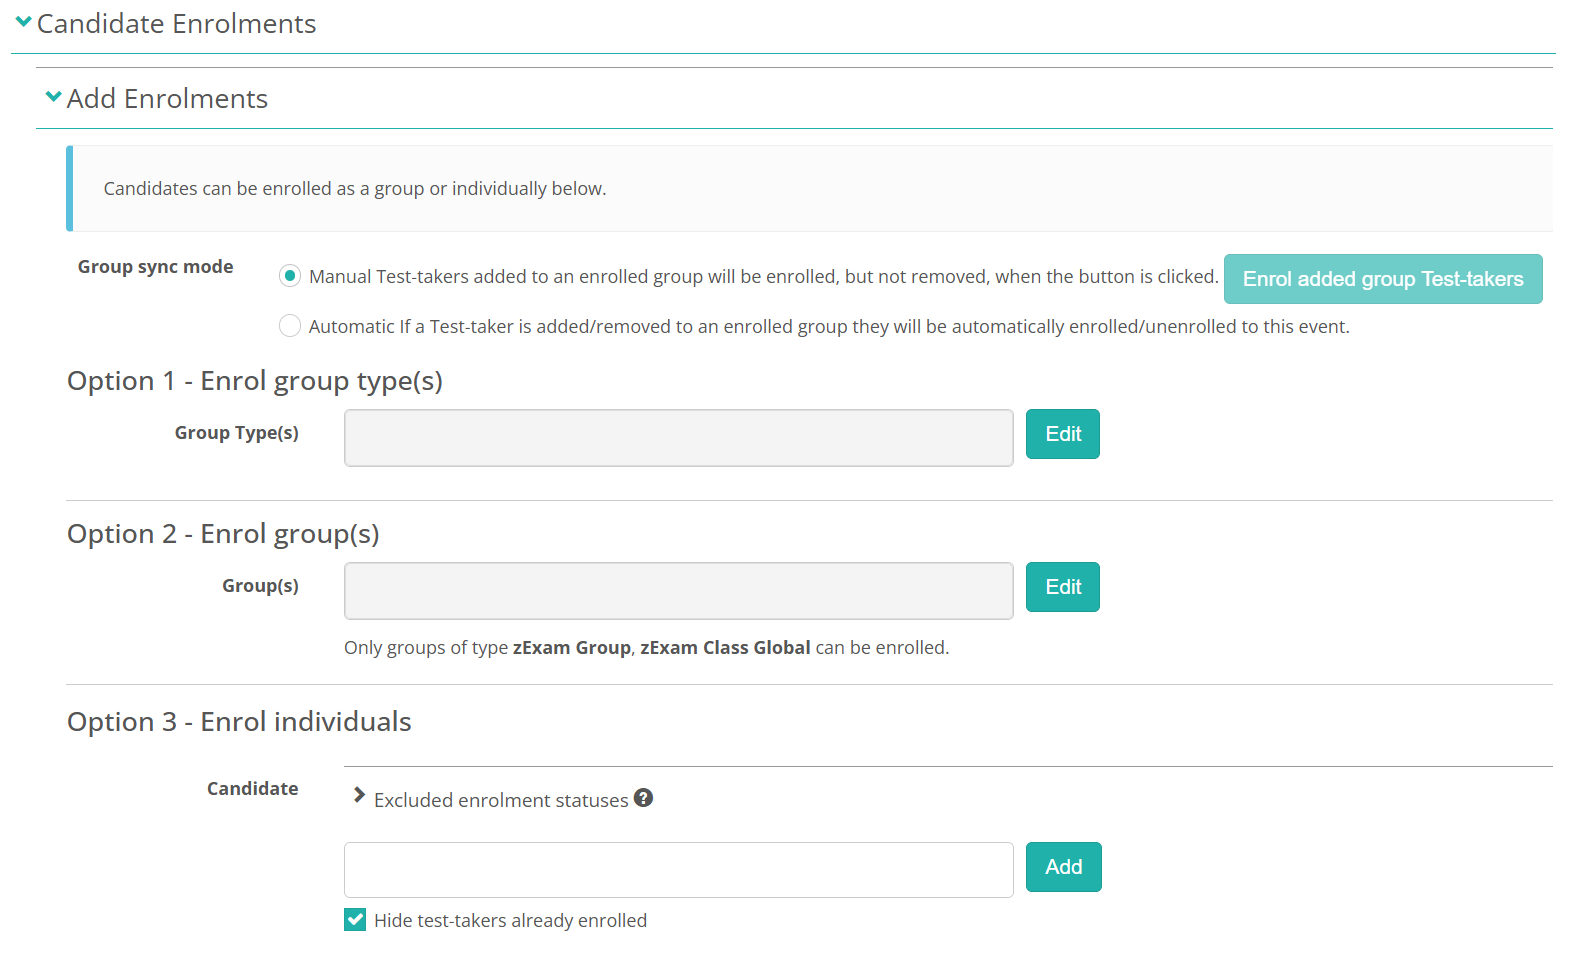
Open the Candidate Enrolments panel. It has two parts: Add Enrolments, which is available while the event is in Draft or Delivery, and Current Enrolments, which lists everyone enrolled.
Add Enrolments has four parts. The three enrolment options can be combined.
- Group sync mode — how the event handles changes to a group's membership after you've enrolled it. Described after the group steps below.
- Option 1 - Enrol group type(s) — enrol every test-taker in every group of the selected types. Best when whole cohorts sit the test.
- Option 2 - Enrol group(s) — enrol the members of specific groups. Best for a large number of test-takers who already share a group.
- Option 3 - Enrol individuals — pick test-takers one at a time. Best for a handful of test-takers without creating a group.
Sites linked to a learning management system see a fourth option, Option 4 - Enrol from an LMS, with a Manually sync candidates button.
Enrol by group type or group
For either option, you'll need groups first, and the test-takers in them. See Groups and group types.
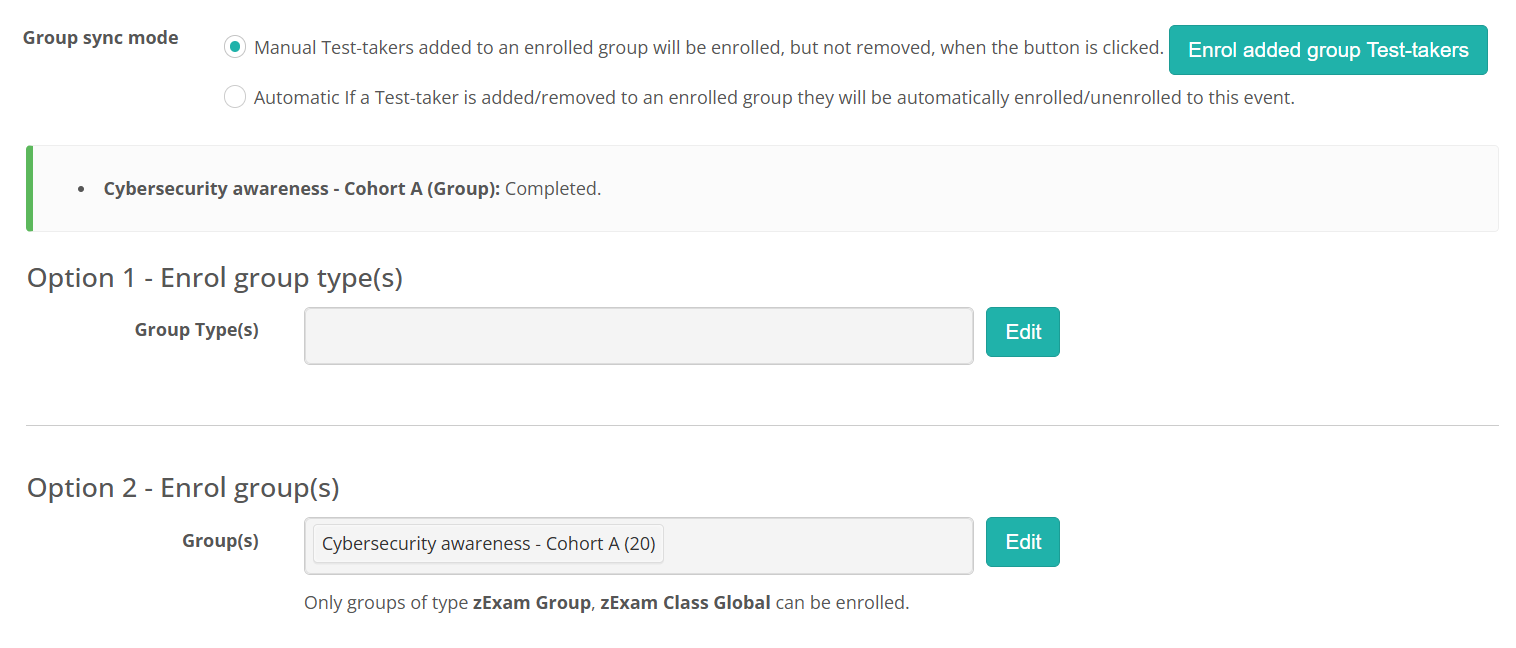
The steps are the same for both pickers. Under Group Type(s) or Group(s), select Edit, choose one or more entries, then Save. Each group is listed with its member count in brackets. Only groups of the types your site allows are offered. The line under the field lists the group types set at the global tenant, so it may not match your site's own setting. The picker is what counts.
Important
If the group type you need isn't offered, an administrator has to add it first. Go to Settings > Assessment Event Settings, expand Event Settings and add the type to Group Types to Enrol Test-takers By. Both pickers offer only the types listed there.
Saving runs the enrolments straight away, with a Running Enrolments progress bar. A green callout then confirms each group as Completed, and the Enrol added group Test-takers button becomes active. It stays greyed out until at least one group or group type has been saved.
The test-takers then appear under Current Enrolments.
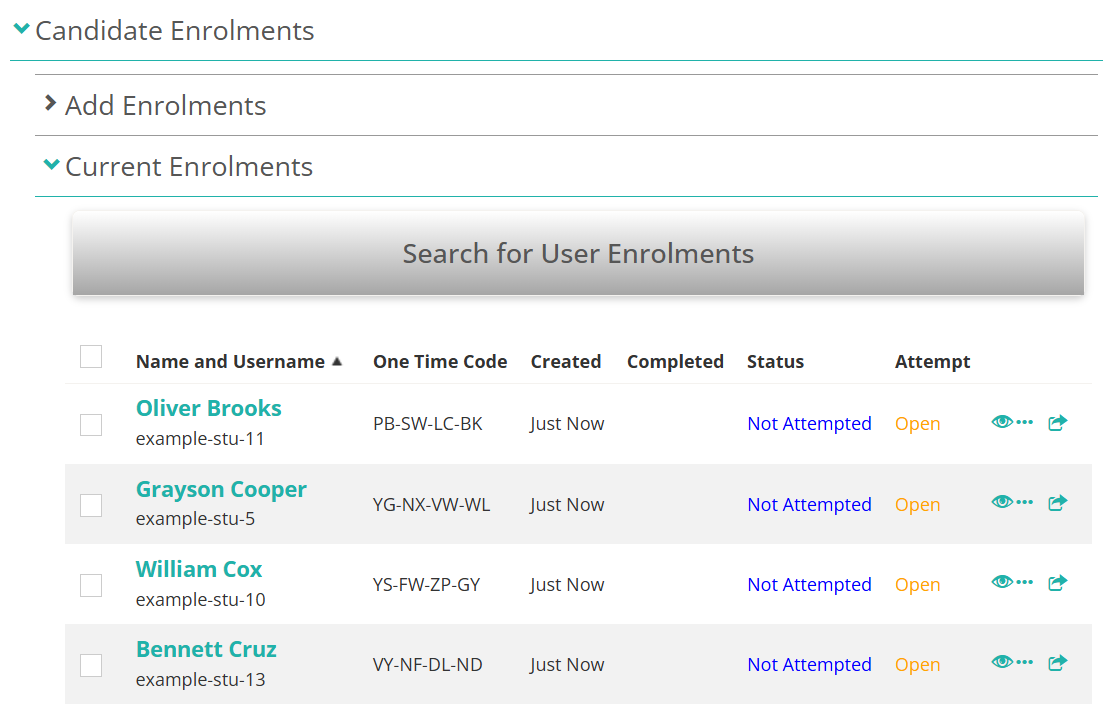
Group sync mode, at the top of Add Enrolments, decides what happens when a group's membership changes after you've enrolled it. Selecting an option saves it straight away.
- Manual — test-takers added to the group are enrolled when you select Enrol added group Test-takers. Test-takers removed from the group keep their enrolment.
- Automatic — test-takers added to or removed from the group are enrolled or unenrolled for you.
Automatic sync only runs in the workflow states your site allows. The default is Draft only, so on most sites it stops once the event enters Delivery. Use Enrol added group Test-takers after that.
Advanced enrolment filters
Sites with advanced filtering enabled see an Advanced Enrolment Filters block under the group options. Select Edit, choose values for each listed user property, then Save. From then on, group and group type enrolments include only test-takers whose details match, and matching test-takers are enrolled straight away.
Enrol individuals
Under Option 3 - Enrol individuals, select one or more test-takers in the search field, then Add. They appear under Current Enrolments straight away.
Hide test-takers already enrolled is ticked by default, so the search only offers people not yet on the list. An Excluded enrolment statuses section lets you stop re-enrolling anyone whose existing enrolment is in a status you choose.
Set the assessment event state to delivery
An event moves through four workflow states:
- Draft — the state every new event starts in. You can change anything, and delete enrolments.
- Delivery — test sessions can run. Enrolments can be added but not deleted. Some settings lock.
- Closed — delivery has finished. Nothing can be edited, and export actions become available.
- Cancelled — the event was cancelled from Draft.
To start delivering, select Change beside Workflow state, select Commence Delivery, then Yes to confirm. The event must have a test linked and timing options set, or the transition is refused with a message saying why.
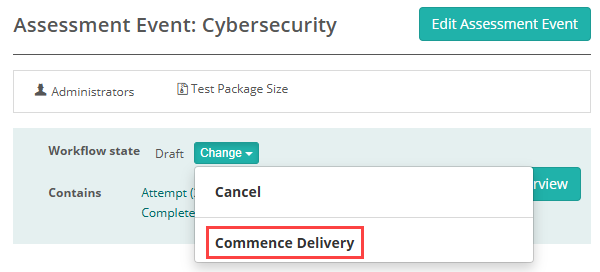
The other transitions are Cancel (from Draft), Close (from Delivery, which finalises the event) and Reopen (from Closed back to Delivery). An event linked to a closed marking project can't be reopened until the project is reopened or deleted.
Create test sessions
A test session is like a virtual classroom where invigilators manage test-takers as they complete the test. Sessions can be organised by room, group or cohort, so each invigilator watches a specific set of test-takers. An administrator or invigilator sets them up once the event is in Delivery.
Use the Delivery dashboard to create one or more test sessions. See Test centre/Invigilator dashboard.
Manage test-taker attempts
The Current Enrolments grid shows each test-taker's Name and Username, One Time Code, Created and Completed dates, enrolment Status and current Attempt status. Some sites also show a Delivery Centre, Exam Class or Payment column. Use Search for User Enrolments to filter the list.
The icons at the end of each row open the attempt in different ways.
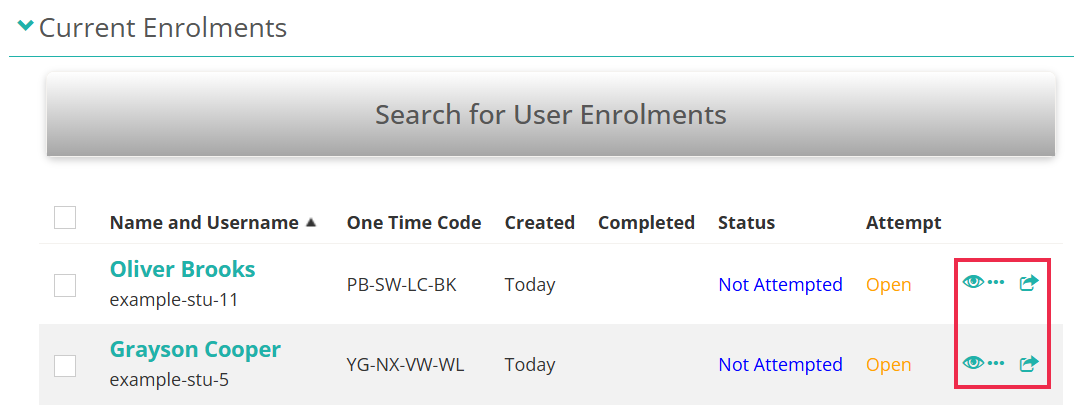
The people icon  opens the test session administration screen for the test-taker's session. It appears only once the attempt is linked to a test session, so the grid above doesn't show it.
The eye icon  opens the test attempt modal. The two View more icons open the test-taker's enrolment page. The three-dot icon
  opens it in the same tab, and
  opens it in a new tab. Test-takers with personal needs and preferences have an extra icon that opens them directly.
For what the modal and the page hold, how to change an attempt's status and what every status means, see Test attempt workflows.
Delete enrolments
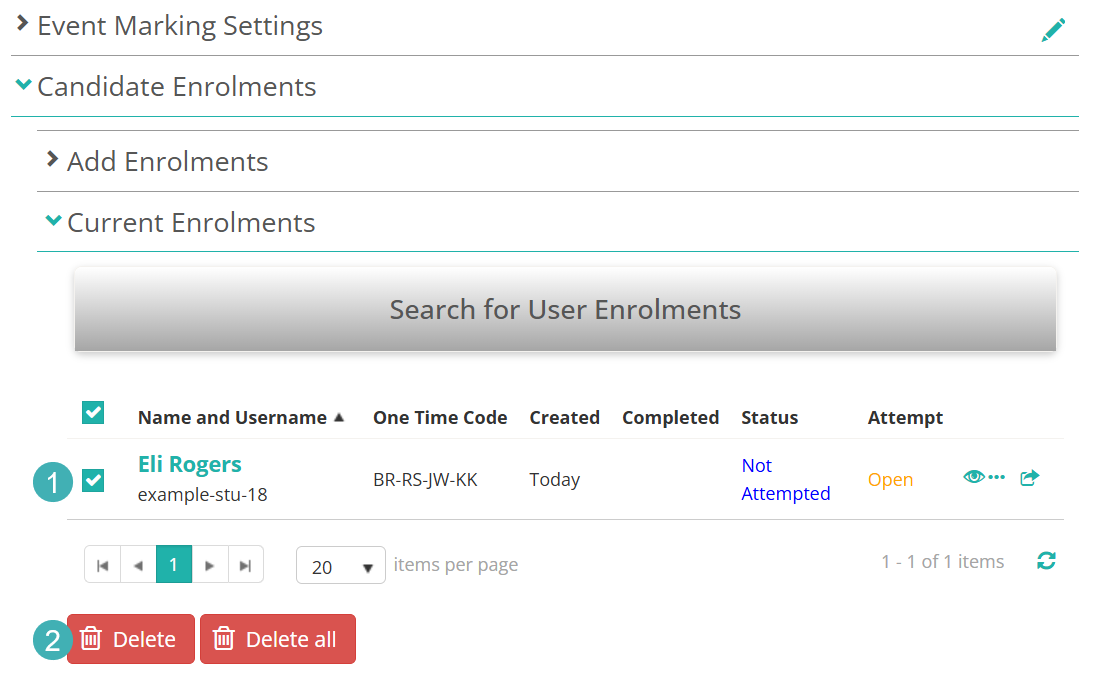
While the event is in Draft, you can delete enrolments whose status is Not Attempted. Deleting other enrolments needs an extra permission.
- Tick the test-taker in Current Enrolments.
- Select Delete.
To clear the list, select Delete all. A dialog summarises what will be deleted and asks you to type the word "delete" to confirm. This can't be undone.
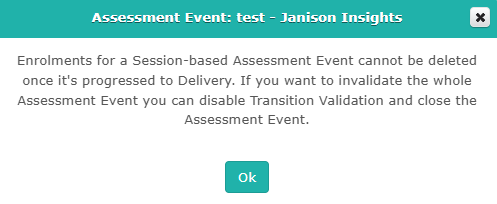
Once the event is in Delivery, enrolments in a session-based event can't be deleted. A dialog explains why and suggests closing the event instead if you need to invalidate it.
Settings
Administrators configure the following at Settings > Assessment Event Settings. Most sit inside the Event Settings expandable; the exceptions say where they are.
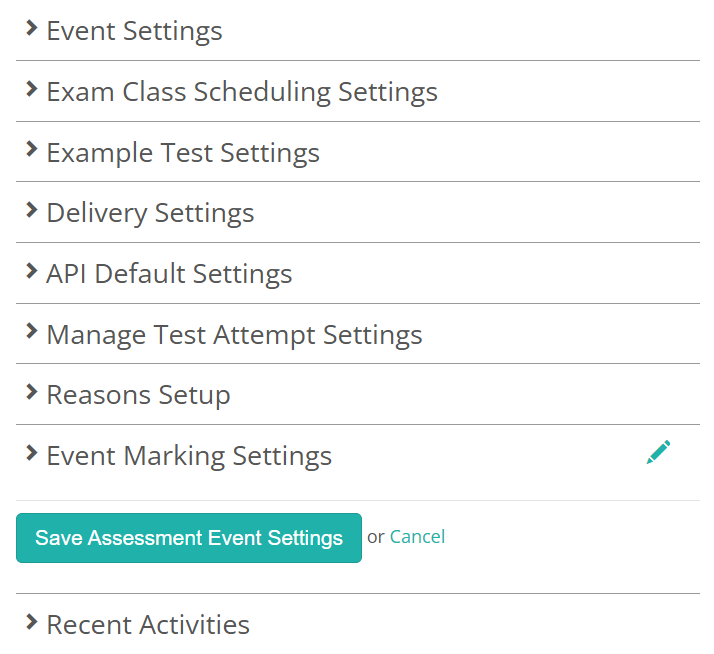
Group Types to Enrol Test-takers By — the group types offered under Option 1 - Enrol group type(s). Only groups of these types are offered under Option 2 - Enrol group(s). Set at the global tenant, it flows down to local tenants.

Enable Auto-enrolment based on — the workflow states in which Automatic group sync runs: Draft Only, Delivery Only or Draft & Delivery. Defaults to Draft Only. At the top of the settings page.
Enable advanced filtering for assessment event enrolments and Matching user attributes — show the Advanced Enrolment Filters block and set the user properties it filters on.
Allow multiple enrolments as independent enrolments for each Enrolment group — one enrolment per enrolment group for a test-taker who belongs to several. At the top of the settings page.
Link Session Based Assessment Events to — Tests or Assessment Packages. Decides whether the create form asks for a Test or an Assessment Package.
Enable pre-start window and Default pre-start window duration (minutes) — show Preparation time before start and set its starting value for new events.
Enable minimum duration before submission of test attempt and Default minimum time before submission (minutes) — show the minimum duration field on each event and set its starting value.
Show Timezone On Assessment Event Date / Time Fields — shows the Timezone line in the schedule.
Default title display option — the value shown in brackets after Default in Test Player Title of Test.
Gather Answer History — the site default that an event inherits when its own Gather Answer History is blank.
Enabled Allow Re-entry to a Test Without Needing to be Unlocked — shows Allow re-entry to a test without needing to be unlocked on each event.
Enable Unrestricted Entry — adds the Allow unrestricted entry checkbox to the test session console. Sessions with it ticked ignore Allow Starting of Test Offline.
Enable Proctored Test Delivery Option — shows the Proctored Event Settings panel: Off, On and enabled by default or On and disabled by default.
Enable payments for enrolments — shows the Payment Options panel and the Payment column: Off, On and disabled by default or On and enabled by default.
Enable Sessionless Delivery Option — shows Sessionless Delivery Settings on each event: Off, On and disabled by default or On and enabled by default. Existing events keep their current value. In the Delivery Settings expandable.
Use NoSQL delivery — required for the Item Difficulty Calculation panel. In the Delivery Settings expandable.
Default event marking mode — the Event marking mode new events start with. In the Event Marking Settings expandable.
Display Delivery Centre (Org Unit) per Test Attempt — adds the Delivery Centre column and filter to Current Enrolments. In the Manage Test Attempt Settings expandable.
The Replay settings are at Settings > Test Delivery Settings.
Enable Offline Reliable Delivery — makes the Test Delivery/Replay Settings available on every event.
Enable Offline Support for Assessment Events as Default — whether Allow Reliable Offline Delivery starts ticked on new events.
Enable Replay lockdown — shows Force Replay Lockdown on each event.
Reset Replay on Test Submission — enables the event-level setting of the same name. Turning it off also turns it off on every event that had it on.
Enable Replay Media Caching Requirements on Delivery Transition — shows Require Replay to Pre-cache all Media and ticks it by default on new session-based events.
Under Settings > Test Designer Settings, Enable Live Marking of Items makes Test Player Progress Scoring Display available. The test must also have a section that supports a running score.