Hybrid test preparation and delivery
Hybrid delivery lets test-takers sit a test on paper while Insights still does the marking. You print a question paper and an answer sheet for each test-taker's attempt, scan the completed answer sheets back in, and Insights reads the answers from the scans. Answers it can't read with enough confidence are flagged, so a teacher can check them against the scan before the attempt is marked.
This page covers the whole journey, in 3 stages:
Set up before you print
Several settings must be in place before any papers are printed or scanned, and some can only be set by Janison. Work through Settings first.
How the answers are read
Each page of an answer sheet carries a QR code in all 4 corners. The code identifies the test-taker's attempt, the page number and the total number of pages. When you upload a page, Insights reads the QR code to match the page to the right attempt. Only one of the 4 codes needs to be readable.
Once every page of an attempt has arrived, and the attempt is still open, the scans are sent for reading. Marked bubbles are read by optical mark recognition (OMR) and handwriting by optical character recognition (OCR). Each answer is given a confidence score: how sure the reading is.
An answer whose score is below the threshold set for its item type is flagged for review. Every other answer is accepted as read. Multiple choice and text entry answers are then marked automatically, and extended text answers go to quick marking.
Important
Nothing is flagged until an administrator sets a confidence threshold. With no threshold, every answer is accepted as read, however unsure the reading was. See Settings.
Prepare and print the papers
Check the test can be printed
Only 4 item types can be printed on a hybrid paper:
- Multiple Choice
- Multiple Choices
- Text Entry
- Extended Text.
The test's Delivery Mode must be set to Mixed. See Paper-based tests.
For each Extended Text item, the Line Count set on the item decides how many writing lines the answer sheet gives the test-taker, from 1 to 100. An answer that needs more lines than fit on a page flows onto a continuation page, labelled with its item number. When the sheets are scanned, the pages are joined back into one answer in page order.
Tip
Settle each Line Count before you print. If a line count changes after papers are printed, the affected attempts need to be reprinted so the sheets match the item.
Before you print a new test for the first time, send Janison a sample print of it. Janison uses it to set up the reading of that test's answer sheets.
Enrol the test-takers first
Each paper is printed from a test-taker's own test attempt, and its QR codes point back to that attempt. Test-takers must be enrolled in the assessment event before you print, or there is no attempt to print from. See Assessment events.
Choose the print templates
Hybrid papers use 2 dedicated print templates, loaded into your tenant by Janison:
- Hybrid Question Paper - EN — the question paper, showing each item with its stimulus, options and images. Set it as the Test Print Template
- Hybrid Answer Paper - EN — the answer sheet the test-taker writes on, with bubbles or checkboxes for multiple choice items and lined answer areas for written ones. Set it as the Test Mark Scheme Print Template.
To find them in a template list under Paper Settings, type "hybrid" into the search box.
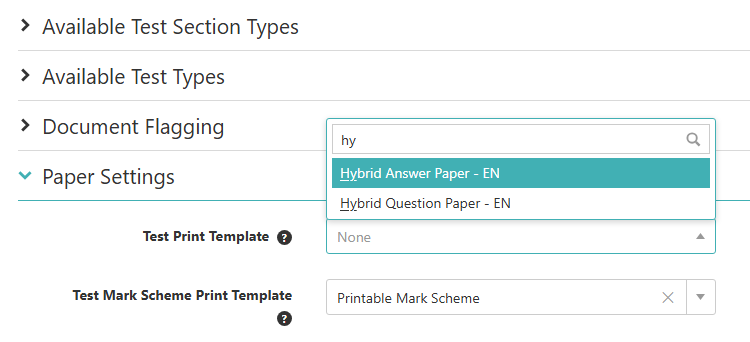
You may see other hybrid templates in the list, created to meet your organisation's specific requirements.
You can set the templates at 3 levels, under Paper Settings:
- Test — on the test's details page. Use this only when one test needs something different from its module
- Module — on the module's details page. This covers every test in the module and is the best place to set them
- Tenant — at Settings > Test Designer Settings. The default for every module that hasn't saved its own.
Each level either inherits its Paper Settings from the level above or has its own, as a whole set. A test that inherits says Paper Settings are currently inherited from the Settings for this module, with an Override them now link. Once a module or test has saved its own settings, it uses only those, and a template left as None stays None even if the level above has one. If a template you've set isn't being used, check the test's module for saved settings.
Don't change the answer sheet instructions
The answer sheet reader ignores a fixed area at the top of the page, sized to the instruction text. If the instructions gain or lose a line, answers are read from the wrong place. Ask Janison before changing the instruction text on either answer paper template.
Print the papers
Printing starts on the test attempts screen.
- Select Deliver > Manage Attempts and find the attempts for the assessment event. See Search for test attempts.
- Tick the attempts you want to print.
- From Select to apply a bulk action, choose Print Paper Test for the question papers, then select Apply.
- Repeat with Print Paper Test & Answer Sheet for the answer sheets.
Each opens a Print Preview in a new tab, with every selected attempt in one document. To make the text larger or smaller, change Item Font Size under Print Options; the other attempts in the preview follow the first. Then select Print to open your browser's print dialog.
Each page of the answer sheet carries the test-taker's name, the test name, a QR code in each corner and a page number. Multiple choice items get a row of bubbles, and text entry items a writing line.
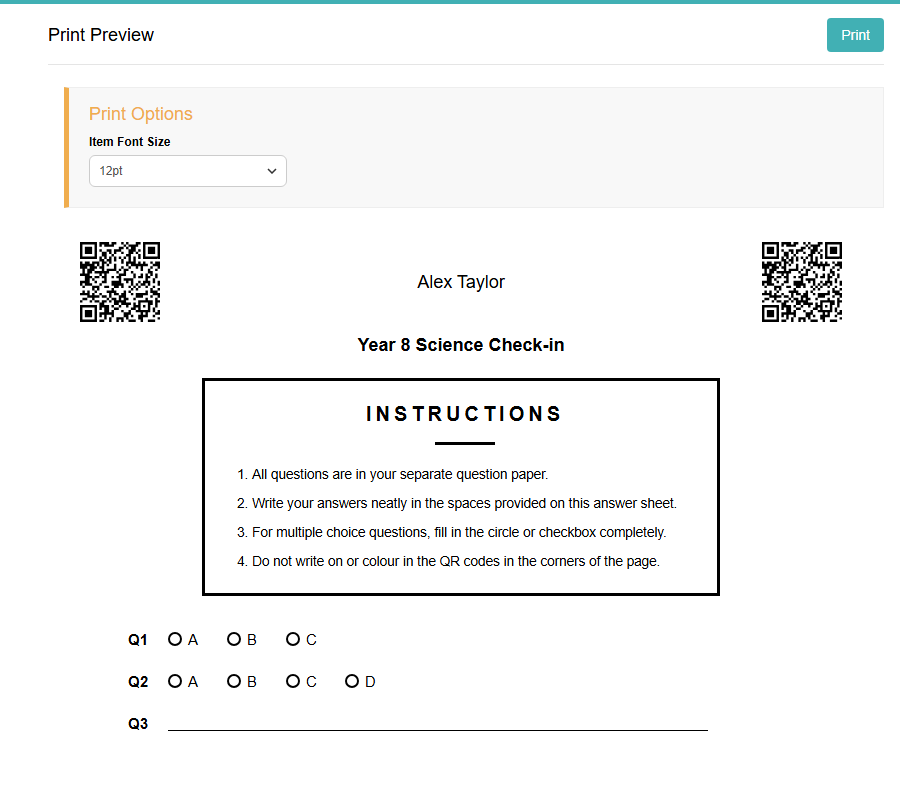
If the papers won't print
| What you see | What it means and what to do |
|---|---|
| Online only against each attempt in the Print Test-taker Test Paper window | The test's Delivery Mode is Electronic, and an electronic test can't be printed. Change it to Mixed, then print again. |
| No 'template' attribute found for print preview. | There's no template for the paper you chose. Print Paper Test needs a Test Print Template, and Print Paper Test & Answer Sheet needs a Test Mark Scheme Print Template. Check the test's Paper Settings, then its module's. See Choose the print templates. |
Brief the test-takers
How a test-taker marks the answer sheet decides how well it can be read. Before the test, tell them to:
- use a dark pencil or black pen, and fill each bubble firmly and completely
- cross out an unwanted answer clearly, then fill the bubble they mean
- keep clear of the QR codes in the corners
- write every answer to the right of the item number — anything over or to the left of the number isn't read
- continue a long answer on the continuation page labelled with its item number, and fill the pages in order.
Scan and upload the answer sheets
After the test, collect the completed answer sheets and bring them in at Deliver > Paper Scan. The Paper Test Submissions screen opens. If Paper Scan isn't in your menu, see Settings. VIEW MARKING PROGRESS, under the introduction, takes you to the test attempts screen.
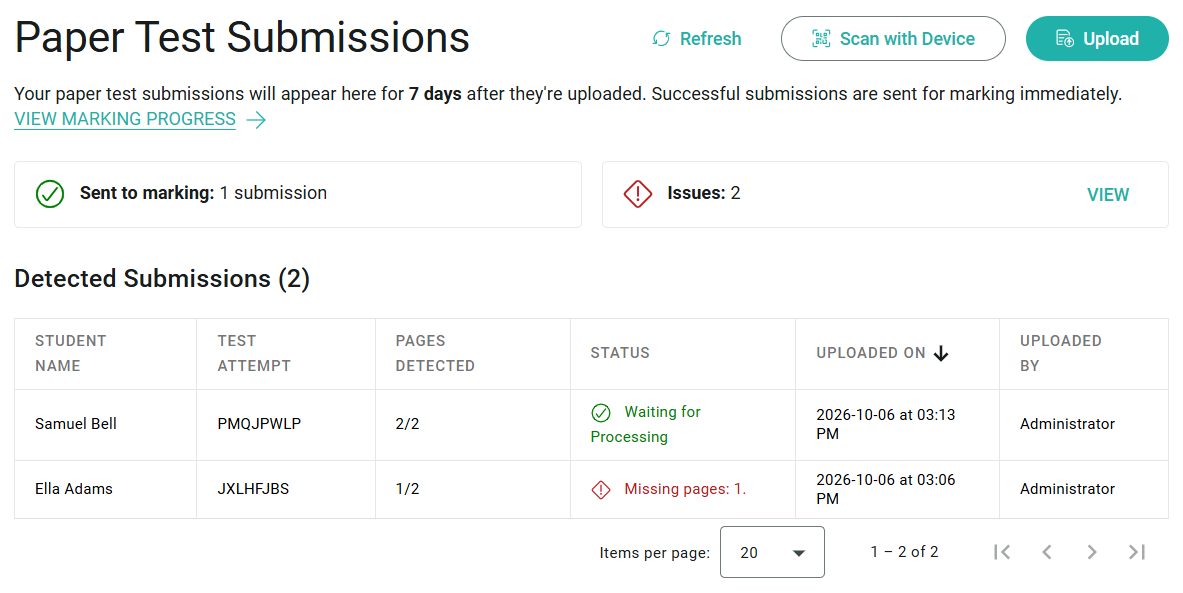
There are 2 ways to add the pages:
- Upload — upload files you've scanned on a flatbed scanner or multifunction printer. This gives the most reliable reading, and suits a large batch of sheets
- Scan with Device — photograph each page with a phone camera. Useful where there's no scanner, but more sensitive to lighting and angle.
You can mix the 2 methods. All the pages for one attempt are grouped into one row, however they arrived.
Upload scanned files
Set your scanner to 600 DPI before you start. Lower resolutions lose detail and make the reading less accurate.
- On Paper Test Submissions, select Upload.
- Choose one or more files. PDF, JPG and PNG are accepted, up to 100 MB per file.
- Wait for the upload to finish, then select Refresh to see the result.
For a test with more than one page, save one PDF per test-taker. Don't compress the PDF or reduce its size before uploading.
Scan with a phone
- On Paper Test Submissions, select Scan with Device. The Scan with Phone window shows a QR code.
- Scan the QR code with your phone's camera. The scanner opens on your phone, already signed in.
- Select Start Scanning.
- Hold the phone directly above the page, in portrait, so all 4 corner QR codes fit inside the frame markers.
- Press the capture button. The page uploads and the camera resets for the next page.
- When you've finished, go back to Paper Test Submissions on your computer and select Refresh.
The Scan with Phone window repeats these steps beside the QR code.
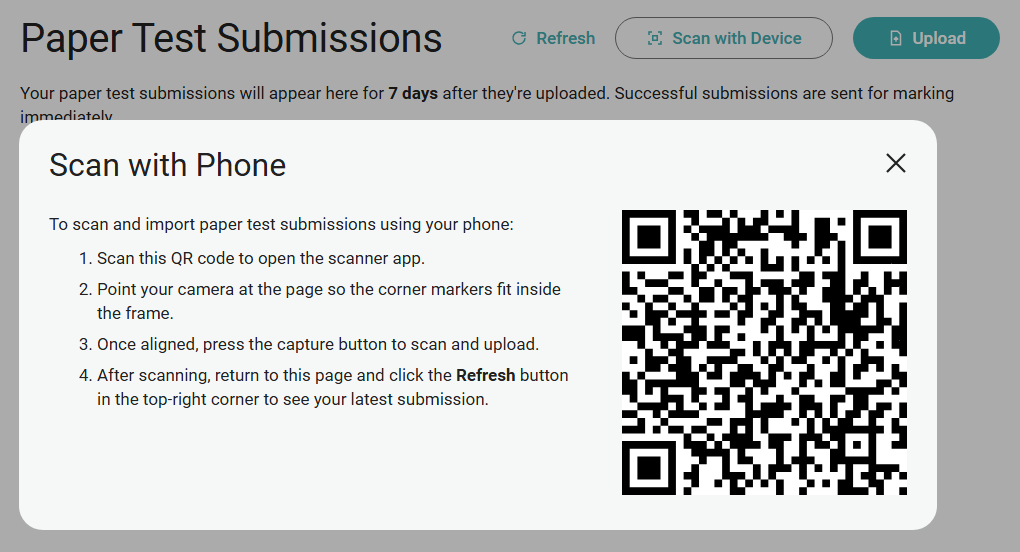
The QR code works once. To scan from another phone, or to start again, select Scan with Device to get a new one.
For a good capture:
- use bright, even light with no shadows across the page
- flatten any folds or creases first
- keep other answer sheets face down, out of the frame.
If none of the QR codes can be read, the phone shows Page Unreadable. Hold the phone steady, check all 4 corners are visible and well lit, and try again.
Check the detected submissions
The Detected Submissions table lists one row per attempt, with the test-taker's name, the attempt's one time code, how many of the expected pages have arrived, and who uploaded them and when. It doesn't update on its own: select Refresh to see the latest.
The table shows submissions from everyone in your organisation, not only your own. Each submission stays on the screen for 7 days after it's uploaded.
Each submission has one of these statuses:
- Processing — the pages are being received and checked
- Partially Uploaded — some pages are still missing. Upload the rest and the status updates
- Uploaded — every page has arrived
- Upload Failed — one or more pages couldn't be accepted. The reason is shown in the issue history
- Waiting for Processing — the attempt has been sent for reading. This normally clears within a few minutes
- Marking Completed — the answers have been read and the attempt has moved on to review and marking
- Marking Failed — the answers couldn't be read. Contact Janison support.
Where something is wrong, the STATUS column shows the reason in red, such as Missing pages: 2.
The summary cards above the table count what has been Sent to marking (Waiting for Processing and Marking Completed) and the Issues (Upload Failed, Marking Failed and Partially Uploaded).
Stuck in Waiting for Processing
If an attempt stays in Waiting for Processing for more than a few minutes, the connection to the reading service has stalled. That isn't something you can fix by uploading again. Contact Janison support.
Fix upload issues
To see the issue history, select VIEW on the Issues card. Test Paper Upload - Issue History lists every upload problem in your organisation over the past 7 days, with the file or test-taker and the reason. It can include issues that have since been fixed.
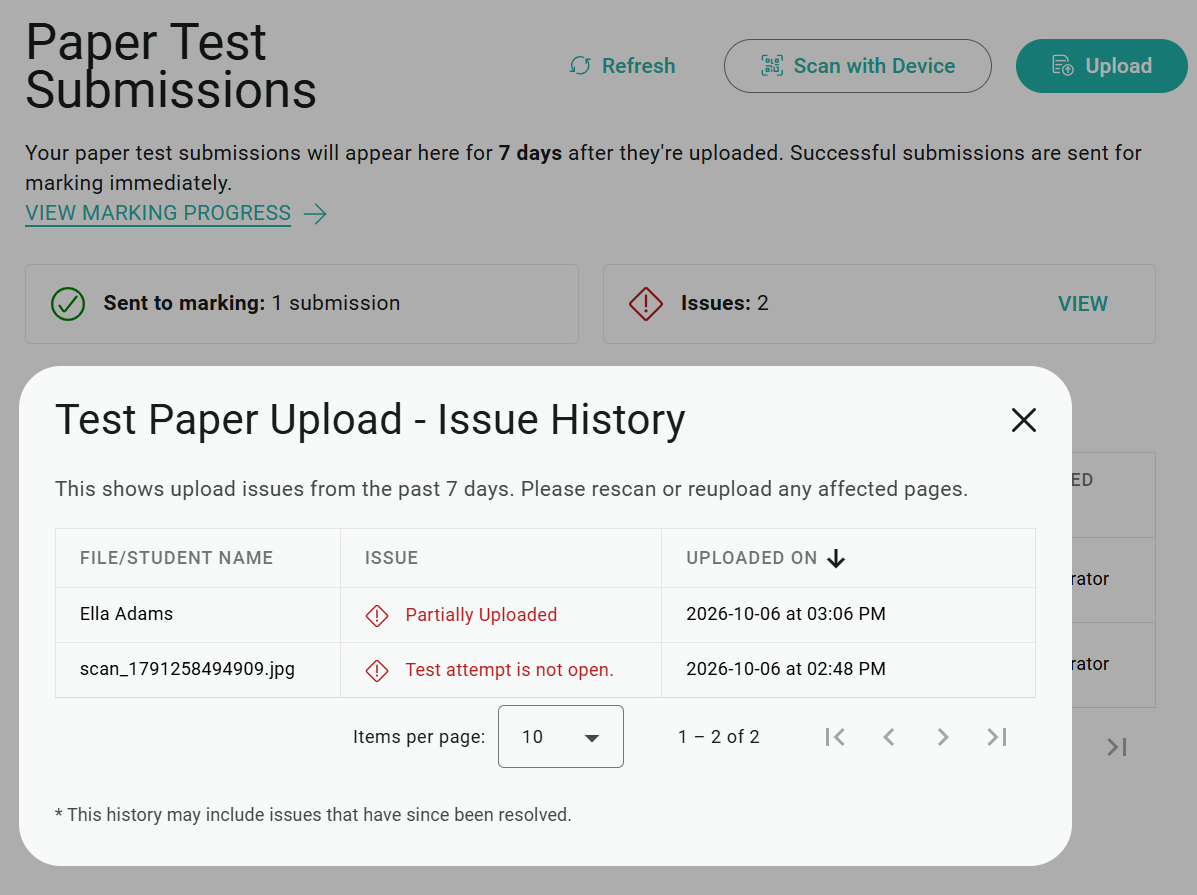
| Issue | What to do |
|---|---|
| QR code unreadable. | None of the 4 QR codes could be read, or they disagreed with each other. Rescan the page flat and well lit, with the corners unobstructed. If it still fails, check it's the right answer sheet. |
| Partially Uploaded (in the table, Missing pages: …) | Upload the pages listed in the table. The submission updates once they arrive. |
| Duplicate page detected in PDF for the same attempt. | The same page appears twice in one PDF. Rescan the attempt without the duplicate. |
| Unsupported file format. | Upload the page as PDF, JPG or PNG. |
| Cannot read file. | The file is damaged or incomplete. Scan it again. |
| Test attempt is not open. | Only an open attempt can take scanned pages. This happens when the answer sheet belongs to an attempt that's already finished, for example one the test-taker submitted online, or when the wrong test-taker's sheet was printed. Check you've got the right sheet, and the attempt's status on the test attempts screen. |
| Attempt has already been submitted | The attempt has already been sent for reading, so it can't take more pages. Contact your assessment coordinator if a correction is needed. |
Uploading the same page again before the attempt is sent for reading replaces the earlier copy. If 2 people upload the same page, the later upload is kept.
Review the scanned responses
Once an attempt's answers have been read, a teacher checks them on the Review Scanned Responses screen, usually under Marking. The list shows every scanned attempt, not only the flagged ones, so you can correct any answer that was read wrongly.
Open the list
- Select Marking > Review Scanned Responses.
- Choose the Assessment event. Only events in delivery are listed.
- Optionally, choose a group. The default is All Groups.
- Select View responses.
The list shows each attempt's Student Name, Test Attempt ID (the one time code), Test, Date Added, Flagged Responses and Review Status. A Review Status of Pending means flagged answers still need checking; Complete means there are none left. Search by the test-taker's name or the one time code. To pick a different event or group, select Change Selection.
Check and correct an attempt
Select Review on an attempt's row. Where nothing on the attempt can be edited, the action says View instead.
Each answer appears beside the part of the scan it was read from, with flagged answers highlighted:
- Multiple Choice — the detected option, which you can change
- Multiple Choices — the detected options as checkboxes
- Text Entry — the text as read, in an editable box
- Extended Text — the whole answer as one piece of text, even if it ran over several pages, in an editable box.
To see the full original pages, select View Original Scan. They open in a new tab.
Correct any answer that doesn't match the scan. Answers you leave alone are accepted as they are. Then select Submit Changes. To abandon your edits instead, select Discard Changes.
When you submit, only the answers you changed are updated, and the attempt is re-marked. Multiple choice and text entry answers are marked automatically again. A changed extended text answer goes back to quick marking, and if it had already been marked with AI co-marking, that marking runs again on the corrected text. Each edit is recorded in the answer's history with the text before and after.
What can still be edited
| Item type | Editable | Becomes view only when |
|---|---|---|
| Multiple Choice, Multiple Choices, Text Entry | As many times as needed, flagged or not | The assessment event closes |
| Extended Text | As many times as needed, flagged or not, until its quick marking score is submitted | Its quick marking score is submitted, or the event closes |
Each answer is locked on its own, so the other answers on an attempt can stay editable. An attempt whose event closes while flagged answers are still unchecked keeps a Review Status of Pending, but can no longer be edited.
If 2 people edit the same attempt at once, the second to submit is told the attempt has changed. Refresh the page and make the changes again.
Things the reading can get wrong
Reading improves with good scans, but a few patterns are worth looking for when you review:
- Faint marks — light pencil or highlighter can be read as no answer
- Phone captures — different lighting can give the same answer different confidence scores
- Text left of the item number — it isn't read at all
- Punctuation — a double quote can be read as the number 11
- Long answers — lines can be split or partly missed, so compare the text against the scan.
Settings
Most of these settings must be in place before any papers are printed or scanned.
Administrators can configure the following settings at Settings > Test Designer Settings.
Enable paper based tests (under Test Authoring Settings) — makes printing available, including the Paper Settings section and the Delivery Mode field on tests. It can only be turned on if Janison has enabled it for your tenant.
Test Print Template and Test Mark Scheme Print Template (under Paper Settings) — the tenant defaults for the question paper and the answer sheet. Override them on a module or a test, as described in Choose the print templates.
Automatic Print Dialog (under Paper Settings) — when ticked, printing several attempts opens a separate print dialog for each one, with no chance to change the print options. Untick it for hybrid printing, so the attempts open together in one preview.
Administrators can configure the following settings at Marking > Marking Settings.
PDF Image DPI — the resolution scanned PDFs are converted at for reading, from 75 to 600. It defaults to 200. Set it to 600 for hybrid delivery.
Answer Accepted Confidence Tolerance — the confidence threshold, from 0 to 100, below which a scanned answer is flagged for review. Set it separately on the Multiple Choice, Multiple Choices, Text Entry and Extended Text rows; a value of 60 is a common choice. An answer is flagged only when its score is below the threshold. A row left empty flags nothing, and with no rows set the review list is empty. The Extended Text row also controls the low-confidence flag in quick marking.
Access to the 2 screens is set per role at Settings > Roles, under Securable Areas of the Application:
Spa Api > Paper Scan — the Paper Test Submissions screen and Scan with Device.
Spa Api > Review Responses — the Review Scanned Responses screen.
See User roles and key features.
Both screens normally appear in the menu: Paper Scan under Deliver and Review Scanned Responses under Marking. If your tenant's menu has been customised, an administrator may have moved them, and a screen added since then won't appear until it's added. To add one, go to Settings > Menu, select the dots beside the area it belongs in, and add the item paper-scan or review-flagged-scanned-responses.
Some setup can only be done by Janison: loading the hybrid print templates into your tenant, setting up the reading for each new test from a sample print, and adjusting the reading if the answer sheet instructions change.