Chief marker tasks
Once marking starts on an enrolment-based project, chief markers keep results moving. They release results, deal with escalated scripts, promote seed scripts and return suspended markers to marking. This page covers each task.
Senior markers have the same tools as chief markers on the dashboard and the marking screen. The tools appear for anyone on the marking team at seniority level 0 to 4. See Marking roles and seniority.
Where you work
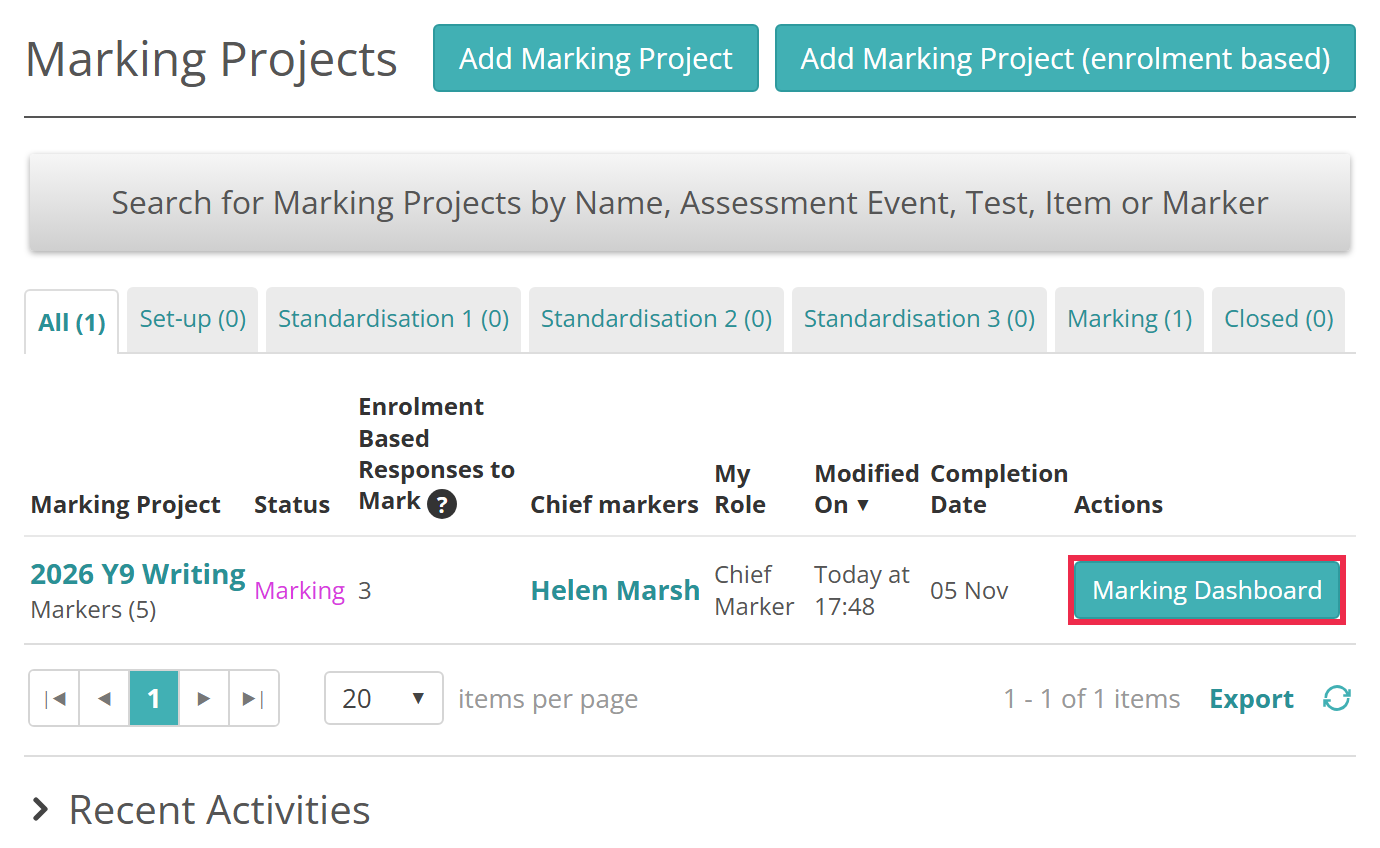
You work from your Marking Dashboard. To open it, go to Marking > Marking Projects and select Marking Dashboard in the project's row.
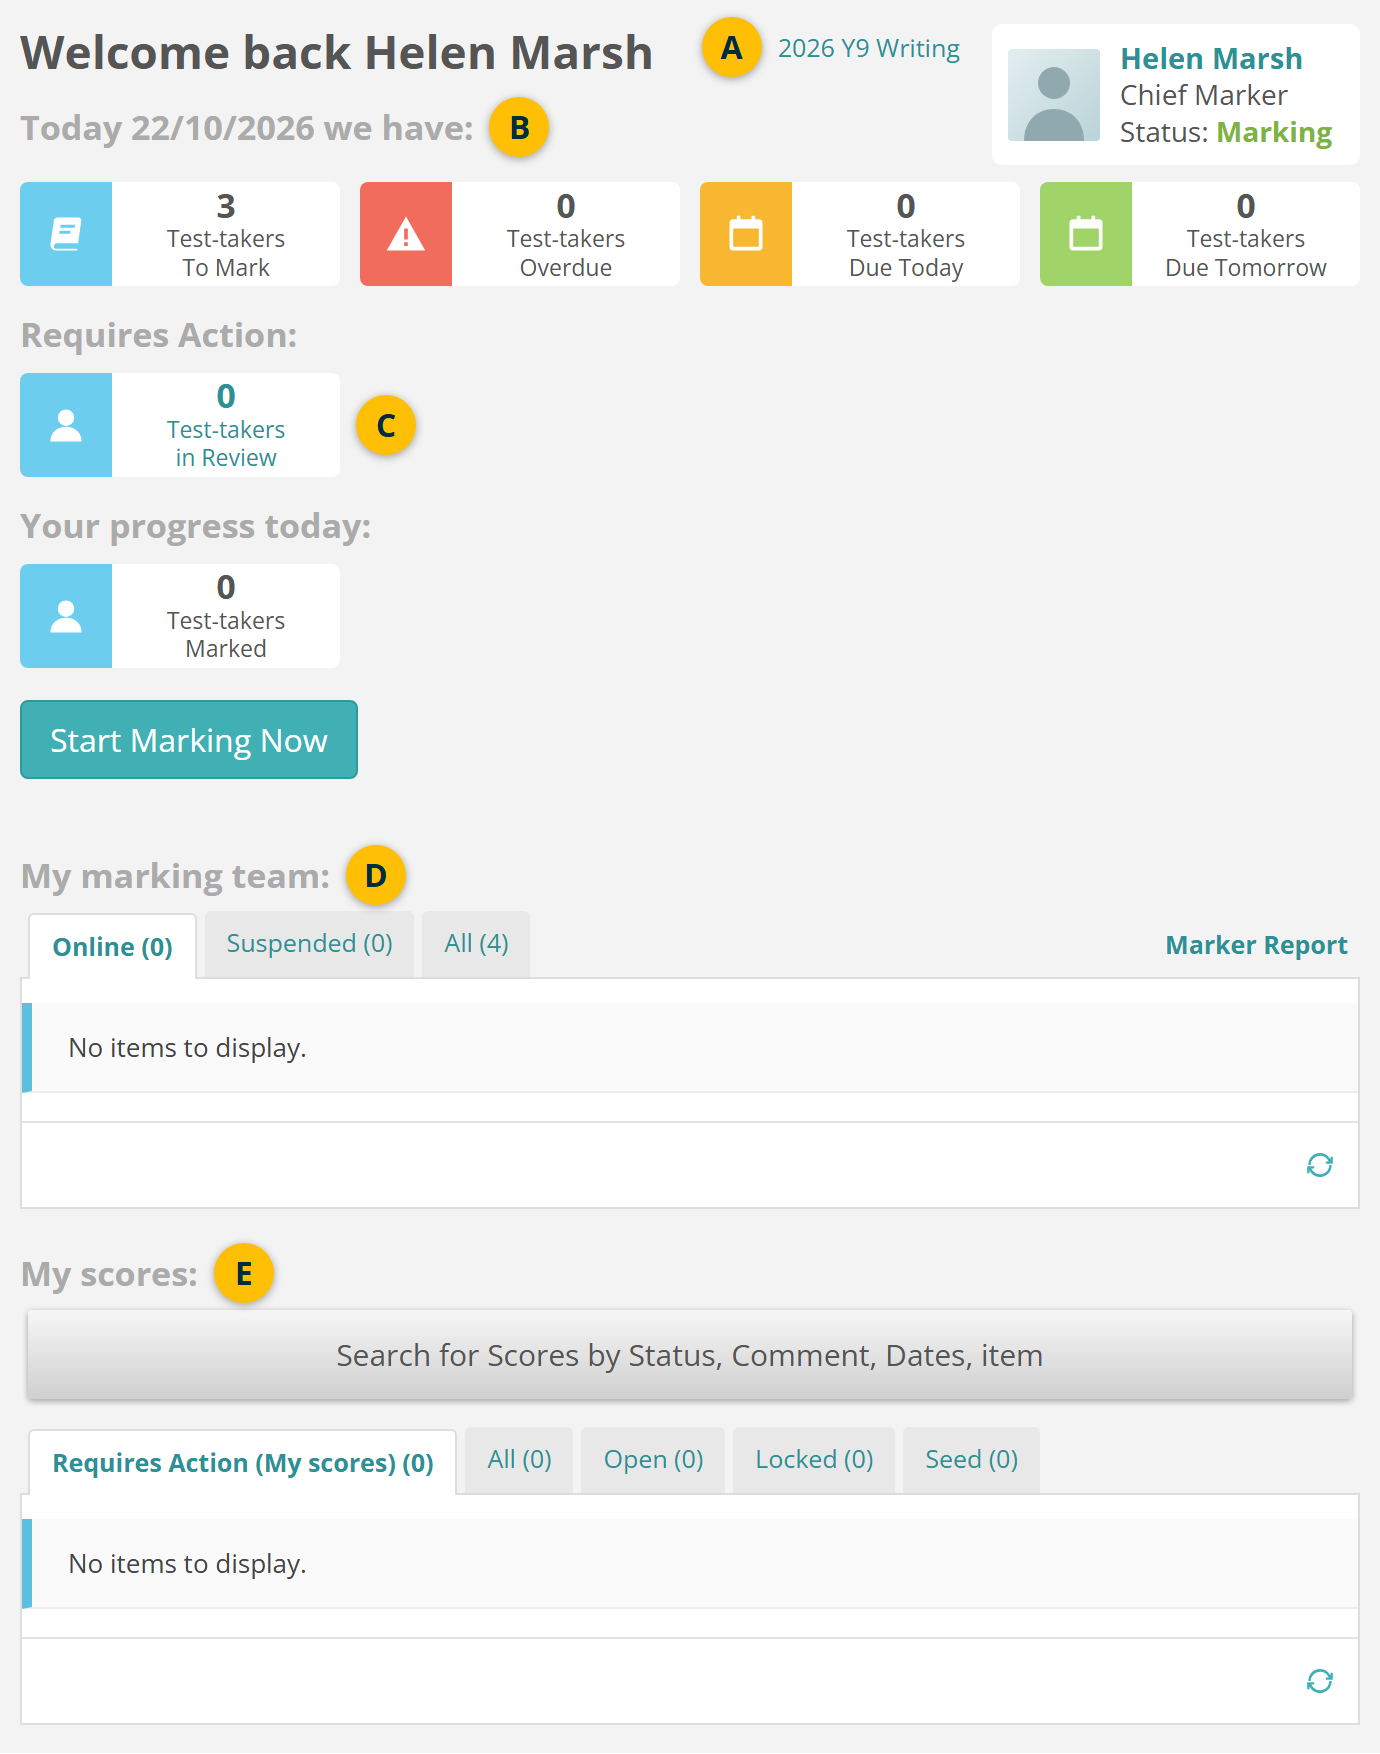
The dashboard has these parts:
- The project's name opens the project's page, where its Enrolments section lists every test-taker.
- The tiles count the test-takers waiting to be marked, and those overdue, due today and due tomorrow.
- Test-takers in Review counts the test-takers held for review. Select it to open them on the project's In Review tab.
- My marking team lists your markers. Its Suspended tab holds markers who've been suspended.
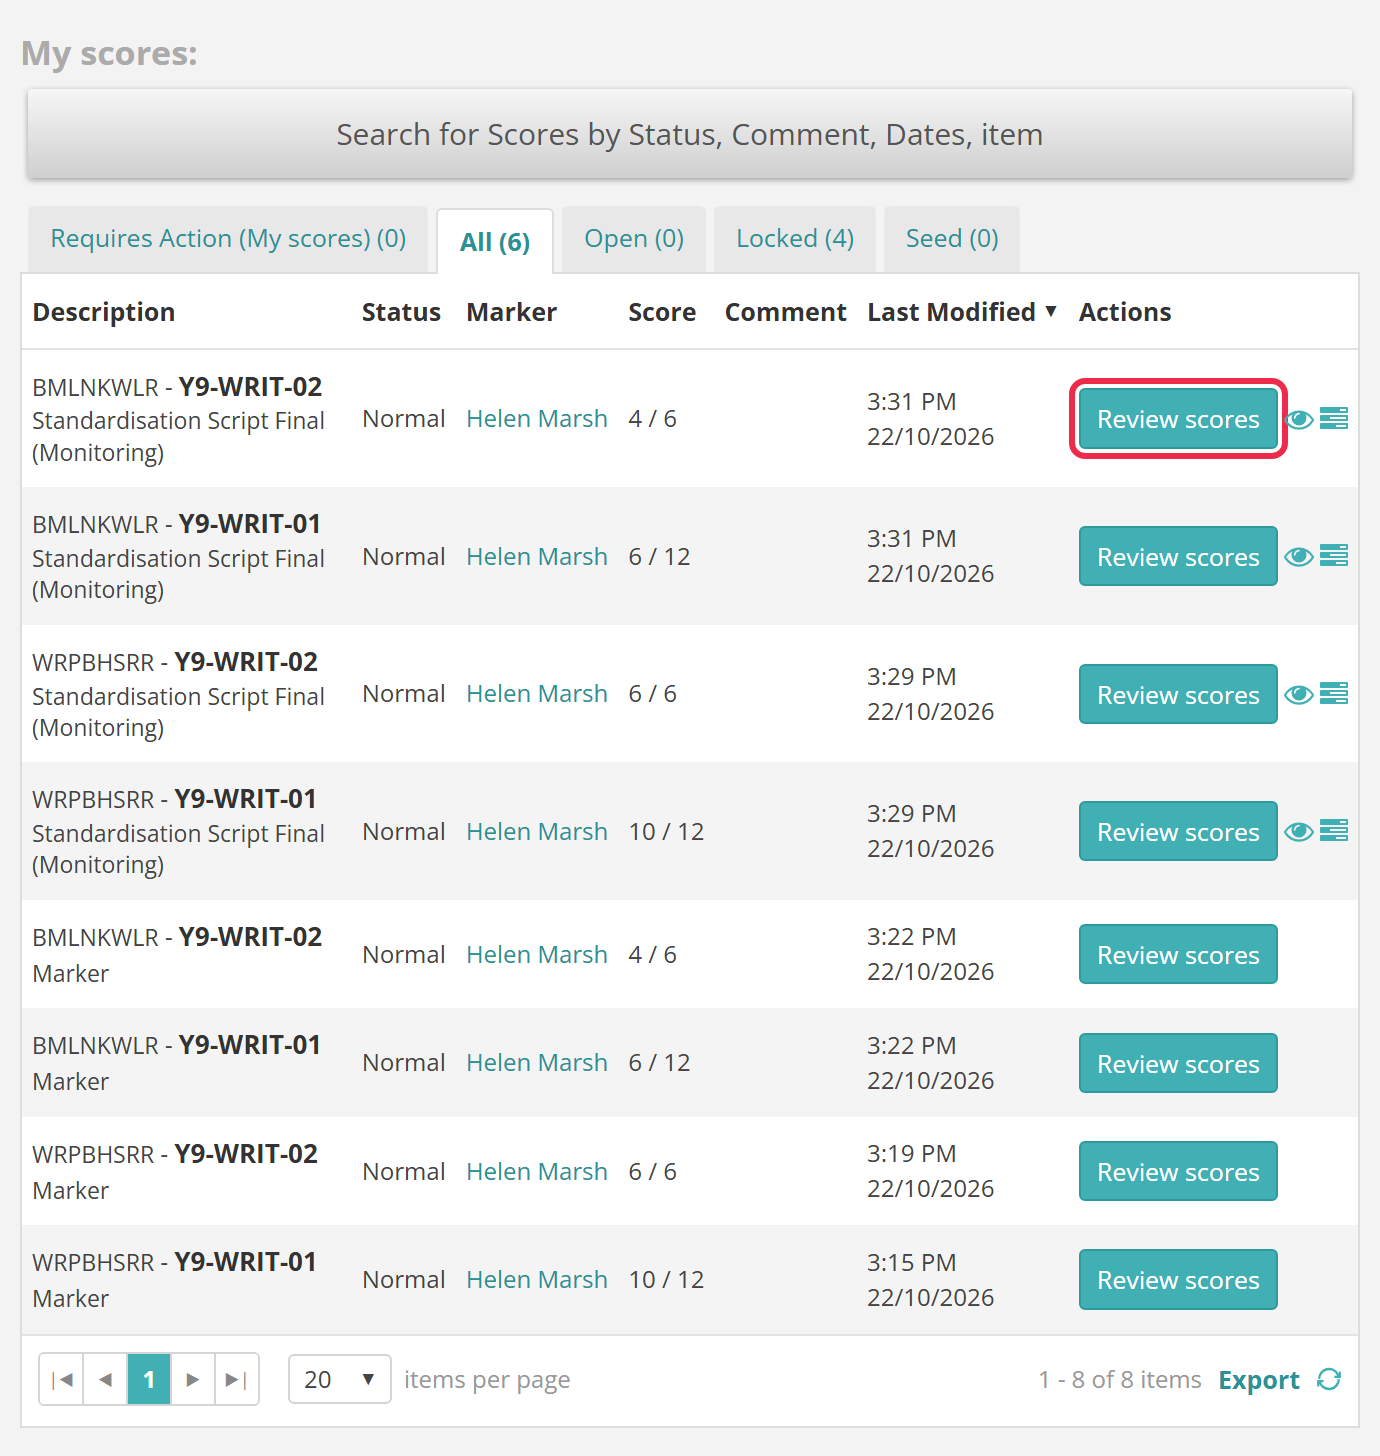
- My scores lists the scores you can open. Select Review scores in a score's row to open its marking screen.
Open a test-taker's marking screen
Each task on a test-taker starts from their marking screen. Open it in one of these ways:
- Under My scores on your dashboard, select Review scores in the score's row.
- In the project's Enrolments section, select
 View more in the test-taker's row. See Act on a test-taker.
Change a test-taker's status
Senior markers see the test-taker's Enrolment Status at the top of the marking screen. Select Change beside it to move the test-taker to another status.
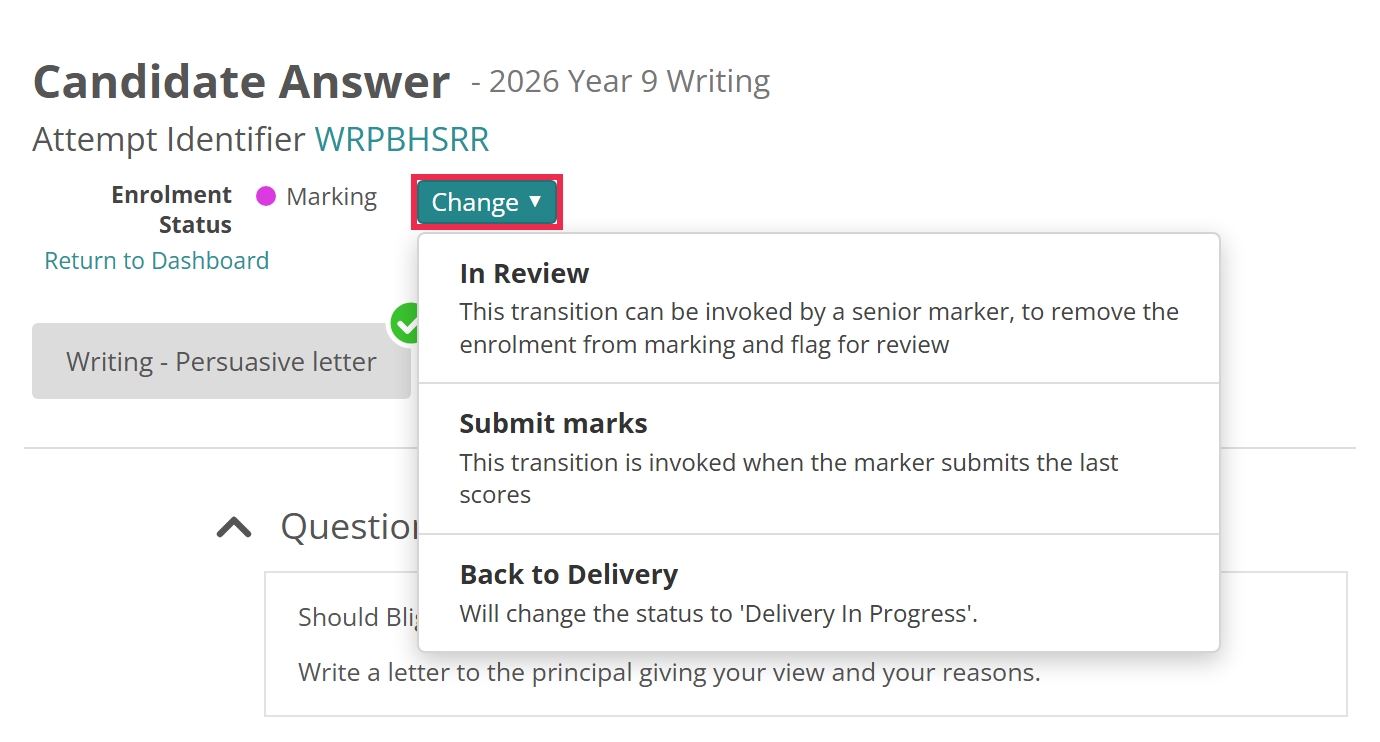
The options depend on the test-taker's status. Once the result is released, Change no longer appears.
At Marking, while the marker is working on the test-taker:
- In Review — takes the test-taker away from their marker and holds them for review.
- Submit marks — submits the marker's scores, as Finish does. See Submit a marker's marks.
At Pending Release, once marking is finished:
- Release results — releases the result. See Release marker results.
- Partial Finalisation — releases the result with the status Partially Finalised.
- Return for marking — sends the test-taker back to their marker to mark again.
- In Review — holds the result for review. It waits there until you move it on.
Return for marking and In Review clear the marks Insights saved to the test-taker's attempts. The marker's scores stay.
At In Review, while the test-taker is held for review:
- Start Marking — moves the test-taker back to Marking for their marker.
- Submit marks — moves the test-taker to Pending Release, ready to be released. See Resolve the escalation.
Back to Delivery is on every menu. It moves the test-taker back to Delivery In Progress.
Each option asks you to confirm. Select Yes.
Release marker results
A result at Pending Release is released automatically 4 days after the test-taker submitted their last test. See When results are released. To release it sooner, open the test-taker's marking screen, where their Enrolment Status is Pending Release. Select Change, then Release results, then Yes.
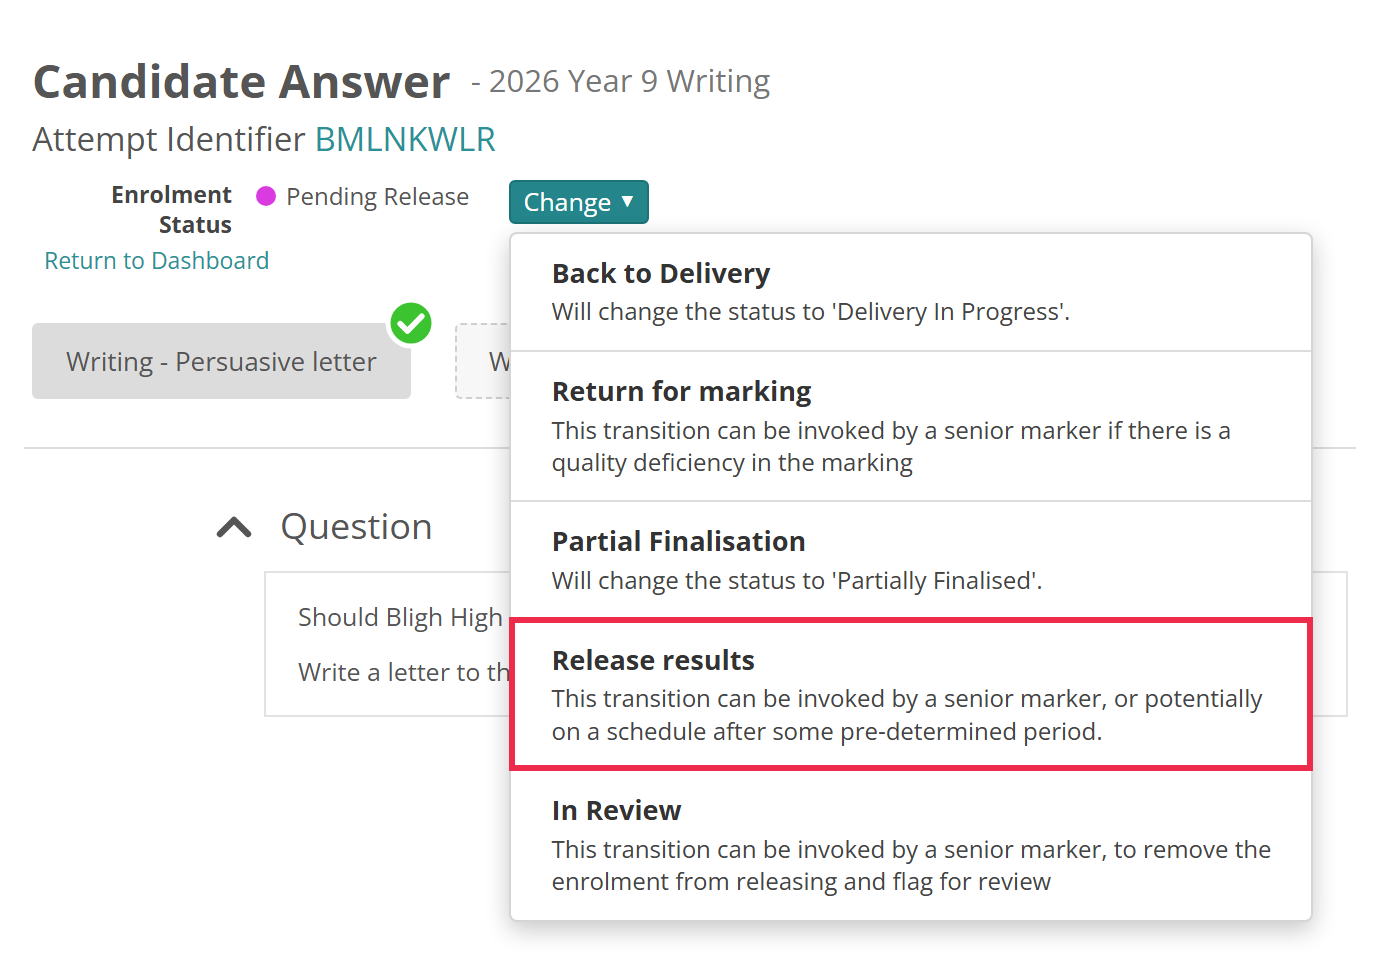
The test-taker moves to Finalised and is emailed that their results are available. If the project uses seed scripts, you can now promote the script. See Promote a script to a seed script.
For a test-taker who didn't complete every test in the enrolment, select Partial Finalisation instead. Their status becomes Partially Finalised.
When Require email to release results is on, a test-taker needs an email address before their result can be released. Without one, Insights shows "Result release has been configured to require email, user missing email address."
Release from the marking project
You can also release a result from the project's Enrolments section, without opening the marking screen. See Release a result.
Submit a marker's marks
A marker may score every item but not select Finish. You can then submit their marks for them. Open the test-taker's marking screen, where their Enrolment Status is Marking. Select Change, then Submit marks, then Yes.
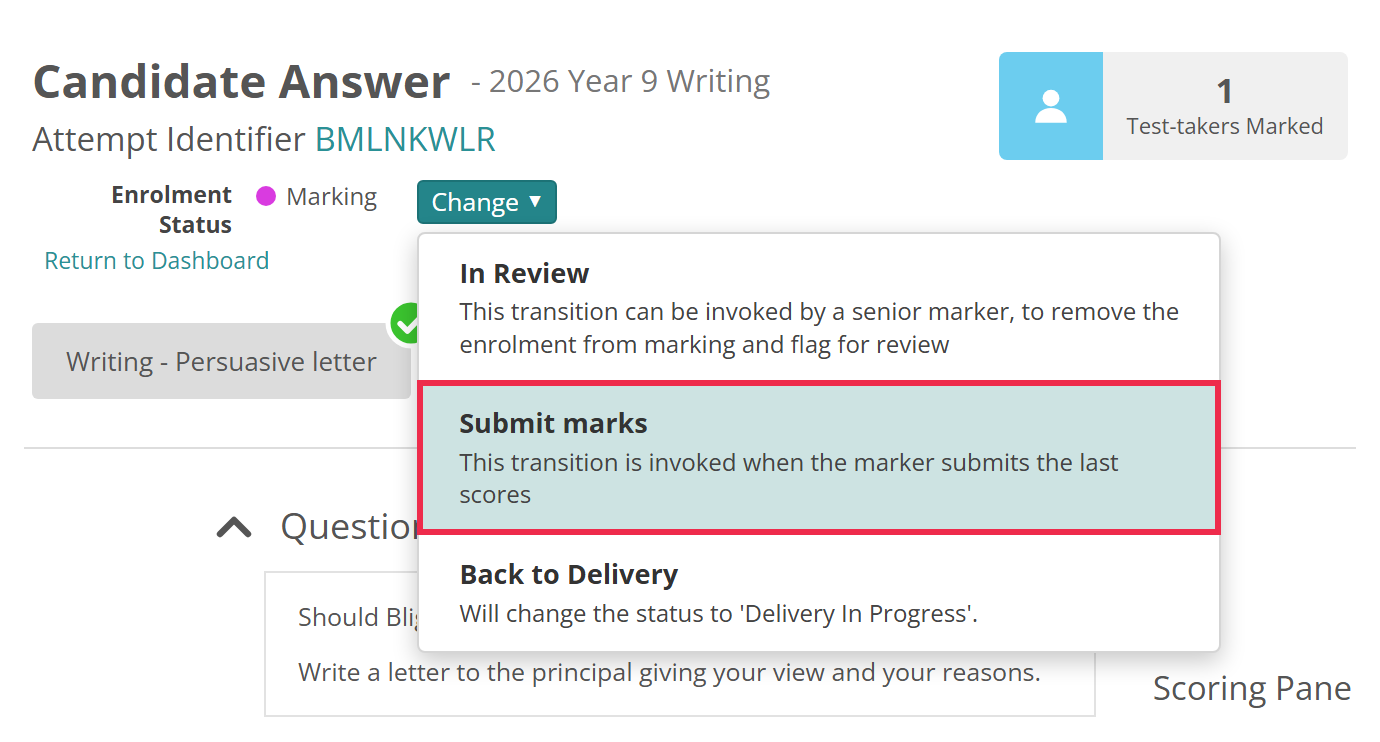
The test-taker moves to Pending Release. Insights first runs the same checks as Finish: every item has a score, and no score is still escalated or in its grace period. If a check fails, a message says why, and the test-taker stays at Marking. Here, two scores are still in their grace period:
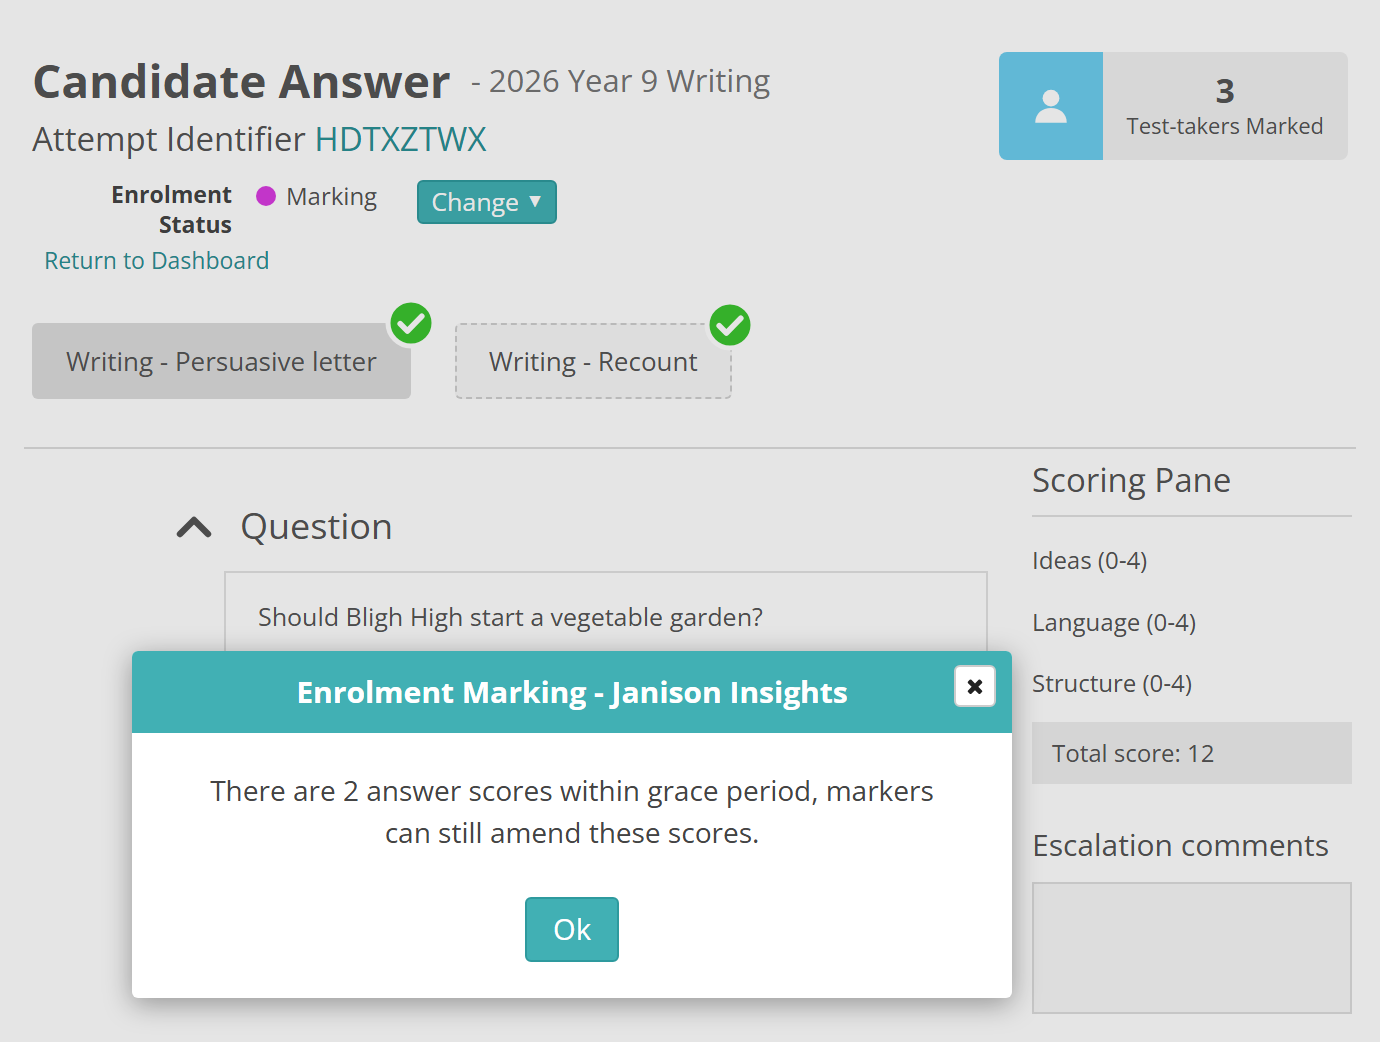
Select Submit marks again once the grace period ends. See Grace periods.
Promote a script to a seed script
Seed scripts check how closely markers match a known mark. See Quality controls. You can promote a script once its result is released with the status Finalised. Promote appears only on projects with Use Seed Scripts selected.
Open the script's marking screen. Select Promote, then Ok.
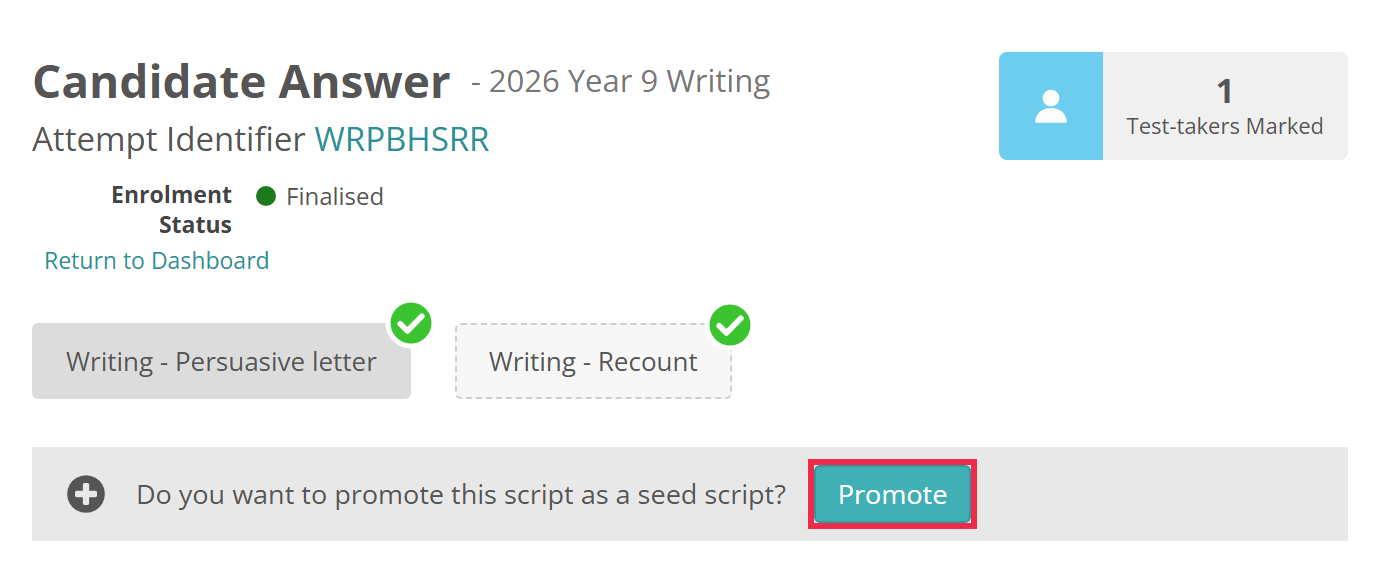
Promoting makes the script's current scores the seed script's mark, so check you agree with all of them first. Insights copies them to My scores as Standardisation Script Final (Monitoring) scores, with you as the marker.
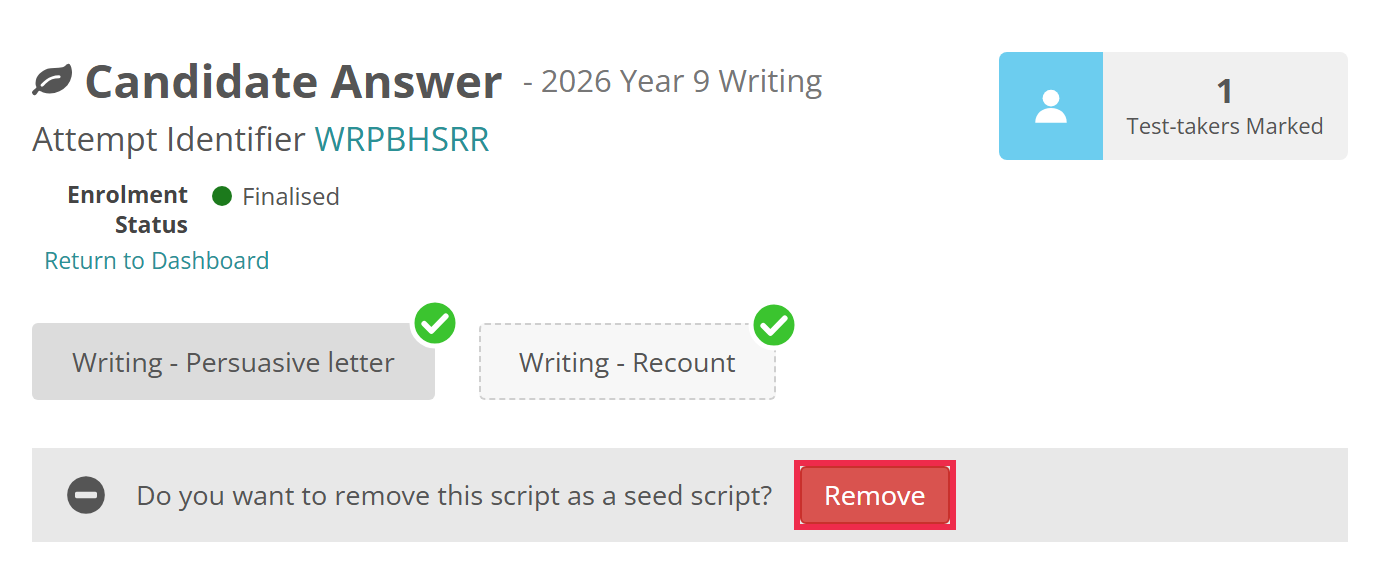
Once the script is a seed script, a leaf icon appears beside Candidate Answer and Remove replaces Promote. To make it an ordinary script again, select Remove, then Ok.
Review escalated scripts
A marker escalates a score when they need advice. Senior markers see an escalated score once any grace period on it has ended. If the marker finishes the test-taker with a score still escalated, the test-taker moves to In Review. A senior marker can also move a test-taker there.
Find test-takers in review
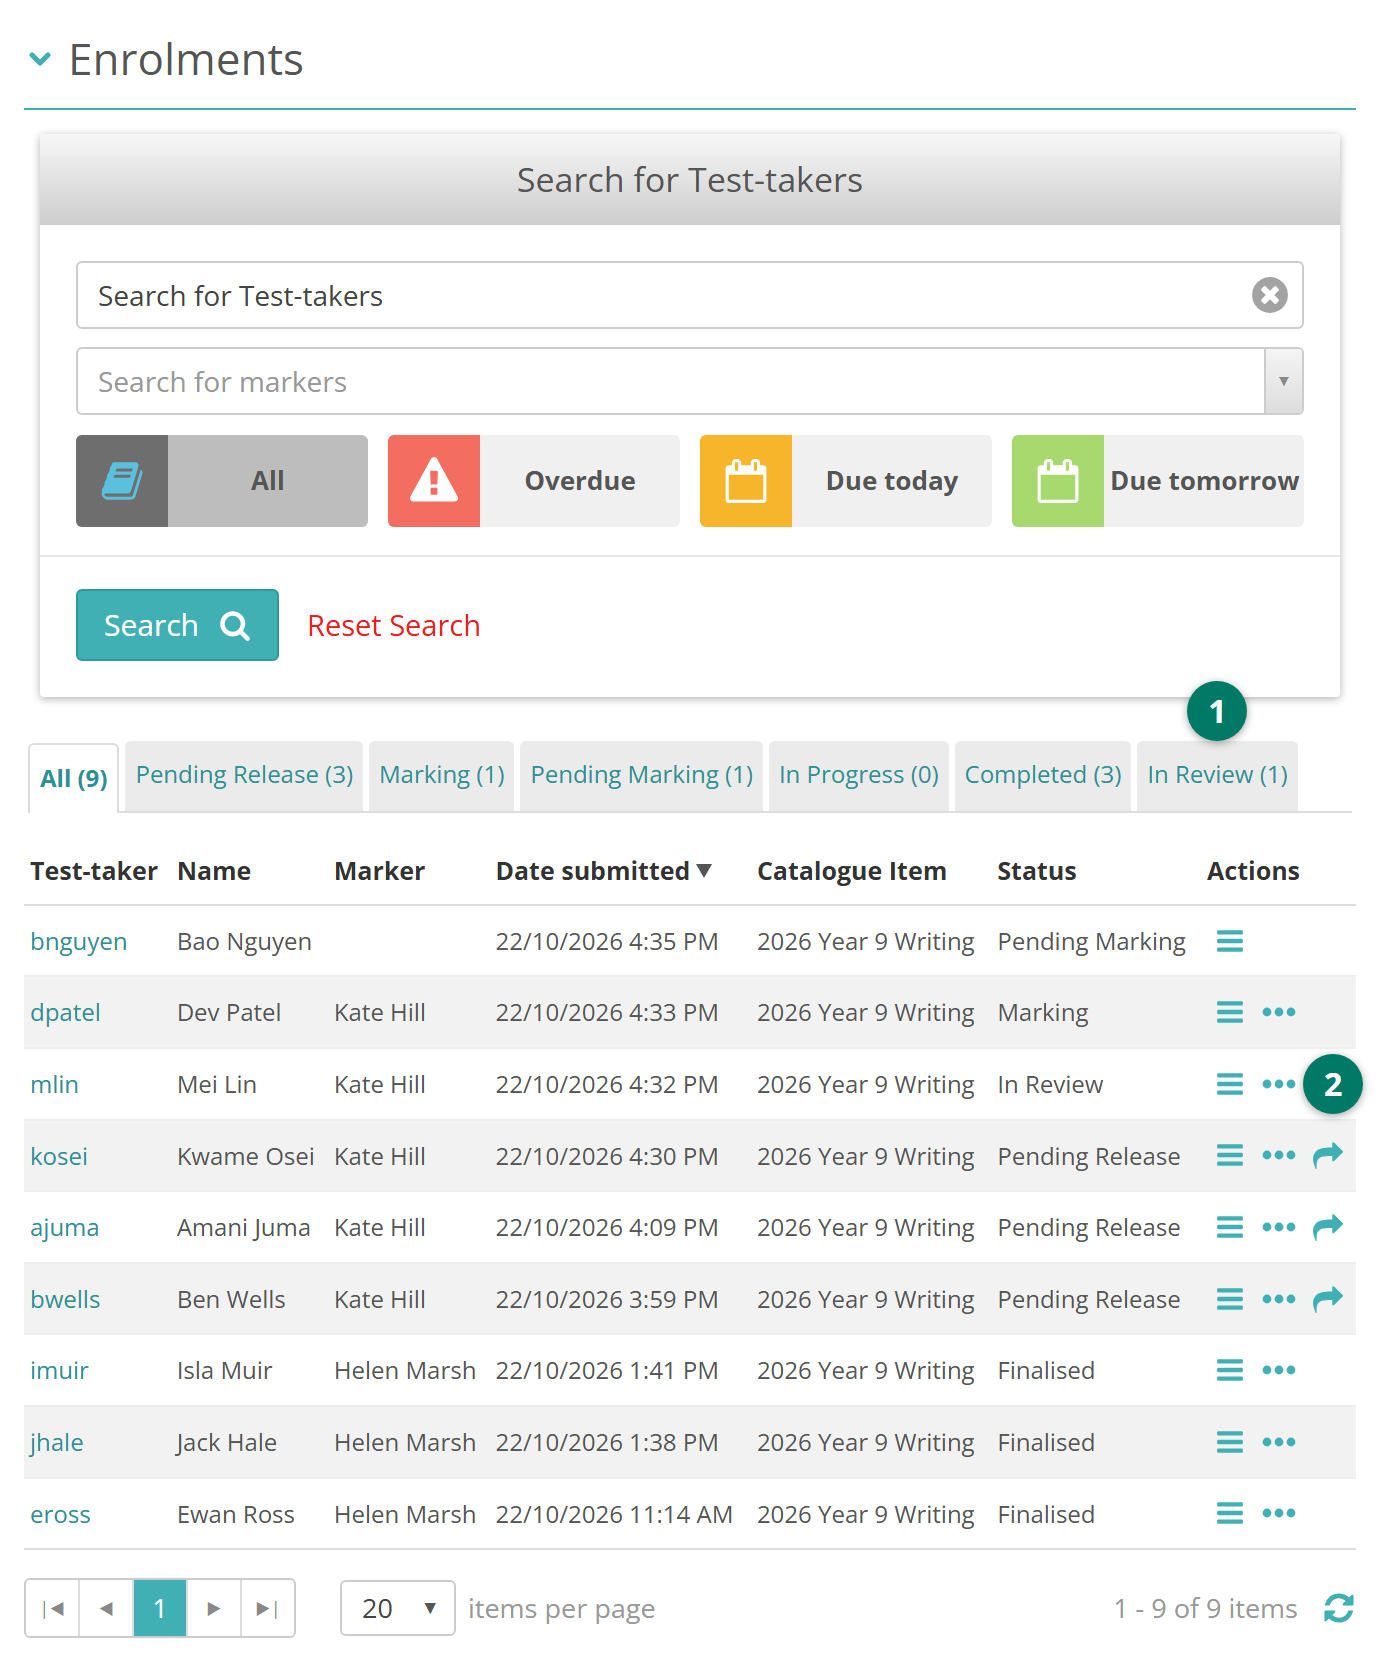
Test-takers at In Review are on the In Review tab of the project's Enrolments section. The Test-takers in Review tile on your dashboard opens the same tab.
- In the project's Enrolments section, select the In Review tab.
- Select View more in the test-taker's row.
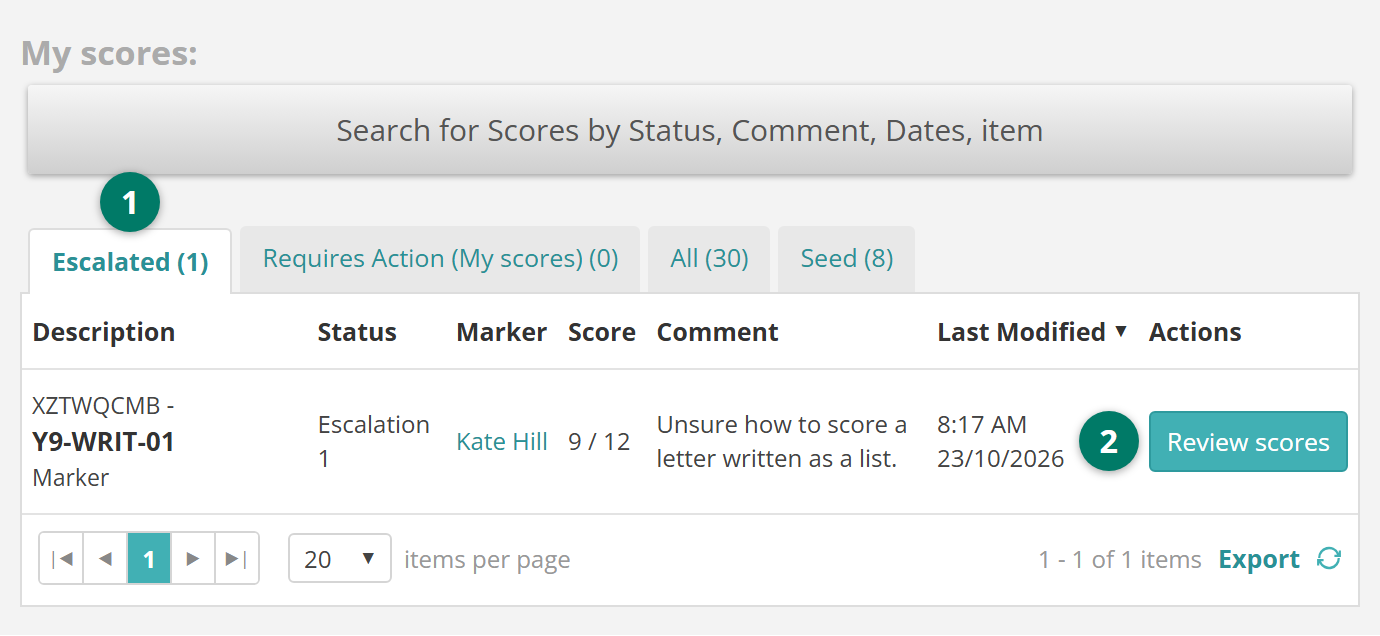
If your role allows it, My scores on your dashboard also has an Escalated tab. It lists escalated scores, including those on test-takers still at Marking.
- Under My scores, select the Escalated tab.
- Select Review scores in the score's row.
A test-taker with an escalated score stays at Marking until their marker finishes. Until then you can open the script and see the escalated item, marked with a blue arrow, but the options for resolving it appear only at In Review. To deal with it straight away, select Change beside Enrolment Status, then In Review, then Yes. This takes the test-taker away from their marker until you return them with Start Marking or submit their marks.
Resolve the escalation
On the test-taker's marking screen, the Do you agree? panel asks whether you agree with the marker's score. It appears while the test-taker is at In Review, if you haven't scored the script yourself. It sits beside the response, below the Scoring Pane, with the marker's comment under Escalation comments.
- No, add my score lets you score the item yourself.
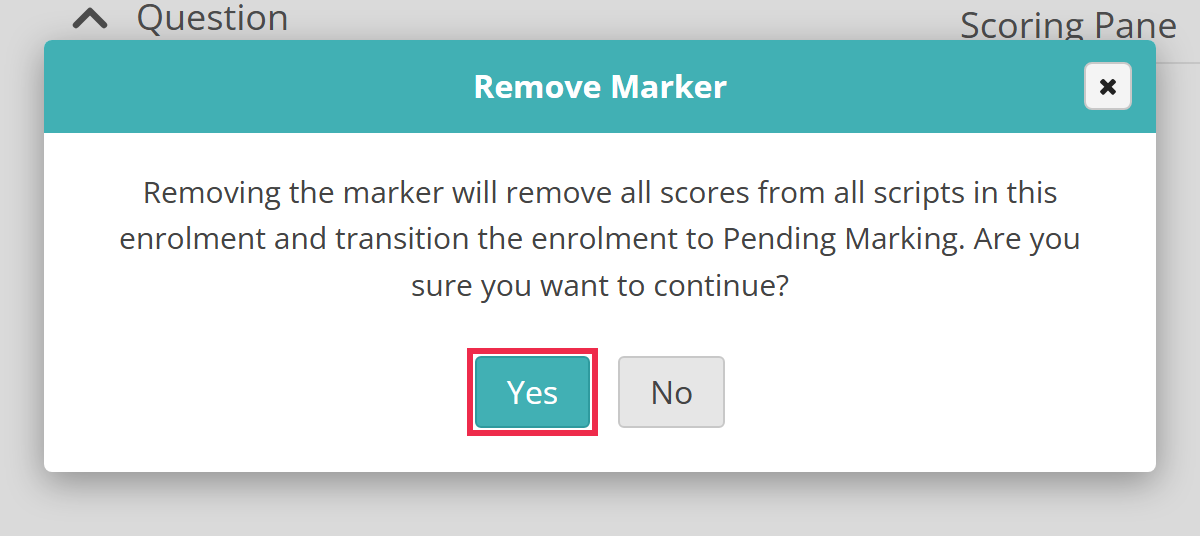
- Remove marker takes the test-taker away from their marker. It deletes every score on their scripts and moves them back to Pending Marking, to be marked again.
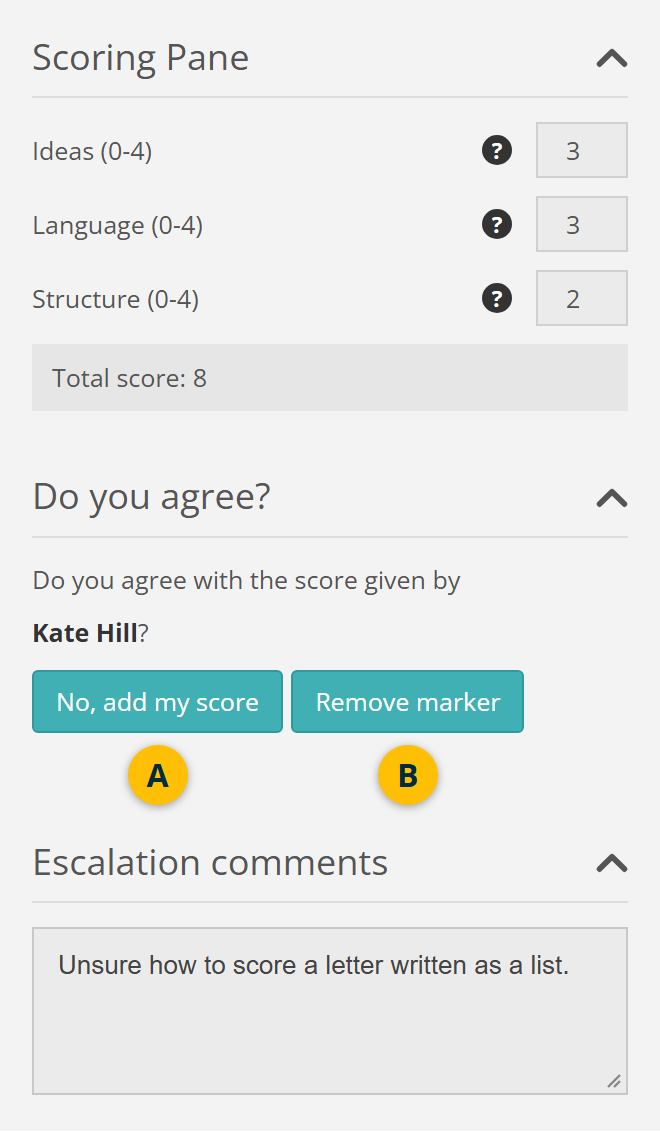
Remove marker asks you to confirm. Select Yes.
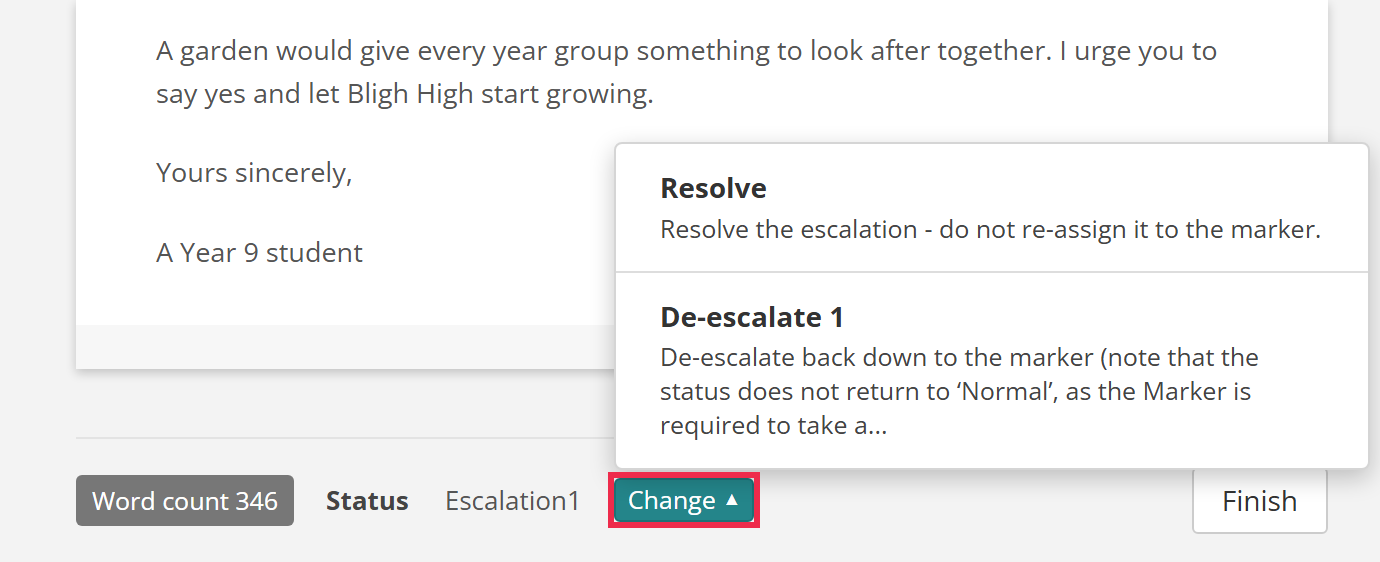
At In Review, each score also has a Change menu, beside its Status below the response. For an escalated score it has Resolve and De-escalate 1. Resolve closes the escalation and keeps the score. De-escalate 1 returns the score to the marker to deal with.
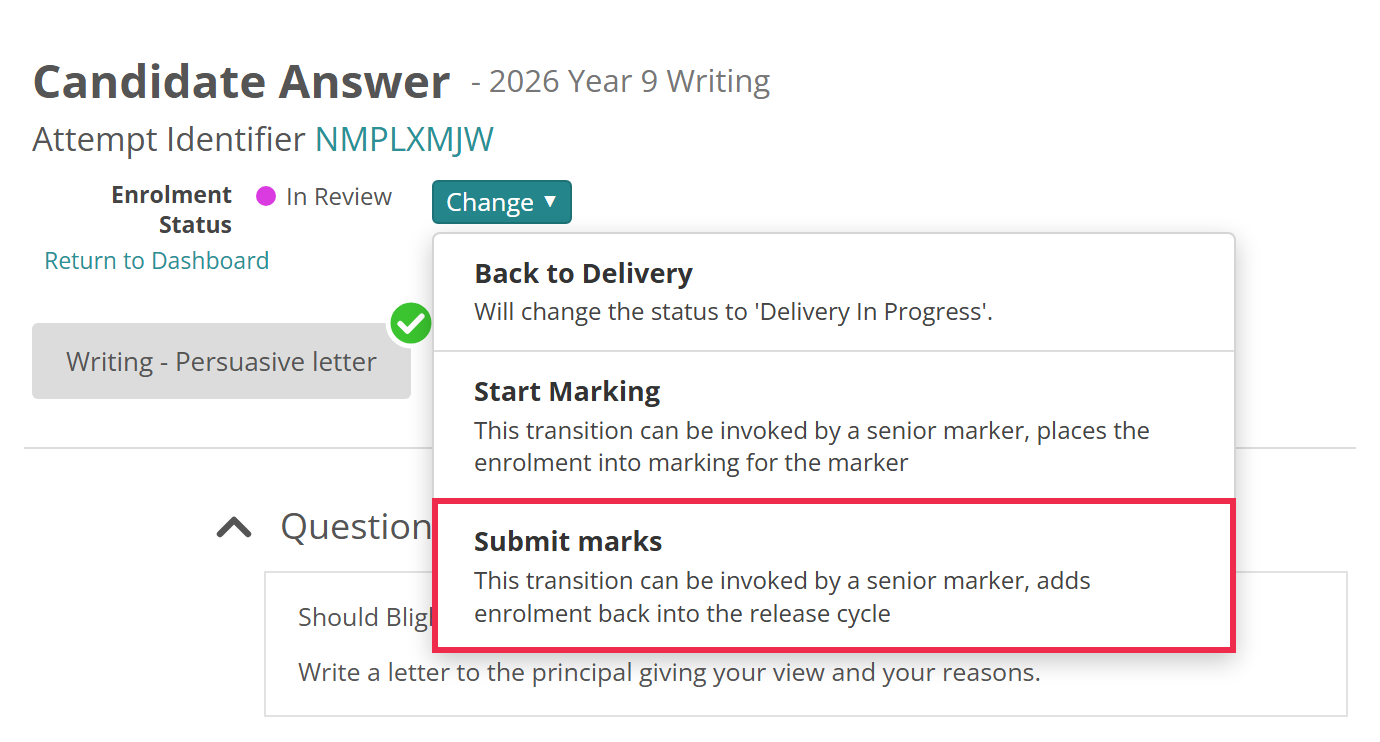
Once every escalation on the test-taker is dealt with, select Change beside Enrolment Status, then Submit marks, then Yes. The test-taker moves to Pending Release, ready to be released.
Manage suspended markers
Insights suspends a marker who fails too many seed scripts, and emails their nearest senior marker. See Notification settings. The marker sees a message telling them to contact the chief marker. They can't mark until a senior marker returns them to marking.
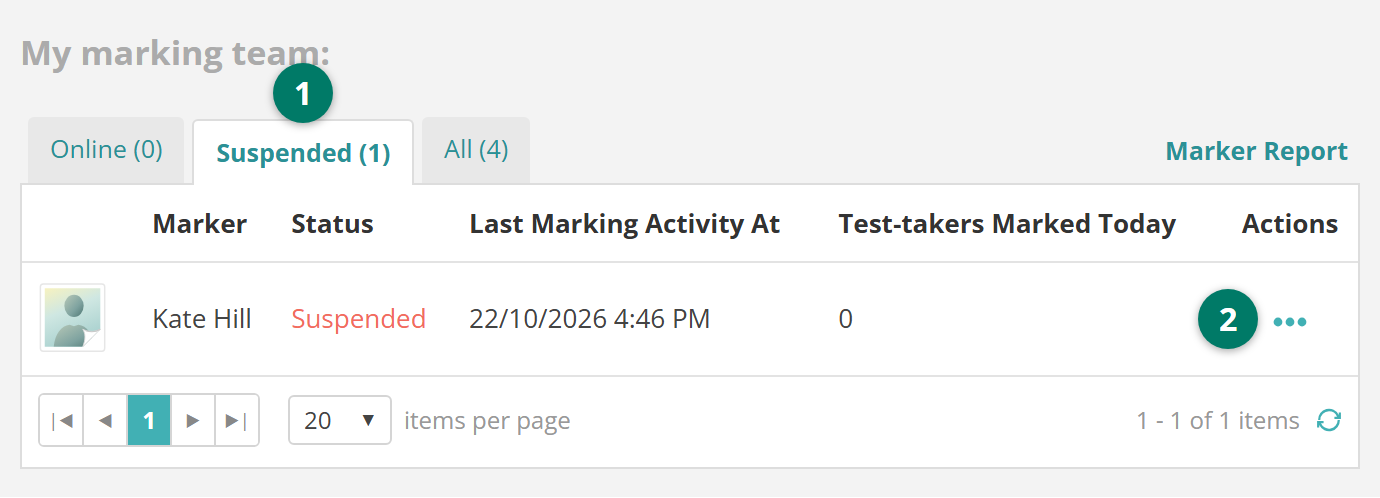
- On your Marking Dashboard, under My marking team, select the Suspended tab.
- Select View more in the marker's row.
The marker's profile opens.
Return a marker to marking
On the marker's profile, select Change beside Status, then Return to Marking, then Yes.
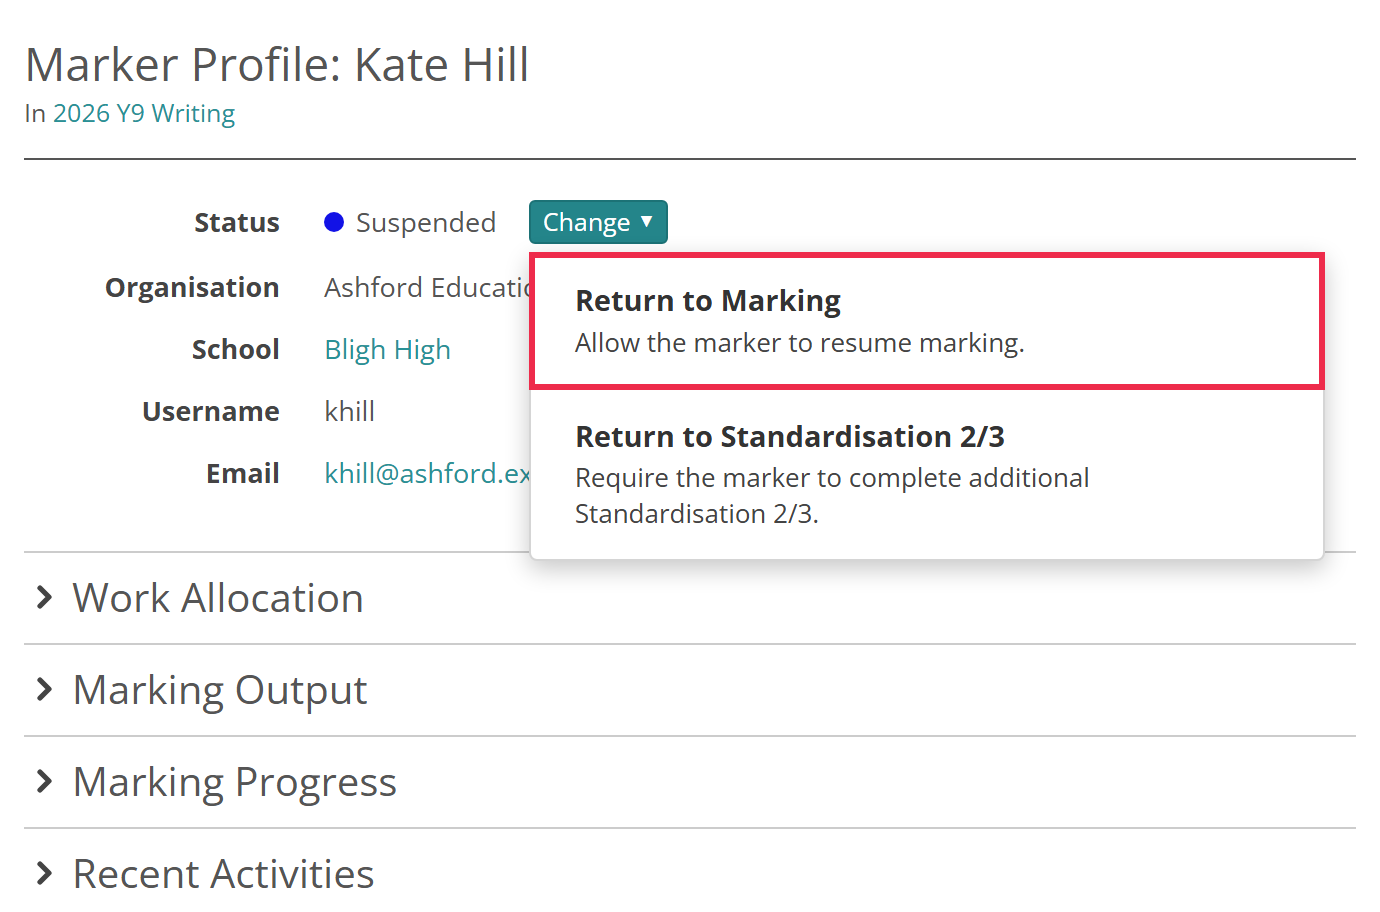
Return to Standardisation ⅔ sends the marker back to Standardisation ⅔ and clears their standardisation scores. An enrolment-based project uses Standardisation ⅔ only when an administrator turns its section on. See Quality controls.
Review a marker's script history
Check a marker's seed scripts before you return them to marking. On the marker's profile, expand Marking Progress.
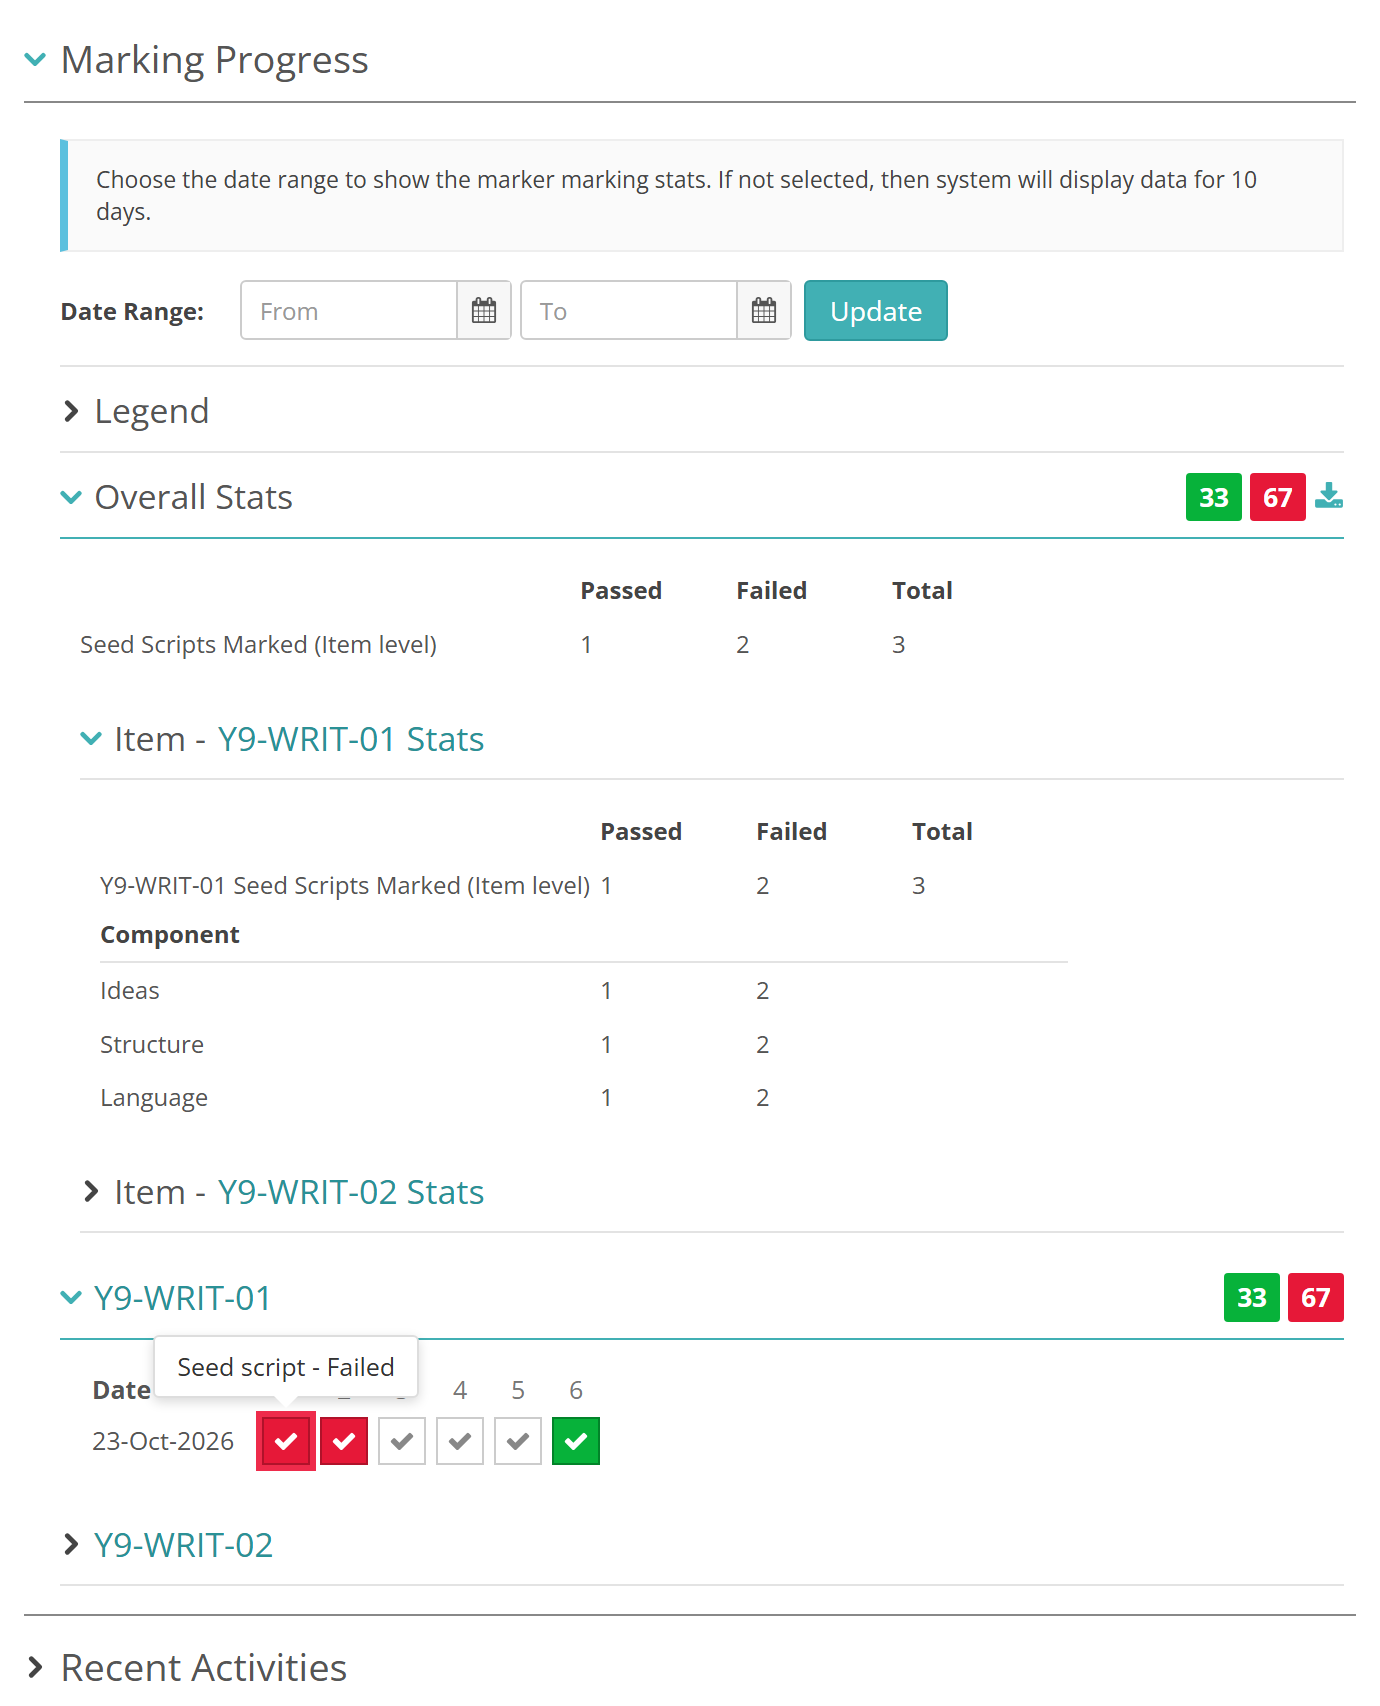
It shows the last 10 days unless you choose a Date Range and select Update. Overall Stats gives the percentage of seed scripts the marker passed and failed, and breaks the numbers down by item and component. Each item below it expands into a grid, with a row for each day and a cell for each script the marker marked that day. Hover over a cell to see which kind it is:
- Live script - Marked — a grey tick, for an ordinary script
- Seed script - Passed — a white tick on green
- Seed script - Failed — a white tick on red.
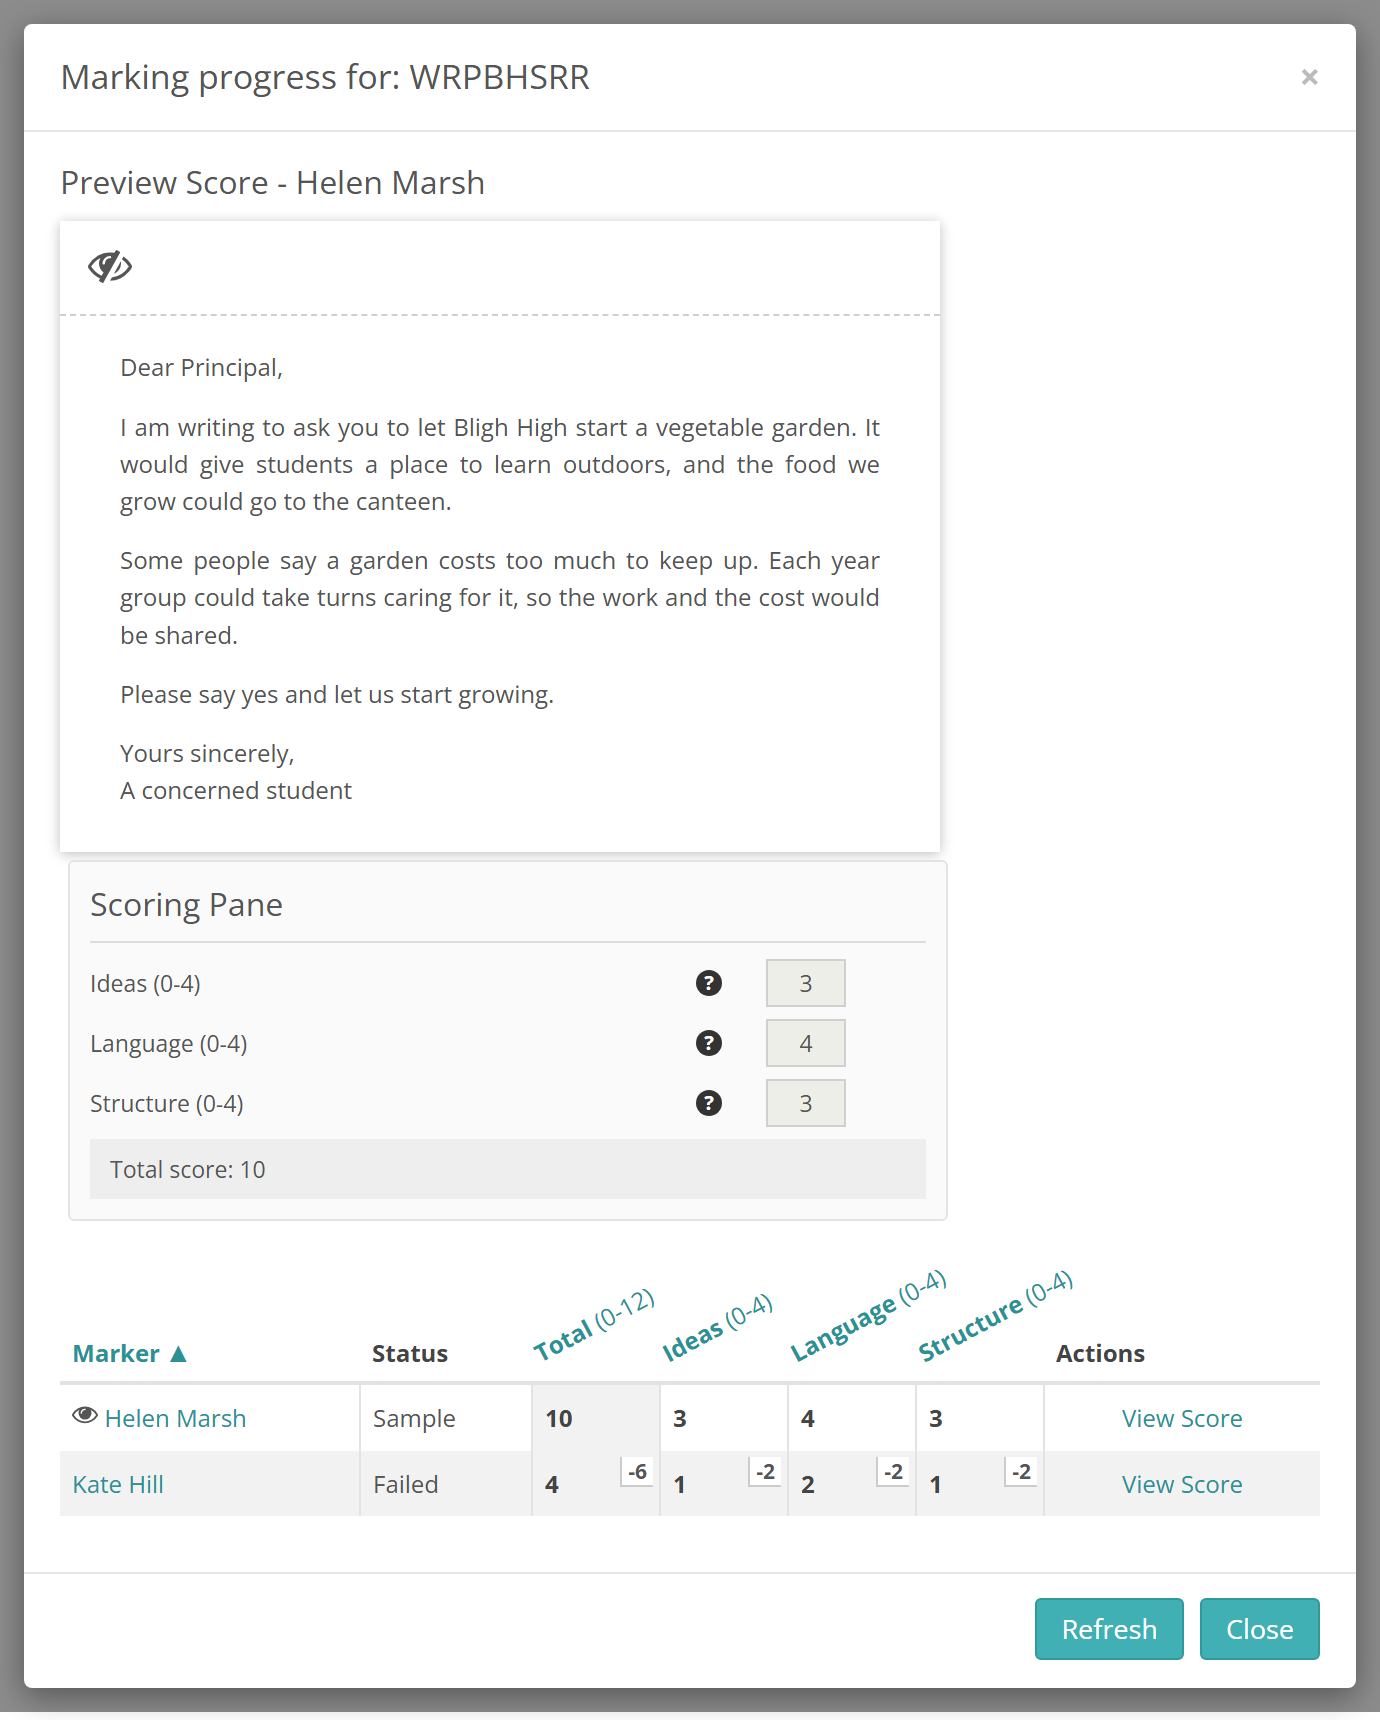
Select a seed script's cell to compare the marker's score with the seed script's mark. The mark is the one the script had when it was promoted.
The Marking progress for: window shows the script, the seed script's mark and the marker's score. The mark is listed as Sample, under the name of whoever promoted the script. Beside each of the marker's marks is how far it was from the seed script's.
Settings
Administrators can configure these settings at Marking > Marking Extended Settings, in the Marking Project Settings section.
Require email to release results — stops a result being released for a test-taker with no email address. Off by default.
Enable Seed Script Settings Section, in Enrolment Based Marking Project Section Settings — shows the Seed Script section, where a project turns seed scripts on. On by default.
On each marking project:
Use Seed Scripts, in the Seed Script section — shows Promote on finalised scripts. See Set up seed scripts.
Grace Periods, in Project Settings — Submit marks is refused while any of the test-taker's scores is in its grace period. With grace periods on, My scores also has Open and Locked tabs. See Grace periods.
Seniority, or Marking role/Seniority, for each marker in Marking Team — markers at level 0 to 4 get the Change menu on the marking screen, Test-takers in Review and My marking team. See Marking roles and seniority.
Each user's role, at Settings > Roles, decides whether My scores has an Escalated tab.
The automatic release 4 days after submission is built in. See When results are released.