Test session administration
A test session is like a virtual classroom. Invigilators use it to manage test-takers as they complete an assessment. An administrator or invigilator sets it up once the assessment event has been switched to Delivery mode.
Test-takers complete the assessment in Janison Replay or a browser. Their progress appears in real time on the Test Sessions Administration dashboard. From there you start and finish the session, and manage individual test-takers — for example, pausing a test or granting extra time.
Important
Janison Insights is highly customisable. Depending on your site's configuration and your role's permissions, your screens may differ from the images on this page.
Practise running a test session
Test session simulation
Practise running a test session, with a guide beside each step. You create a session, start it and admit a late arrival. Then you handle a disruption and 2 device problems, award extra time and finalise. Done it before? Skip straight to free practice.
Create a test session
You create test sessions from the Delivery Dashboard. For the steps, see the test centre dashboard.
You can create several sessions for one event — for example, one per room — so each invigilator sees only the test-takers in their room. Or use a single session so invigilators can monitor everyone at once.
The session dashboard
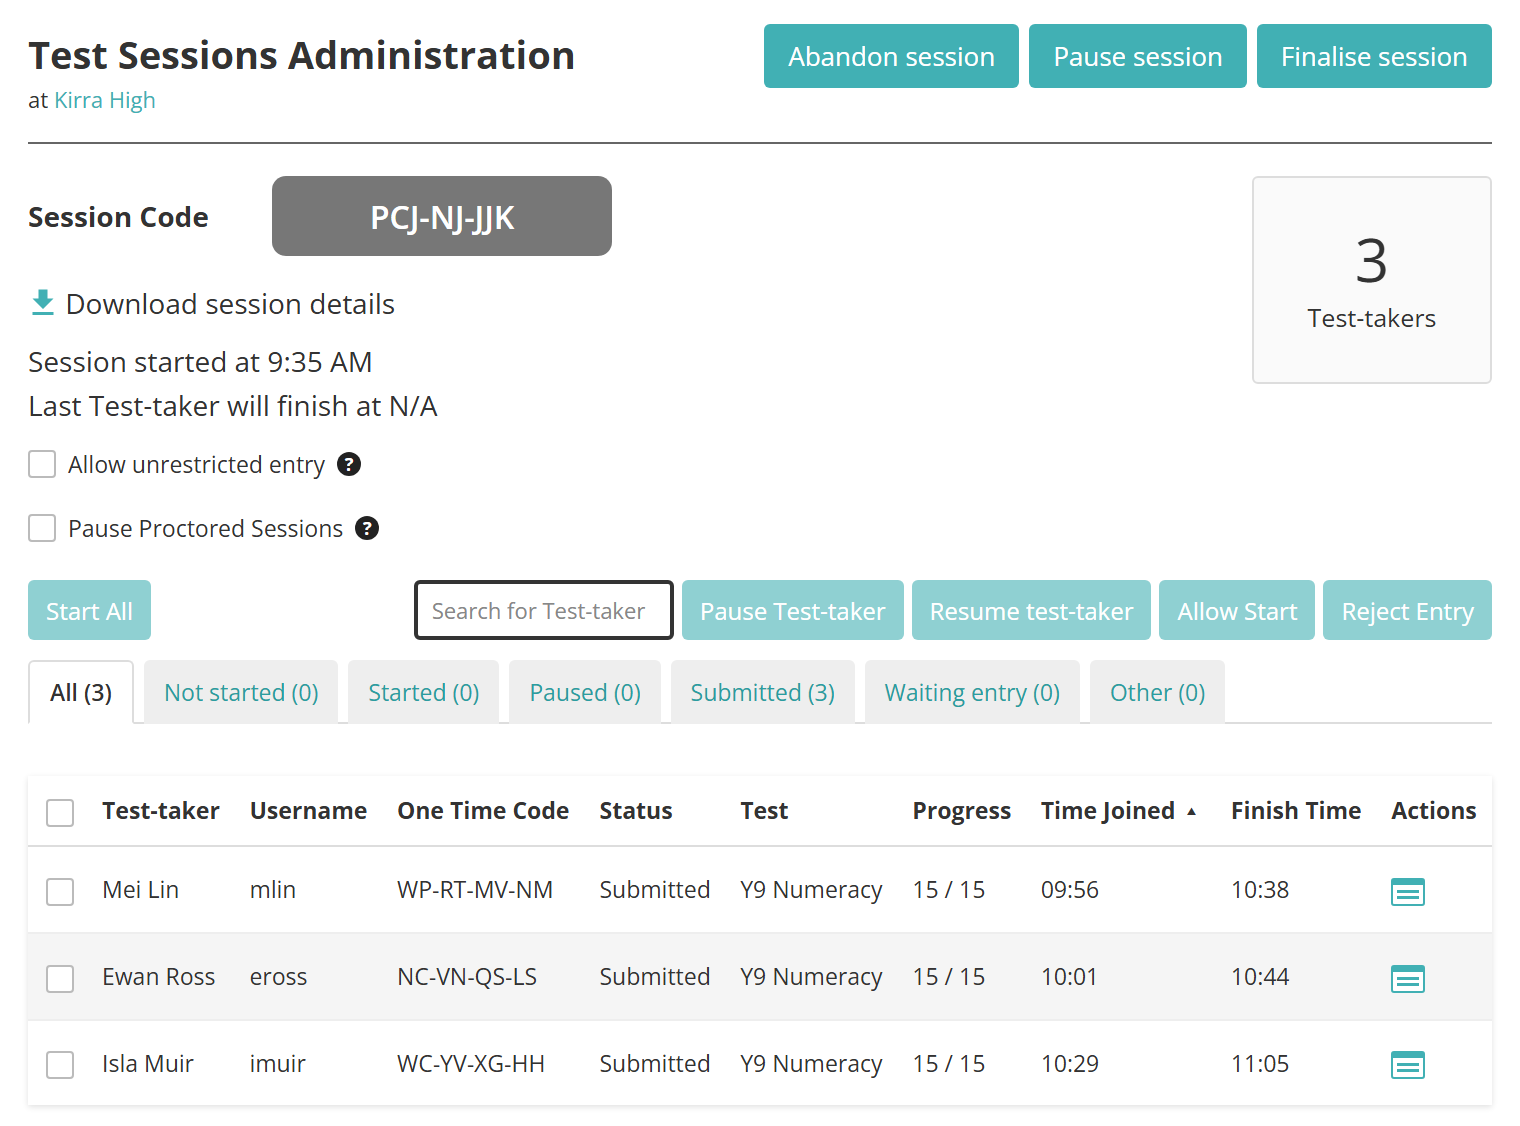
The Test Sessions Administration dashboard is where you manage the session and its test-takers.
Select each plus (+) marker on the screenshot to see what that part of the dashboard does. Use the arrows on a label to step through all 10 in order.
- Manage the session Use these buttons to pause, resume, finalise or abandon the whole session.
- Session code The code test-takers enter to join this test session.
- Download session details Downloads the Invigilator Session Details Excel report. It shows the assessment event details, the disability adjustment codes and each test-taker's details, including their start and end times.
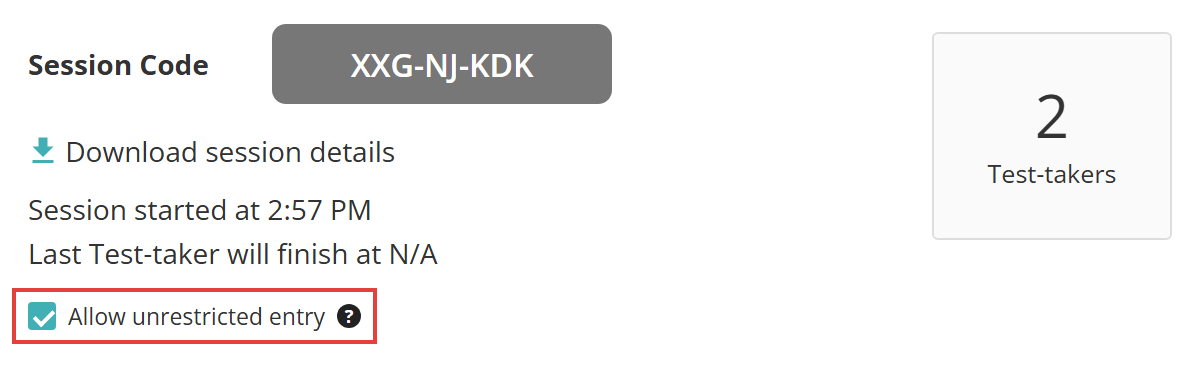
- Allow unrestricted entry When ticked, test-takers who join after the session has started can enter without you having to allow them in.
- Pause proctored sessions When ticked, a proctored test pauses if it loses its connection to the proctoring software.
- Number of test-takers How many test-takers have accessed the test session.
- Manage test-takers Search for a test-taker, then use these buttons on the ones you've ticked. Which buttons appear depends on the tab you're on and the session's state.
- Status filters Filter the list of test-takers by status: All, Not started, Started, Paused, Submitted, Waiting entry or Other. Waiting entry is hidden while Allow unrestricted entry is ticked.
- Test-taker details and progress Each test-taker in the session, with their one-time code, status and progress.
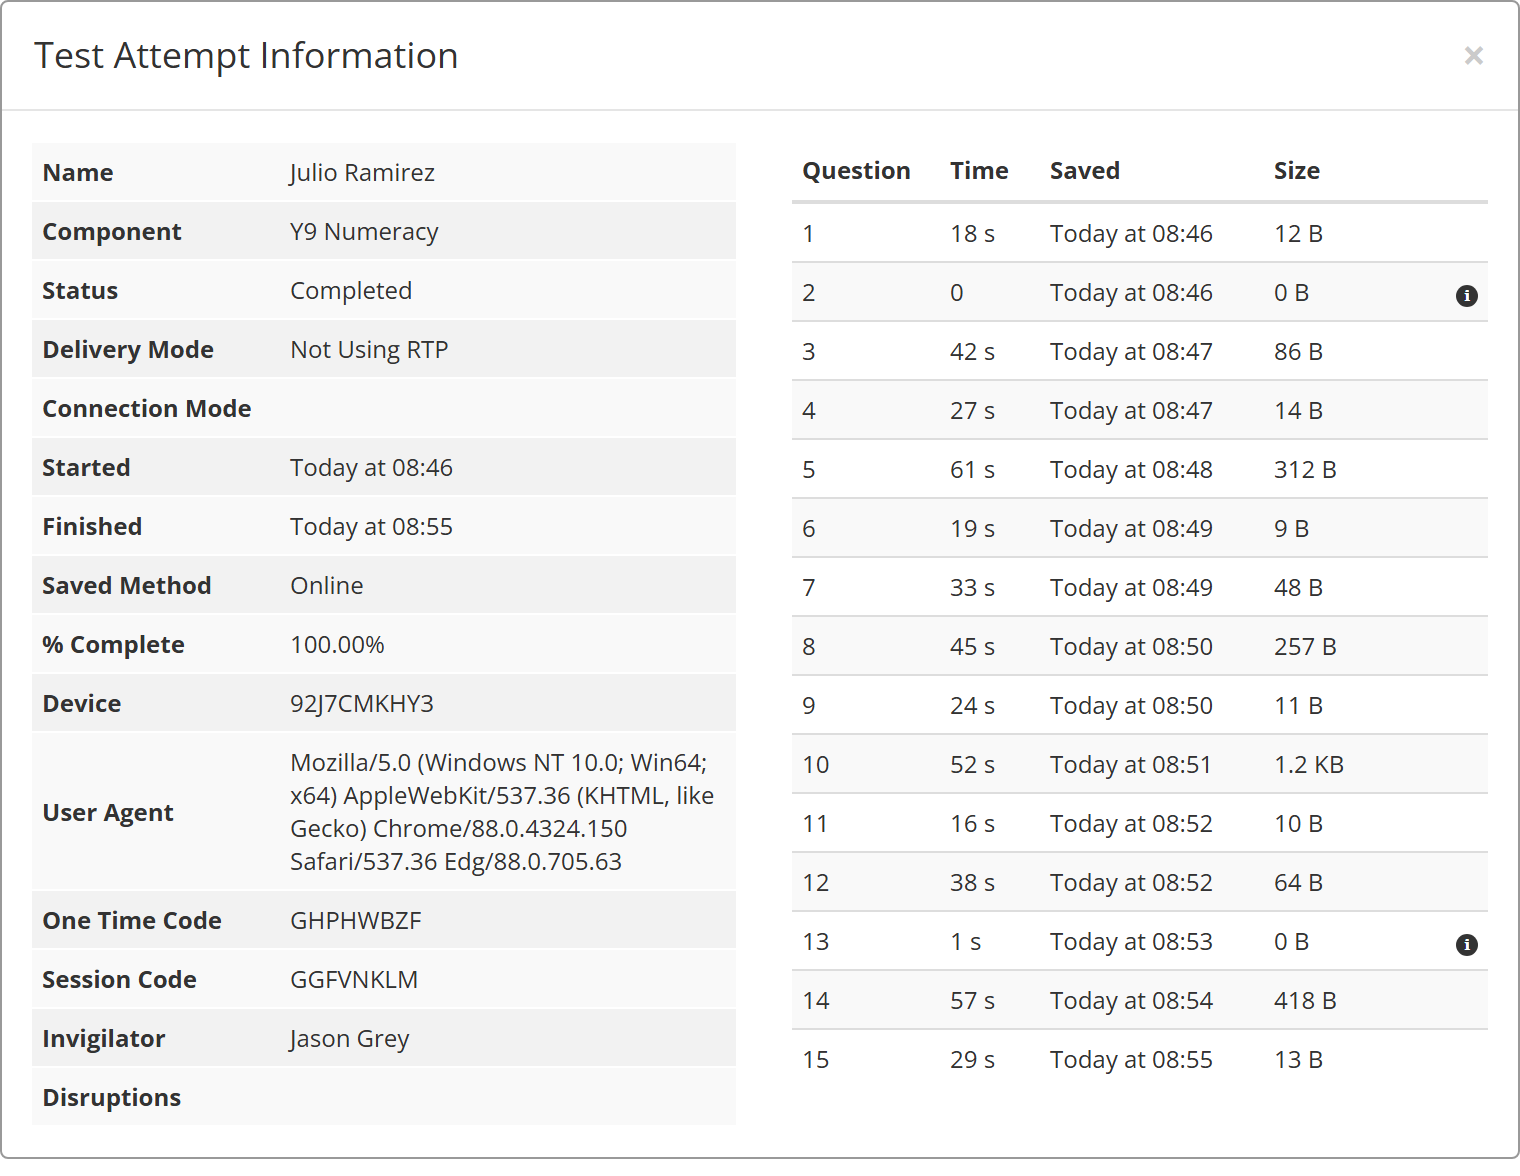
- Test attempt information Select this icon in the Actions column to see a test-taker's test attempt information.
The icon in the Actions column opens the Test Attempt Information window for that test-taker.
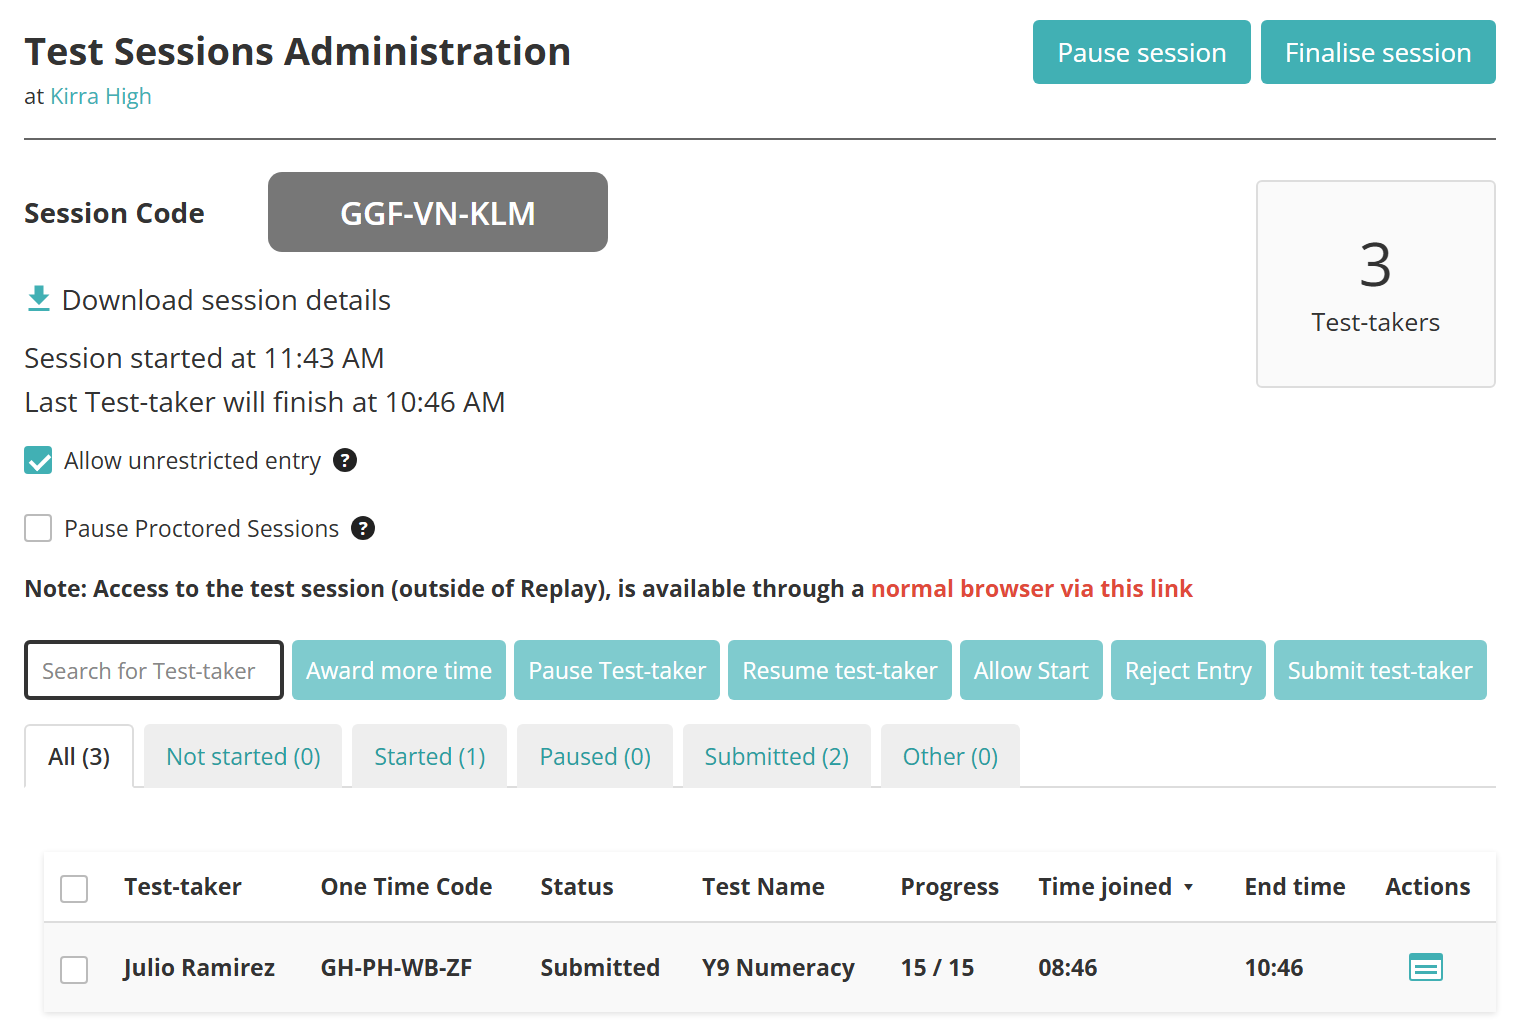
Depending on your site, the dashboard can also show:
- an incident count, with Report incident and View timeline — see incident reporting
- a Scan check-in button below the test-taker count
- the time the session will be finalised automatically, if it has a maximum duration — see auto-finalise test sessions
- a warning that the session may be running offline, as a reminder to reconcile every Replay device before you finalise
Important
Test-takers who complete the test offline may not appear on the dashboard until their attempt has been reconciled.
Confirm an action
Most actions on this page open a dialog before they take effect. It can contain:
- Test-takers selected, showing how many test-takers the action applies to
- a time field, for actions that add or remove time
- Reason, a list of reasons your site has set up — it appears only if reasons are configured
- Details, for a note about why you took the action — it's optional unless your site requires it when the reason is Other
Complete the fields, then select Confirm. Select Cancel to back out.
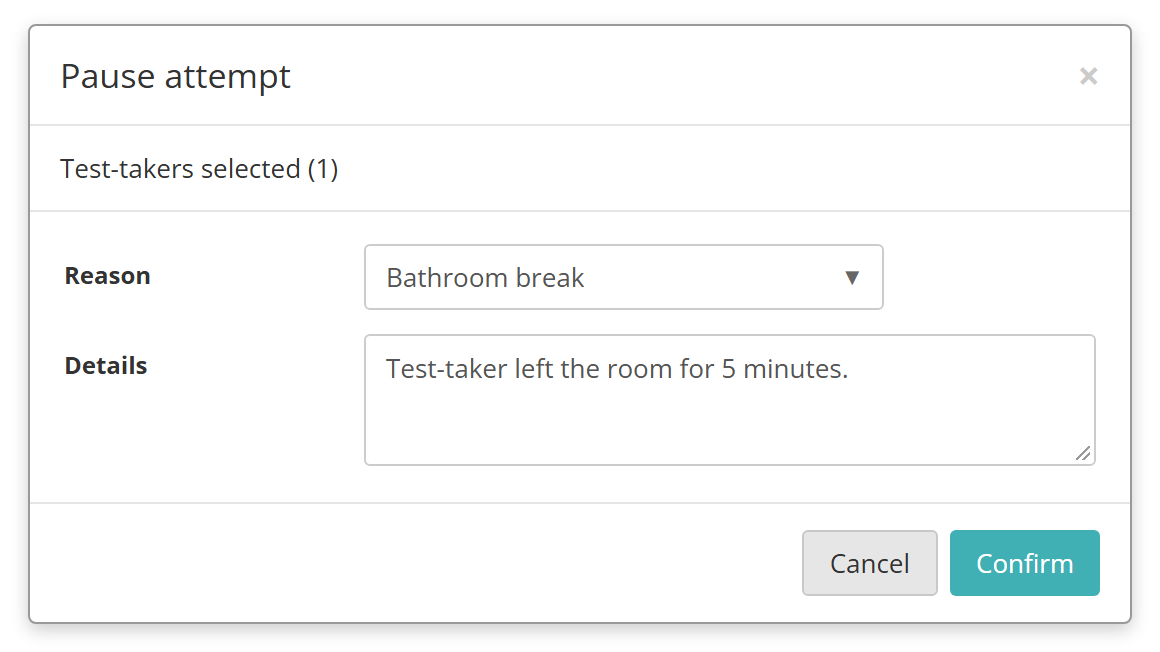
Some actions show a final message after the dialog, such as "Are you sure?" or a confirmation that the action worked. Select Yes or Ok to close it.
Start a session
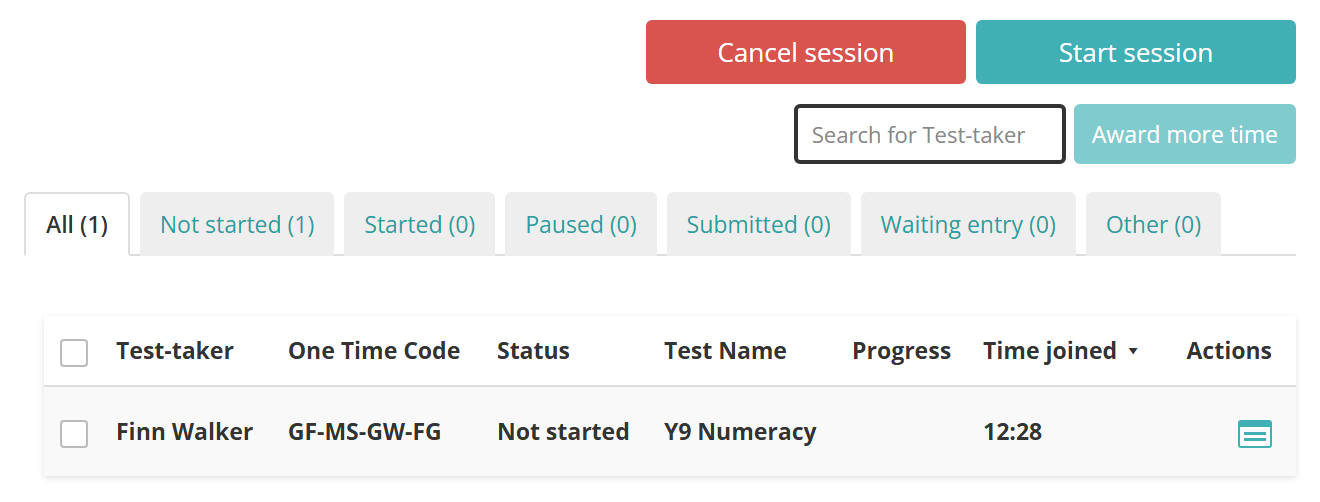
Before the session starts, the dashboard shows short prompts: write the session code on the board, wait for test-takers to join, then start the session. Test-takers appear on the dashboard as they join, but they can't start their tests until you start the session.
To start the session:
- Select Start session.
- A message asks you to confirm. It also tells you whether test-takers who join later will be admitted automatically or will need you to admit them. Select Yes.
Cancel a session
If a session isn't needed, you can cancel it before it starts. Cancelling releases the test-takers from the session so they can join a new one straight away. The session can't be used again.
- Select Cancel session.
- Select Yes to confirm.
- If your site uses reasons, complete the dialog and select Confirm.
Pause and resume a session
You may need to pause the whole session — for example, when test-takers leave the room for a fire drill. Pausing stops every test-taker's time and locks them out of their items. When you resume, they continue with the time they had left.
Pause a session
- Select Pause session.
- In the Pause session dialog, enter any details and select Confirm.
Resume a session
The Resume session button replaces Pause session while the session is paused.
- Select Resume session.
- In the Resume session dialog, enter any details and select Confirm.
- A message warns that this resumes the test for everyone in the session and starts their timers. Select Yes.
Award or remove time
You can add or remove time for test-takers in a timed test. These buttons appear only when at least one test in the session is timed.
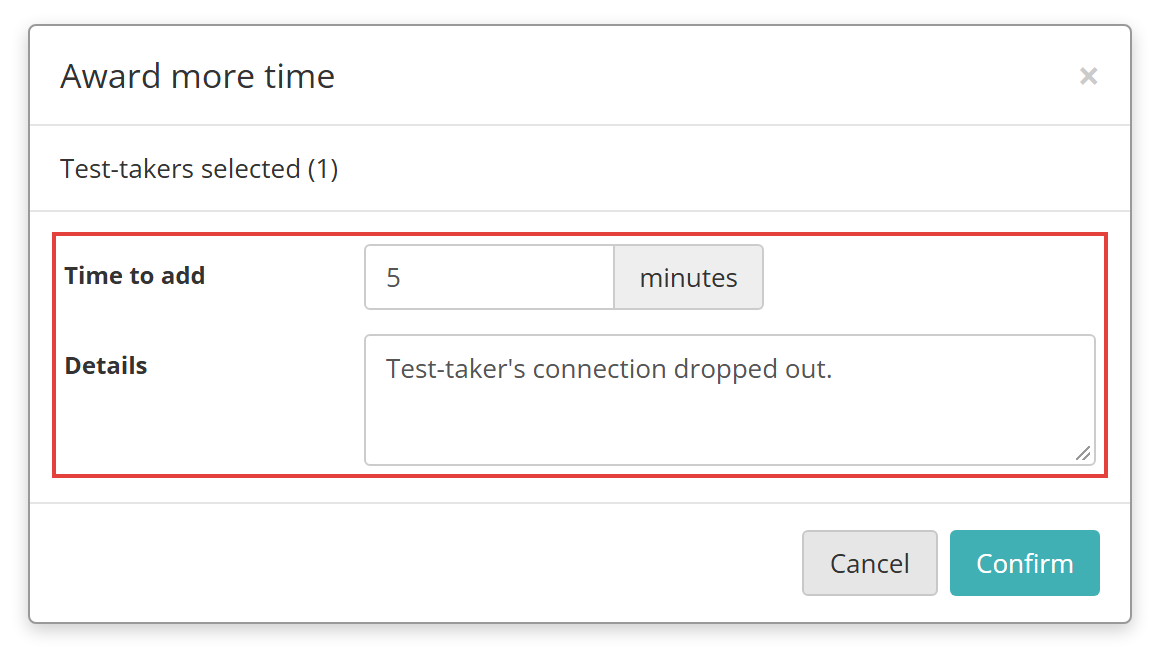
Award more time
- Tick the checkbox next to each test-taker.
- Select Award more time.
- Enter the number of minutes in Time to add, add any details, and select Confirm.
Award less time
Award less time appears once someone in the session has been awarded extra time. It's unavailable if any test-taker you've ticked wasn't awarded extra time.
- Tick the checkbox next to each test-taker.
- Select Award less time.
- Enter the number of minutes in Time to reduce, add any details, and select Confirm.
Pause and resume test-takers
You can pause an individual test-taker — for example, if they need to leave the room. Pausing stops their time and locks them out of their items.
Pause a test-taker
You can pause only test-takers whose test has started and who are online.
- Tick the checkbox next to each test-taker.
- Select Pause Test-taker.
- Enter any details and select Confirm.
Resume a test-taker
Paused test-takers appear on the All and Paused tabs.
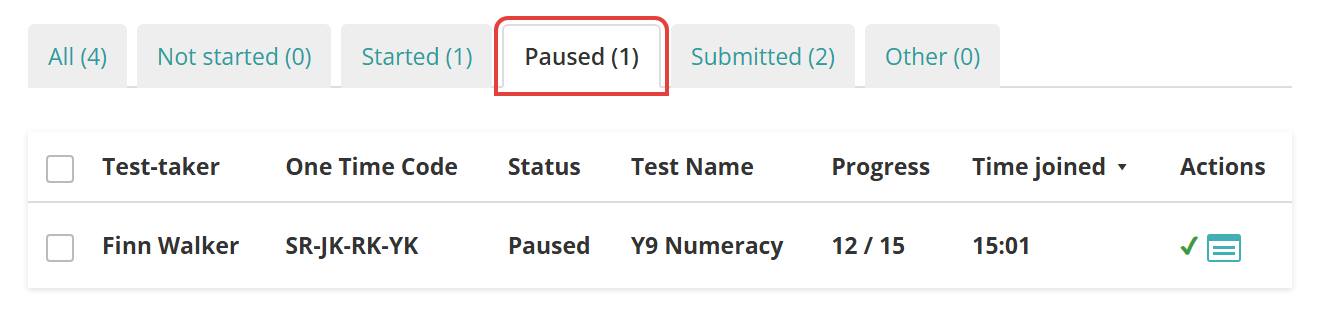
- Tick the checkbox next to each paused test-taker.
- Select Resume test-taker.
- Enter any details and select Confirm.
Resume test-taker is unavailable if any test-taker you've ticked isn't paused.
Admit waiting test-takers
Test-takers who join after the session starts wait to be admitted. You can admit or reject them one at a time, or admit everyone at once. These buttons appear once the session has started.
Note
If Allow unrestricted entry is ticked, test-takers who join late enter without waiting, and the Waiting entry tab is hidden.
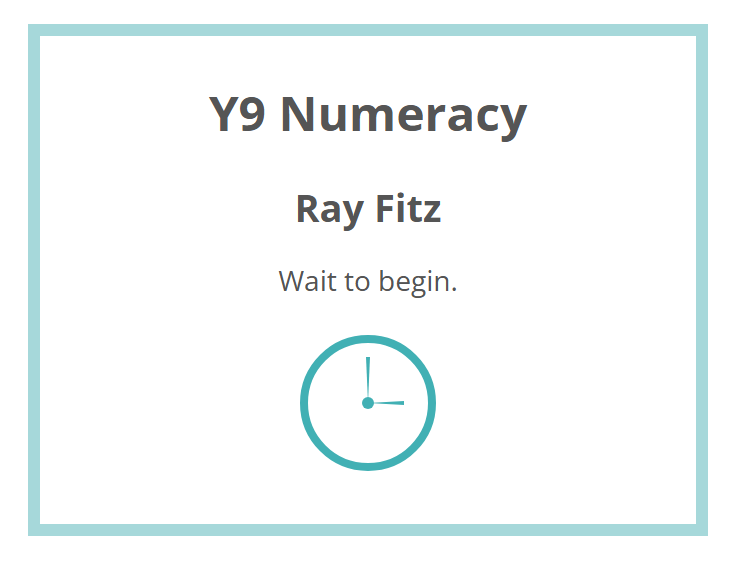
Until they're admitted, test-takers see a Wait to begin screen.
Admit or reject individual test-takers
- Select the Waiting entry tab.
- Tick the checkbox next to each test-taker. Tick the checkbox in the header row to select everyone.
- Select Allow Start or Reject Entry.
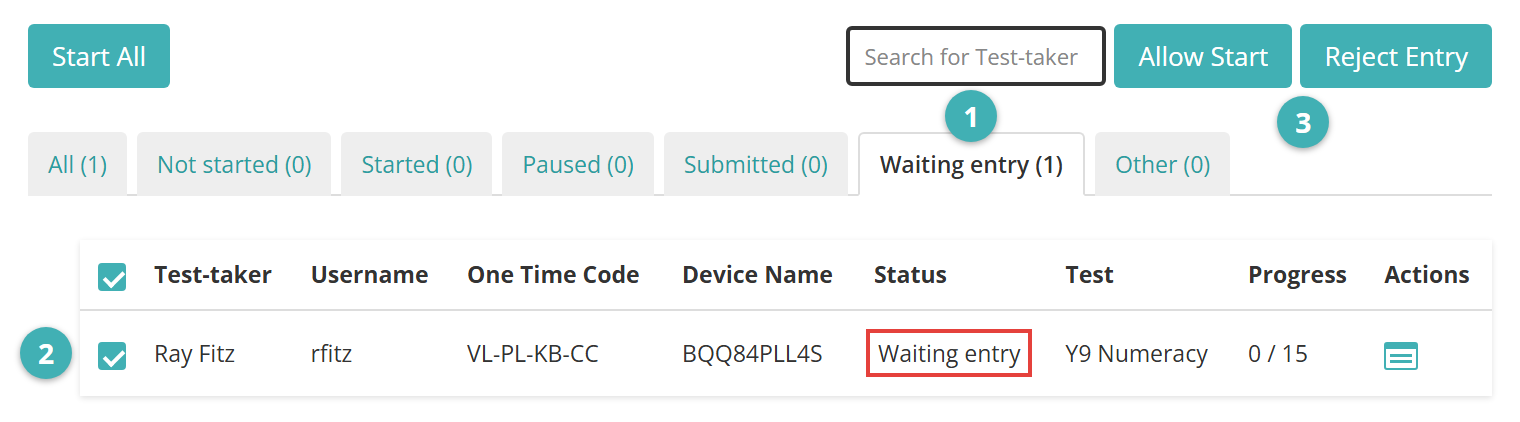
The Allow Start attempt or Reject Entry attempt dialog opens. Enter any details and select Confirm.
Admit all test-takers
To admit everyone who's waiting, select Start All. It appears on the All and Waiting entry tabs.
Allow entry on a different device
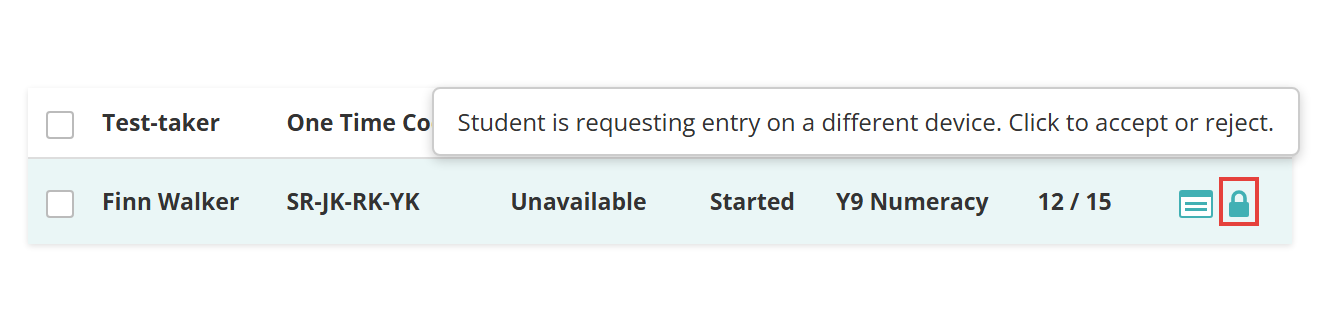
If a test-taker moves to a different device, you must admit them again before they can continue. A lock icon appears in the Actions column.
- Select the lock icon.
- Select Accept or Reject.
Submit a test-taker's attempt
You may need to submit an attempt for a test-taker — for example, if they left the room without submitting.
- Tick the checkbox next to each test-taker.
- Select Submit test-taker.
- Enter any details and select Confirm.
- A message confirms how many attempts were submitted. Select Ok.
Submit test-taker isn't shown on the Submitted or Waiting entry tabs.
Reopen a submitted attempt
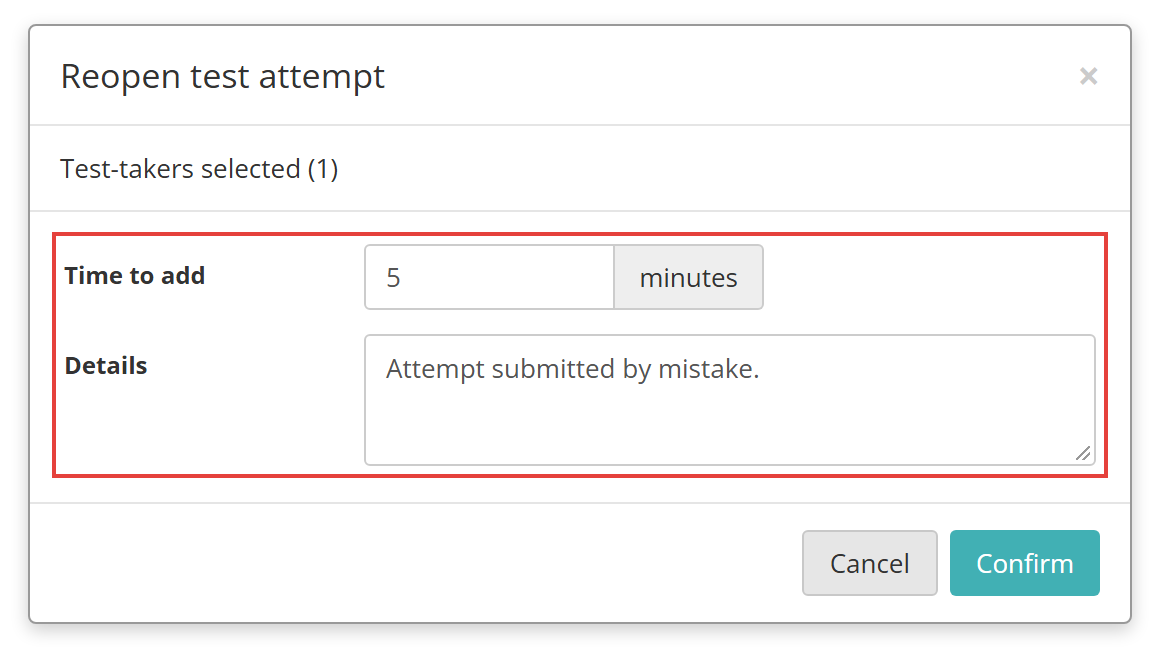
You may need to reopen a submitted attempt — for example, if it was submitted by mistake. You can add time when you reopen it.
- Select the Submitted tab. Reopen test-taker appears only on this tab, and only while the session is running.
- Tick the checkbox next to each test-taker.
- Select Reopen test-taker.
- Optionally enter minutes in Time to add, add any details, and select Confirm.
Postpone or abandon a test-taker's attempt
These buttons appear on the All, Not started, Started and Paused tabs while the session is running. They're unavailable if any test-taker you've ticked has already submitted.
- Postpone candidate stops the attempt part-way and takes it out of the session, so it can be picked up later.
-
Abandon candidate stops the attempt for good. It can't be resumed.
-
Tick the checkbox next to each test-taker.
- Select Postpone candidate or Abandon candidate.
- Enter any details and select Confirm.
Warning
Postponing, abandoning or submitting an attempt that's being completed offline makes that attempt unusable. If you can, take the device online and synchronise the attempt instead.
For what each status means and what can happen next, see test attempt workflows.
Finalise a session
Finalising closes the session so no-one else can join. Finalise when testing is complete. You can finalise only when:
- every attempt has been submitted or abandoned
- the session isn't paused
To finalise the session:
- Select Finalise session.
- A message asks whether you really want to close the session. Select Yes.
- Enter any details and select Confirm.
- A message confirms the session has been finalised. Select Ok.
Your site can also show a prompt when every test-taker has finished, as a reminder to finalise. Sessions with a maximum duration can be finalised automatically — see auto-finalise test sessions.
Abandon a session
Abandoning ends a running session for good. You can't reopen an abandoned session. You can't abandon a session when every attempt has been submitted (finalise it instead) or while anyone is waiting to enter.
- Select Abandon session.
- A message asks whether you really want to abandon the session. Select Yes.
- Enter any details and select Confirm.
Every attempt in the session that hasn't been submitted becomes Abandoned, whether it was in progress, paused or not yet started. The time each test-taker had used is recorded, and the details you entered are saved against each attempt. The test-takers can't continue, and their attempts can't be resumed. Attempts that were already submitted keep their status.
Settings
Each button on this dashboard is an action your role must be allowed to use. Administrators grant them per role at Settings > Roles. If a button described here doesn't appear, your role may not include it.
Administrators can configure the following at Settings > Assessment Event Settings.
Enable Unrestricted Entry — adds the Allow unrestricted entry checkbox to the dashboard. Choose Not allowed, Allowed and off by default or Allowed and on by default.
Enable Proctored Test Delivery Option — lets events use proctoring, which adds the Pause Proctored Sessions checkbox to their sessions.
Show prompt when all students are finished — shows a message when every test-taker has finished. Choose No, Panel only or Pop-up and Panel.
Reasons Setup — sets the reasons offered in each dialog's Reason list, and whether Details is required when the reason is Other.
Administrators can configure the following at Settings > Test Delivery Settings.
Enable Offline Reliable Delivery — lets attempts run offline. The dashboard then warns that the session may be running offline, and offline attempts may not appear until they're reconciled.