Manage attempts
The test attempts screen lists every test attempt you are allowed to see, across all assessment events. From it you can find an attempt, check how it is going, open it, and act on many attempts at once. Open it from Deliver > Manage Attempts. This page covers that screen and the test attempt page that opens from it. To change an attempt's status, see Test attempt workflows.
Note
Your role decides whether you can open this screen, which attempts you see and which buttons and menu options appear. Without the right to see attempt details the list is empty. If you need more access, ask your administrator. Some labels this page quotes, such as Student Details, read differently on sites that have renamed them; see Settings.
The test attempts screen
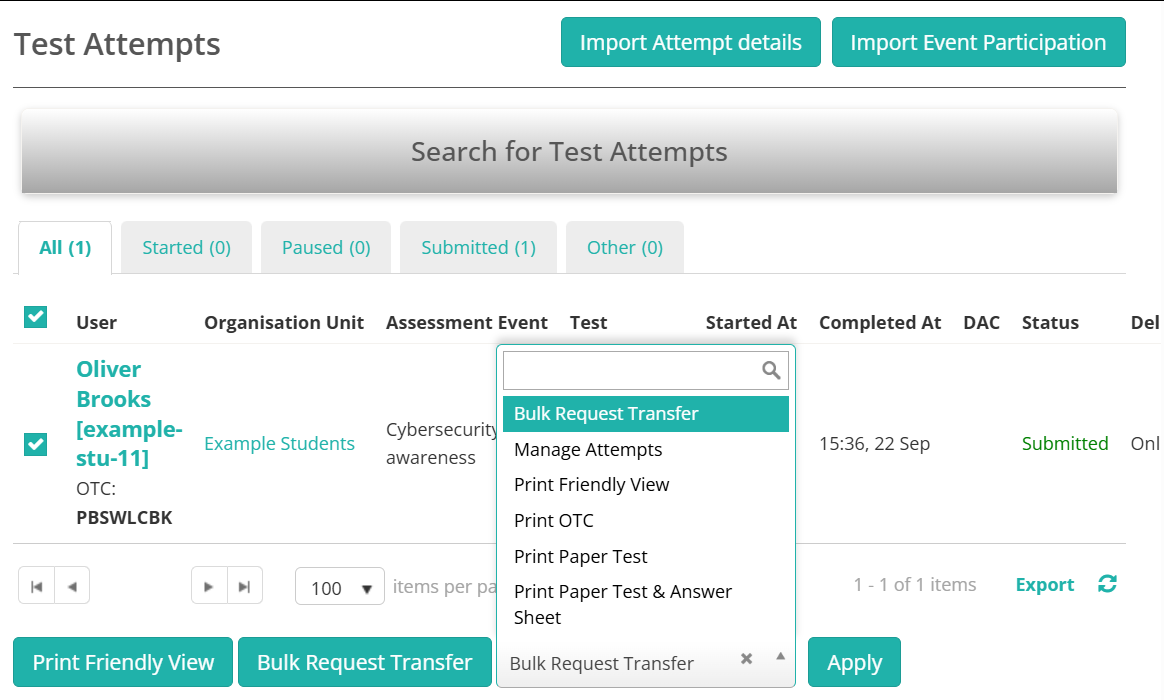
The screen has a search panel, 5 status tabs, the grid of attempts and a row of buttons under the grid. At the bottom, Recent Activities expands to show recent actions taken on attempts. Select Actions on a row to open the attempt.
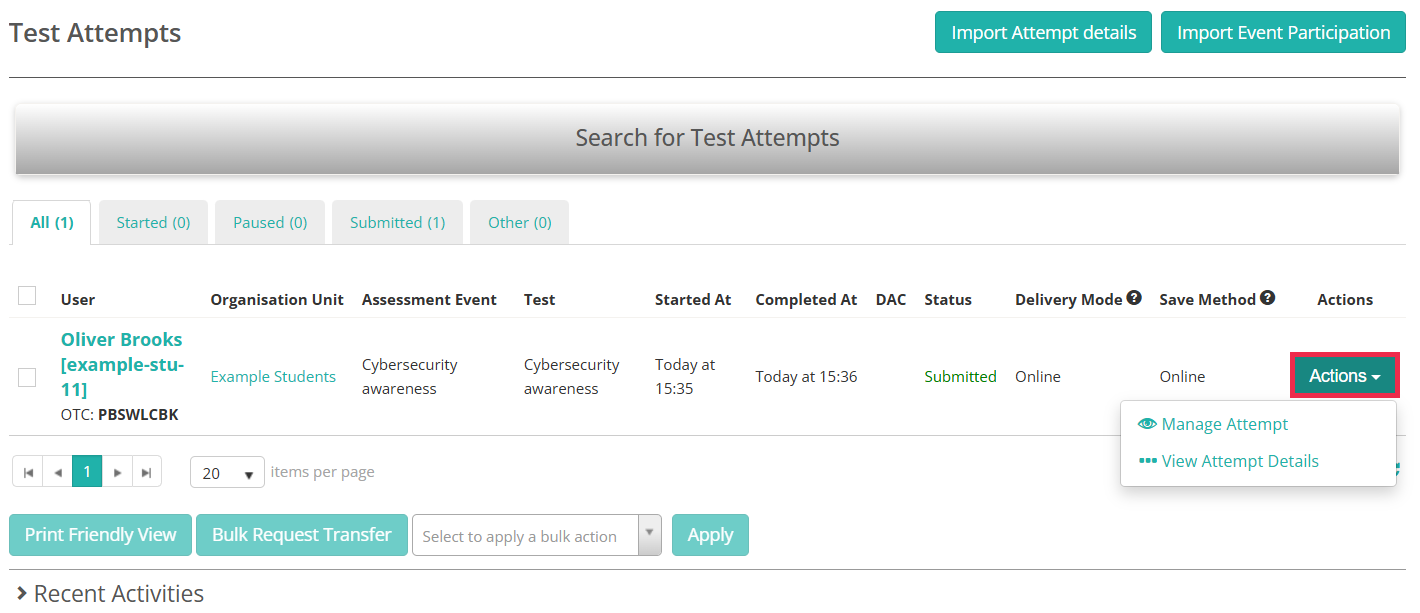
Let's look at some of the main functions in more detail.
Search for test attempts
Expand Search for Test Attempts. The search box finds attempts by a test-taker's name or one time code. The filters under it narrow the list by:
- when attempts were started or completed
- the assessment event and its status
- the org unit or group
- the attempt's status.
Your site may show more filters, such as Exam Class Campus or an Advanced link for other fields; see Settings.
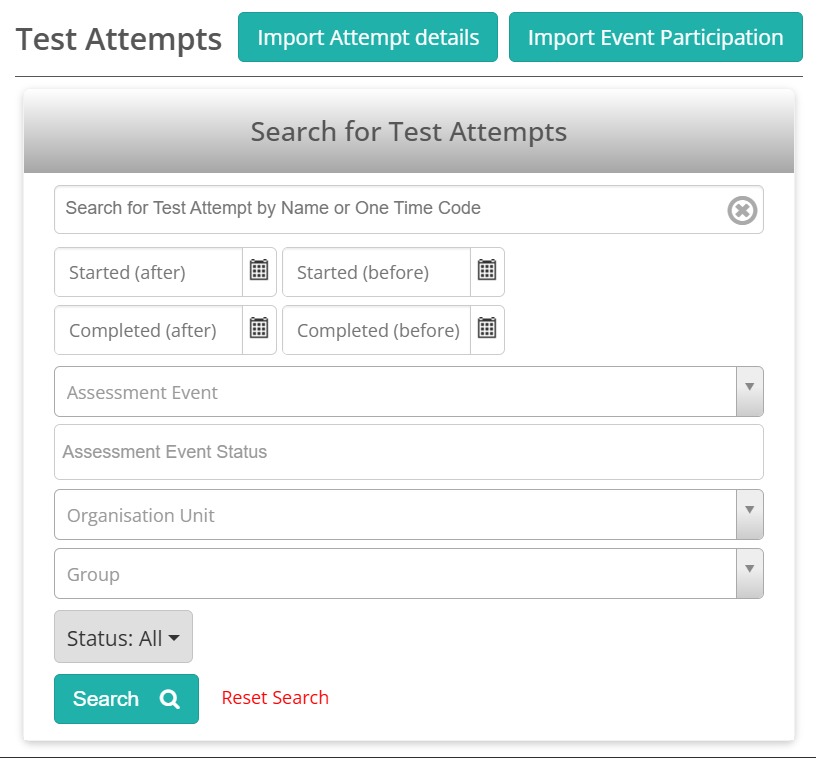
Select Search to run the search or Reset Search to clear it.
Tip
Status lists only the statuses your role may view. While a status is selected in the filter, every tab except All is hidden.
Status tabs
Each tab shows a count of the attempts in it.
- All — every attempt the search returns.
- Started — attempts in progress: the test-taker has opened the test but not yet submitted it. An Open attempt the test-taker hasn't begun shows only under All, and a paused one has its own tab.
- Paused — attempts an invigilator has paused.
- Submitted — attempts the test-taker has finished: Completed, Marking, Marked, Remarking, Passed, Failed, Ready for Marking (External) and Marking (External). The Status column shows all of these as Submitted, except the two external marking ones.
- Other — everything else, such as Absent, Withdrawn, Exempt, Suspended, Postponed, Refused, No longer enrolled and Abandoned.
For what each status means, see Statuses.
The grid
Each row is one attempt. The columns are:
- User — the test-taker's name, linked to their profile, with OTC: and their one time code underneath. Hover over the heading and choose to sort by Given Name, Surname or Username.
- Organisation Unit — the test-taker's org unit. When exam class scheduling is on, this column is Exam Class Campus instead.
- Assessment Event and Test — the event, which links to its page, and the test the test-taker sat.
- Started At and Completed At — when the attempt started and finished.
- DAC — the test-taker's personal needs and preference codes for the attempt. The heading's tooltip spells it out as Disability Adjustment Codes.
- Status — the attempt's status, with submitted attempts shown as Submitted.
- Delivery Mode — the connection mode the Reliable Test Player (RTP) reported when the attempt started. The player runs in a browser as well as in Janison Replay, so browser attempts show these values too:
- Online, Low Bandwidth or Offline — the connection the player had.
- Not Using RTP — reliable delivery was not enabled for the attempt.
- Paper — a paper test.
- Automatic — a transient value the player reports while it works out its connection. It is unrelated to the Automatic save method below.
- Save Method — how the responses reached the server:
- Online — saved throughout the test.
- Automatic — saved by Replay after the test finished.
- Manual — uploaded by the invigilator afterwards.
- Auto Reconcile — reconciled from the device automatically.
- Actions — the menu described next.
The grid shows 20 attempts a page, sorted by name; change the page size at the bottom left. The grid is wide, so in a narrow window scroll sideways to reach Actions.
Open an attempt
Select Actions on the attempt's row.
- Manage Attempt opens the test attempt modal. There you can change the status, manage the session and edit the test-taker's personal needs and preference codes. See The test attempt modal.
- View Attempt Details opens the test attempt page.
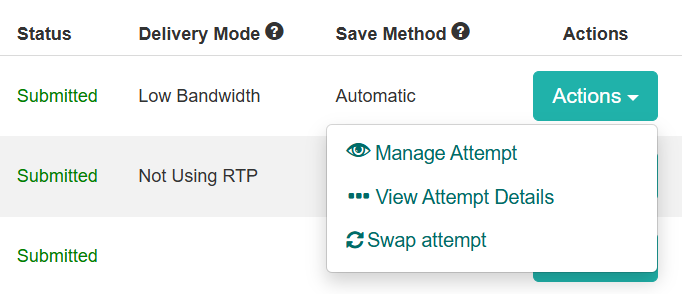
- Swap attempt — swaps two test-takers' attempts. See Swap two attempts.
Swap two attempts
Use Swap attempt when 2 test-takers sat under each other's logins. It appears only for roles granted it, and only on Marked attempts. The grid shows those as Submitted like every other finished attempt, so to find them expand Search for Test Attempts, set Status to Marked and select Search.
Select Swap attempt on the first attempt, then on the second, and select Swap. While you choose, a banner reading You are currently in attempt swapping mode shows the 2 attempts, with Cancel to back out. On a Marked attempt the same Swap attempt button also appears beside Actions.
Act on several attempts at once
Tick the attempts you want, then use the buttons under the grid. Each tab has its own set, which appears only while you are on that tab. The buttons stay greyed out until you tick a row:
- On Started: Complete, Change end time, Pause Attempts, Award More Time and Award Less Time.
- On Paused: Resume Attempts.
- On Submitted and All: Print Friendly View.
- On every tab: Bulk Request Transfer. The same action is also in the bulk action dropdown; both open the same dialog.
Your role decides which of these you get. Each button opens a dialog before it acts, to confirm or to take details such as a new end time or a reason. Print Friendly View opens a preview instead.
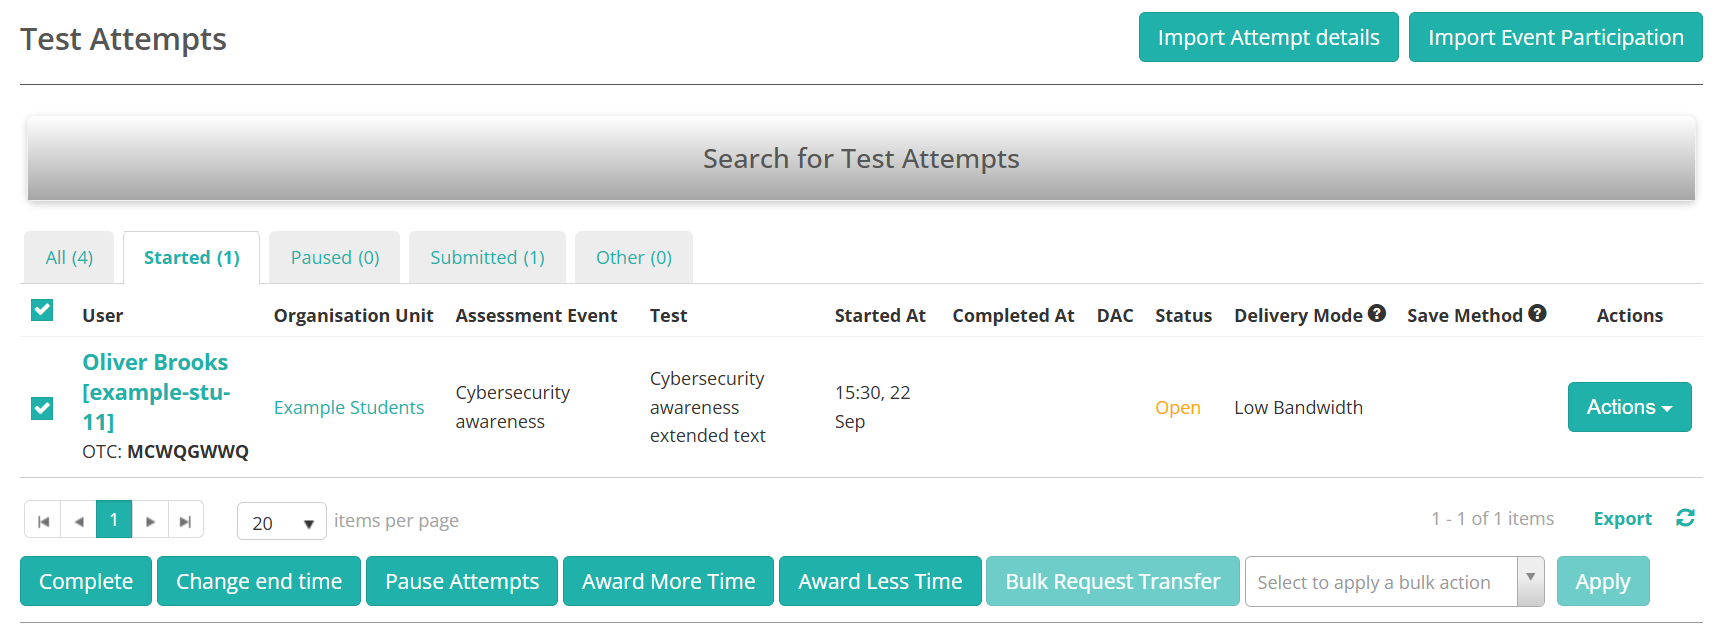
For other actions, choose one from Select to apply a bulk action and select Apply. The options your role allows are:
- Bulk Request Transfer — see Request a transfer to another school.
- Manage Attempts — opens a modal to pause, resume, award time or submit the selected attempts together. See Bulk manage attempts.
- Print Friendly View — see Print attempts.
- Print OTC — prints one time code slips for the selected test-takers.
- Print Paper Test and Print Paper Test & Answer Sheet — print each attempt's question paper or its answer sheet, using the test's print templates. See Print the papers.
Request a transfer to another school
Select Bulk Request Transfer to ask another school to take over the selected attempts. The Bulk test attempt transfer request dialog tells you how many requests it will create, one for each test-taker, and how many attempts they cover. Choose the school under Select destination school, add a Transfer message for that school's administrator, and select Send.
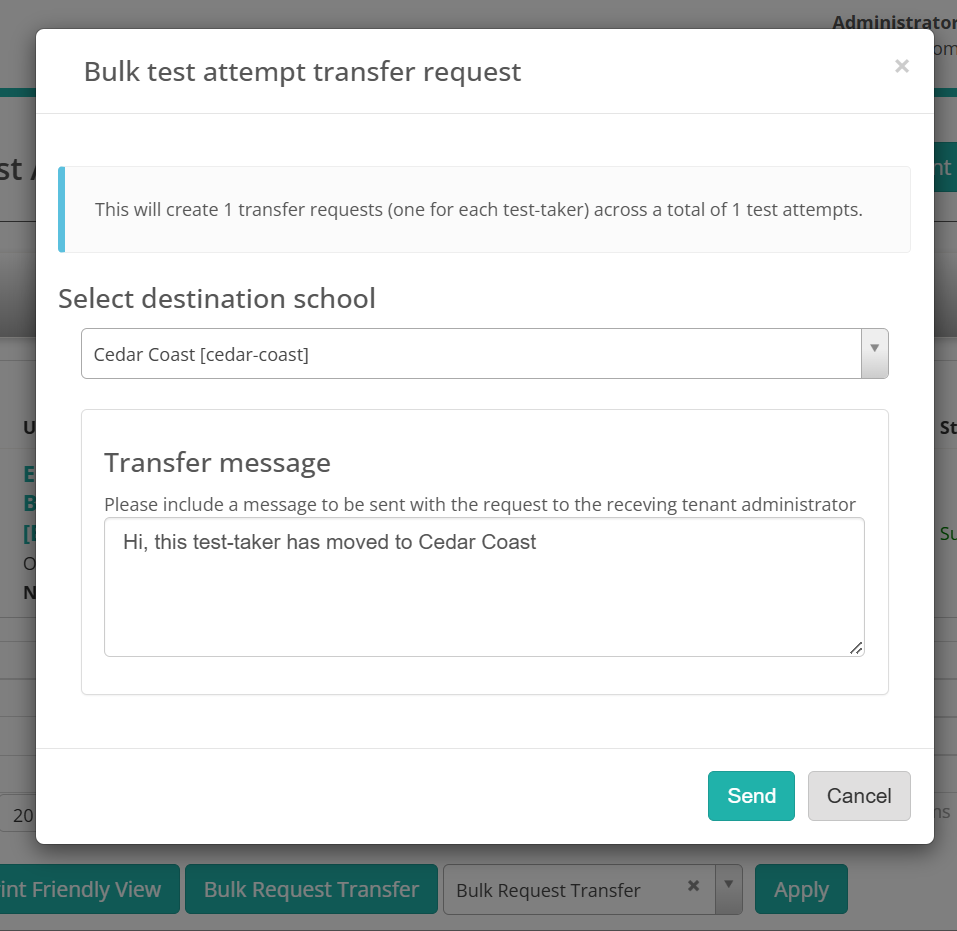
You cannot include attempts that are Open, Postponed or No longer enrolled, or attempts that already have a transfer request. Deselect them and try again.
Print attempts
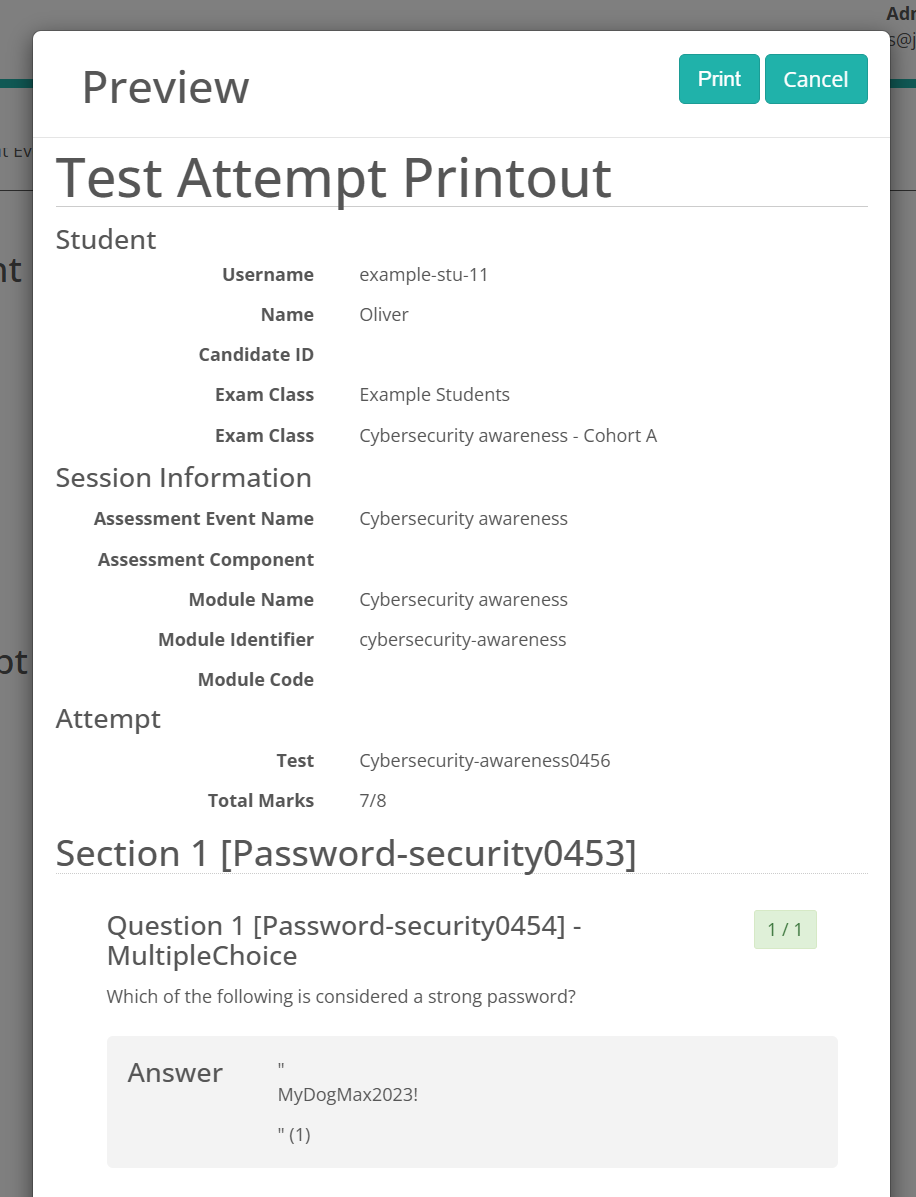
Select Print Friendly View to preview the selected attempts, one after another. Each shows the test-taker's details, the session, and every item with its response and mark. Select Print in the Preview window, or Cancel to close it. It is the same printout the test attempt page produces for a single attempt; see Print the test attempt.
The button appears only when an administrator has set a print template in Marking Settings. See Settings.
Import and export
Two buttons at the top right import spreadsheets:
- Import Attempt details opens Update Test Attempts from spreadsheet. Download the template, fill it in and upload it to update existing attempts in bulk.
- Import Event Participation opens Import Event Participation from spreadsheet, for recording which test-takers took part in an event.
To export the list, select Export at the right of the pager. In Export options, choose Excel format (.xlsx), Comma-separated values (.csv) or Acrobat reader document (.pdf) under Export as. Untick any columns you do not want, then select Export. The export respects your current search and tab.

Find a one time code
In a test session, test-takers enter a one time code (OTC) to open their test. You can find a test-taker's code in 2 places:
- On the test attempts screen, under their name in the User column.
- On the test attempt page, as One time code under Student Details.
To print codes on slips, tick the test-takers and choose Print OTC from the bulk actions. The Invigilator dashboard has Print One Time Code Slips for the same job.
The test attempt modal
Selecting Manage Attempt in the Actions column opens the test attempt modal for the test-taker. From here you can change the attempt status, manage the test-taker's personal needs and preference codes and view recent activities. The modal is the same wherever you open it from, so it is documented once, on Test attempt workflows.
The test attempt page
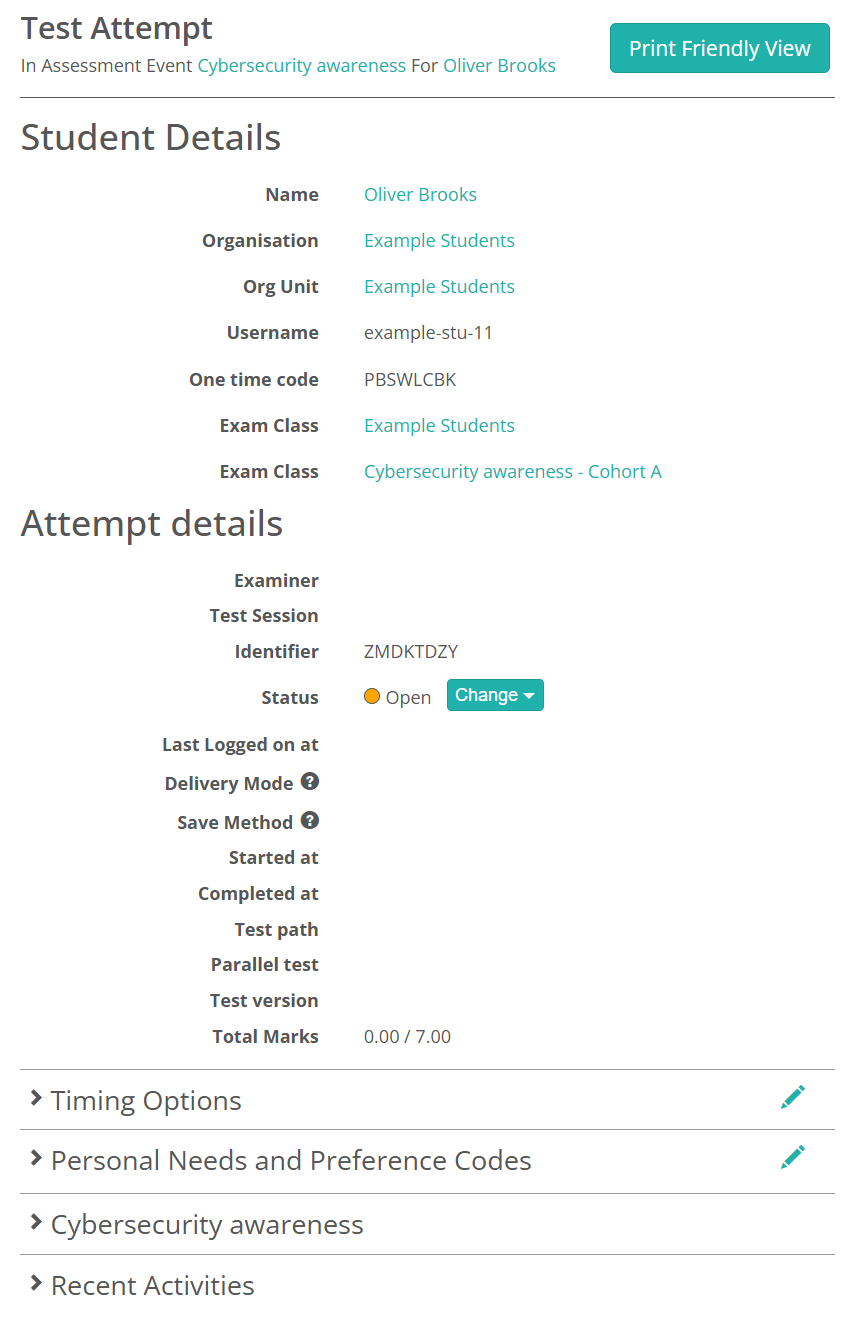
Select Actions > View Attempt Details to open the test attempt page. You can also reach it from a test-taker's profile and from an event's enrolments; see Open a test attempt. The header names the assessment event and the test-taker.
Note
Which sections and buttons appear here depends on the attempt's status, your organisation's settings and your role, so the page may show fewer than this section describes.
Print Friendly View sits at the top right when a print template is set. Other buttons appear beside it depending on the attempt's status and your permissions. When there are more than 3 in total, they all move into a single Actions menu in the same place:
- Mark — once the attempt has been submitted, opens it for marking.
- Resit test attempt — when the attempt can be sat again.
- Remark test attempts — when the attempt can be marked again.
- Reopen test attempt and Reschedule — when the attempt's state allows it and your role has the right.
- Export to PDF — for attempts outside a session-based event.
- Collaboration Report — for tests with collaborative items.
- Print results summary sheet — for a completed attempt on a test with a pass mark, when summary printing is enabled.
Student details
Shows the test-taker's Name, linked to their profile, their Organisation and Org Unit, and their Username. An attempt in a test session also shows their One time code. An attempt outside a session shows their Password instead, with a link to change it. The section also lists the groups the test-taker belongs to, one row per group type, such as Exam Class. Date of birth and student number appear when they are recorded.
Attempt details
Lists how the attempt was delivered and how it went:
- Examiner and Test Session, for attempts sat in a session.
- Identifier — the attempt's own code.
- Status, with Change beside it. To change the status, see Change an attempt status.
- Last Logged on at, Started at and Completed at.
- Delivery Mode and Save Method, with the same values as the grid.
- Test path, Parallel test and Test version, for tests that branch or have parallel forms.
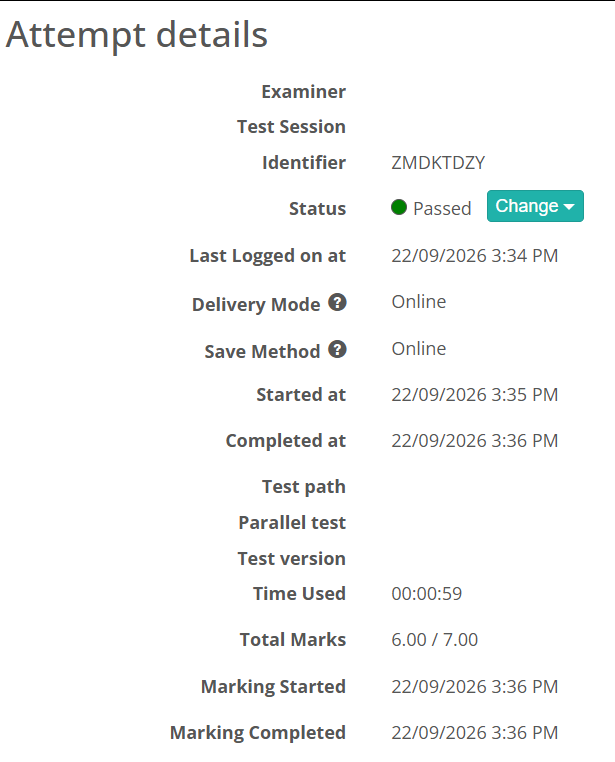
- Time Used, once the attempt has been started.
- Total Marks — marks awarded out of marks available. An Absent or Refused attempt shows dashes. A computer adaptive test shows the ability estimate and confidence instead.
Once marking has started, Marker, Marking Started and Marking Completed appear below the section. Tenants that track delivery centres also show Attempt centre, the test-taker's org unit when they were enrolled. The example below is the same attempt as the previous screenshot, after the test-taker finished the test and it was marked.
Special provisions
Some tenants record extra details against each attempt, such as adjustments arranged for the test-taker. They appear under Special Provisions, and the section shows only when your organisation has set up custom attributes for test attempts. Select the pencil to edit the values. See Custom attributes.
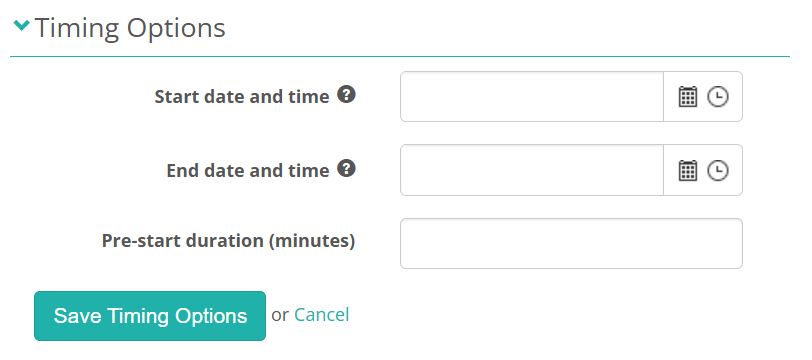
Timing options
Expand Timing Options to see the attempt's timing. For an attempt in an assessment event the fields are Start date and time, End date and time and Pre-start duration (minutes). For a timed test sat outside an event there is a single Duration (minutes). Select the pencil to change them for this attempt, then Save Timing Options or Cancel. The section appears for attempts in an assessment event or a timed test, and only for roles with the View Timing Options right. Editing needs Edit Timing Options, and changing Start date and time needs Edit Timing Option Start Date as well.
Personal needs and preference codes
Expand Personal Needs and Preference Codes to see the adjustments applied to this attempt, and select the pencil to add or remove one. This is the same list the test attempt modal shows. See The test attempt modal for how it works, and Personal needs and preferences for the codes themselves.
Responses
Below the codes, an expandable section named after the test lists the test-taker's responses, grouped by test section. Each test section shows Correct Answers, how many items were answered correctly out of the total in the section. Within a section, each item is labelled Question 1, Question 2 and so on, with its item type and whether it was Correct or Incorrect. Items that carry marks also show the mark awarded out of the marks available. A survey section shows no marks.
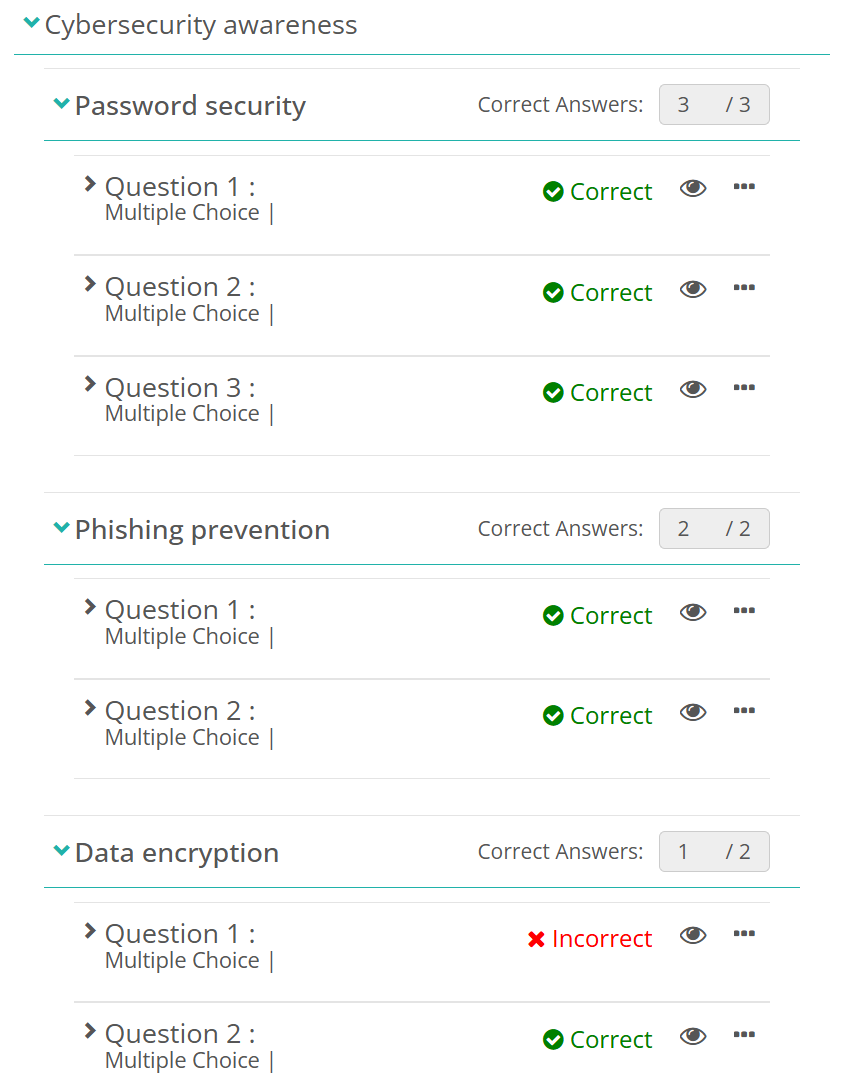
Two icons sit at the right of each item:
- The eye icon, Review, shows the item as the test-taker saw it, with their response. Select Close to return.
- The ellipsis icon, Details, opens the item's own page, where you can see its stimuli, audio and marking scheme.
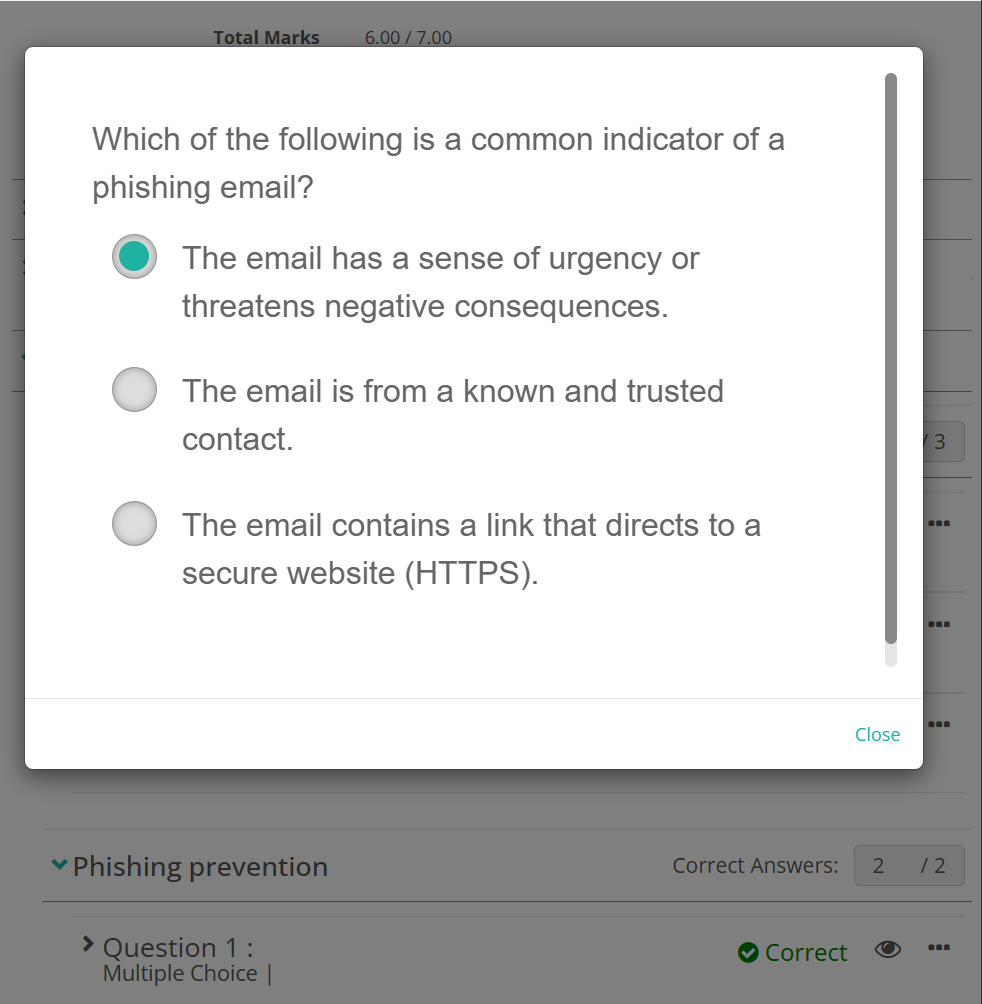
Expand an item to read its text and response in full. For extended text items with the audit trail on, Answer History > View opens the Short answer audit trail. The expanded item can also show Time Used, the Marking Instructions, and any Feedback and Marker Notes a marker entered.
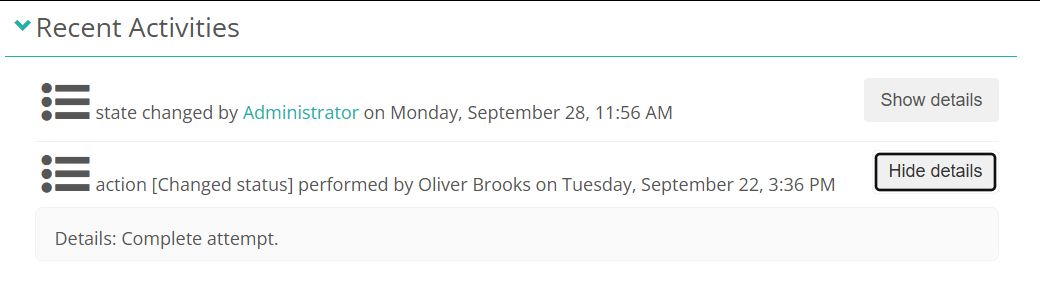
Recent activities
Expand Recent Activities to see the audit trail of everything done to the attempt, who did it and when. Select Show details on an entry to read the details the invigilator or administrator entered, and Hide details to collapse it again.
Print the test attempt
Select Print Friendly View at the top right. The Preview window shows the printout: the test-taker, the session, and each item with its response and mark. Select Print, or Cancel to close the preview. To print several attempts in one go, tick them on the test attempts screen instead; see Print attempts.
Settings
Administrators can configure the following settings at Settings > Assessment Event Settings, under Manage Test Attempt Settings.
Manage attempts introduction text — a message shown at the top of the screen. Edit opens the message for editing as a string resource, and View opens the screen in a new tab so you can check the result.
Use Assessment Event as parent on List View — on by default. The Organisation Unit and Group filters work only after an Assessment Event is chosen. Turn it off to filter by org unit or group across all events.
Display Delivery Centre (Org Unit) per Test Attempt — on by default. Searches and filters use the test-taker's org unit at the time of enrolment, and the test attempt page shows it as Attempt centre.
Test information to display — whether the Test column shows the Test Name or the Test Display Title.
Enable advanced filtering on test attempts screen — off by default. Adds an Advanced link to the search panel that opens a filter builder for specific fields.
On the same page, under Exam Class Scheduling Settings, the enabling checkbox has two effects here. It renames the Organisation Unit column to Exam Class Campus, and it adds a Search for Exam Class Campus filter.
Settings on other pages affect the screen too.
Settings > Test Delivery Settings > Enable Offline Reliable Delivery — with the event's Allow Reliable Offline Delivery, decides whether Delivery Mode records the player's connection mode. With either off, every attempt shows Not Using RTP.
Settings > Test Delivery Settings > Enable Low-Bandwidth Mode — lets the player report Low Bandwidth as the delivery mode.
Settings > Marking Settings > Print Setting — the print template that Print Friendly View uses. Without one, the button does not appear on either screen.
Settings > Password Settings > Display passwords — shows Password: under the test-taker's name in the User column for attempts without a one time code. See Password settings.
Settings > Spreadsheet Import/Export > Max number of rows to be exported — the most rows Export will return.
Settings > Test Designer Settings > Personal Needs and Preferences — whether codes attach at the test attempt level, and whether they lock once created. Together these decide what the Personal Needs and Preference Codes section lets you edit. See Personal needs and preferences.
Permissions are set at Settings > Roles. Every action on both screens is a separate right, from seeing attempt details to each bulk option. Swap attempt is denied to every role until it is granted. Show Attempts from Closed Assessment Events decides whether Closed is offered in the Assessment Event Status filter. See User roles and key features.
The labels this page quotes are the product's defaults. A tenant renames them under Settings > String resources, which is why Student and Disability Adjustment Codes read differently on some sites.