Transition marking project
A marking project's workflow state controls what markers can do. You build the project in Setup, markers mark in Marking, and the project is Closed once you finalise it. This page explains each state and every option for moving between them.
Workflow states
The project's state shows beside Workflow state at the top of the project, with the Change button next to it.
- Setup — every project starts here. You add the marking team, items, quality controls and settings. Markers can't mark yet, and the project isn't on their Marking Dashboard.
- Marking — markers mark test-takers' responses, and results are released.
- Closed — the project has been finalised. Marking has stopped and every marker's status is Complete.
- Cancelled — the project has been cancelled. This is final.
- Standardisation 1, Standardisation 2 and Standardisation 3 — standardisation phases before marking. An enrolment-based project uses them only if an administrator has turned standardisation on (see Settings).
Options in the change menu
The Change menu lists the options for the project's current state. Each one asks you to confirm. It then emails everyone on the marking team to say who changed the project's state, with a link to the project.
In Setup:
- Set-up Commence Marking — moves the project to Marking so markers can start. This is the usual next step. See Start marking.
- Commence Standardisation 1 — starts the first standardisation phase. The most senior markers mark a sample of responses and sort them into benchmark, standardisation and monitoring scripts. These later train and check the other markers. See Standardisation 1.
- Set-up Cancel — cancels the project. See Cancel a project.
Commence Standardisation 1 is in the menu because standard and enrolment-based projects share one workflow. An enrolment-based project can use it only if Standardisation 1 is turned on for the project (see Settings). If it isn't, Insights shows "Standardisation 1 has been set as 'not in use' in the Marking Project Standardisation 1 Settings." and the project stays in Setup.
In Marking:
- Finalise — closes the project once marking is done. See Finalise a project.
- Force Finalise — closes the project without the checks Finalise makes, once a second person approves it. See Force finalise a project.
- Cancel — cancels the project. See Cancel a project.
In Closed:
- Reopen — moves the project back to Marking. See Reopen a project.
A cancelled project has no options.
During standardisation, the menu offers the next phase, a way to start marking and a way to cancel. See Standardisation 1, Standardisation 2 and Standardisation 3.
Start marking
Finish setting up the project first: the marking team, questions, quality controls and project settings. Each marker needs at least one item allocated to take part. See Allocate items to markers.
Until marking starts, each marker's Status in the Marking Team section is Initiation. To start marking, select Change, then Set-up Commence Marking.
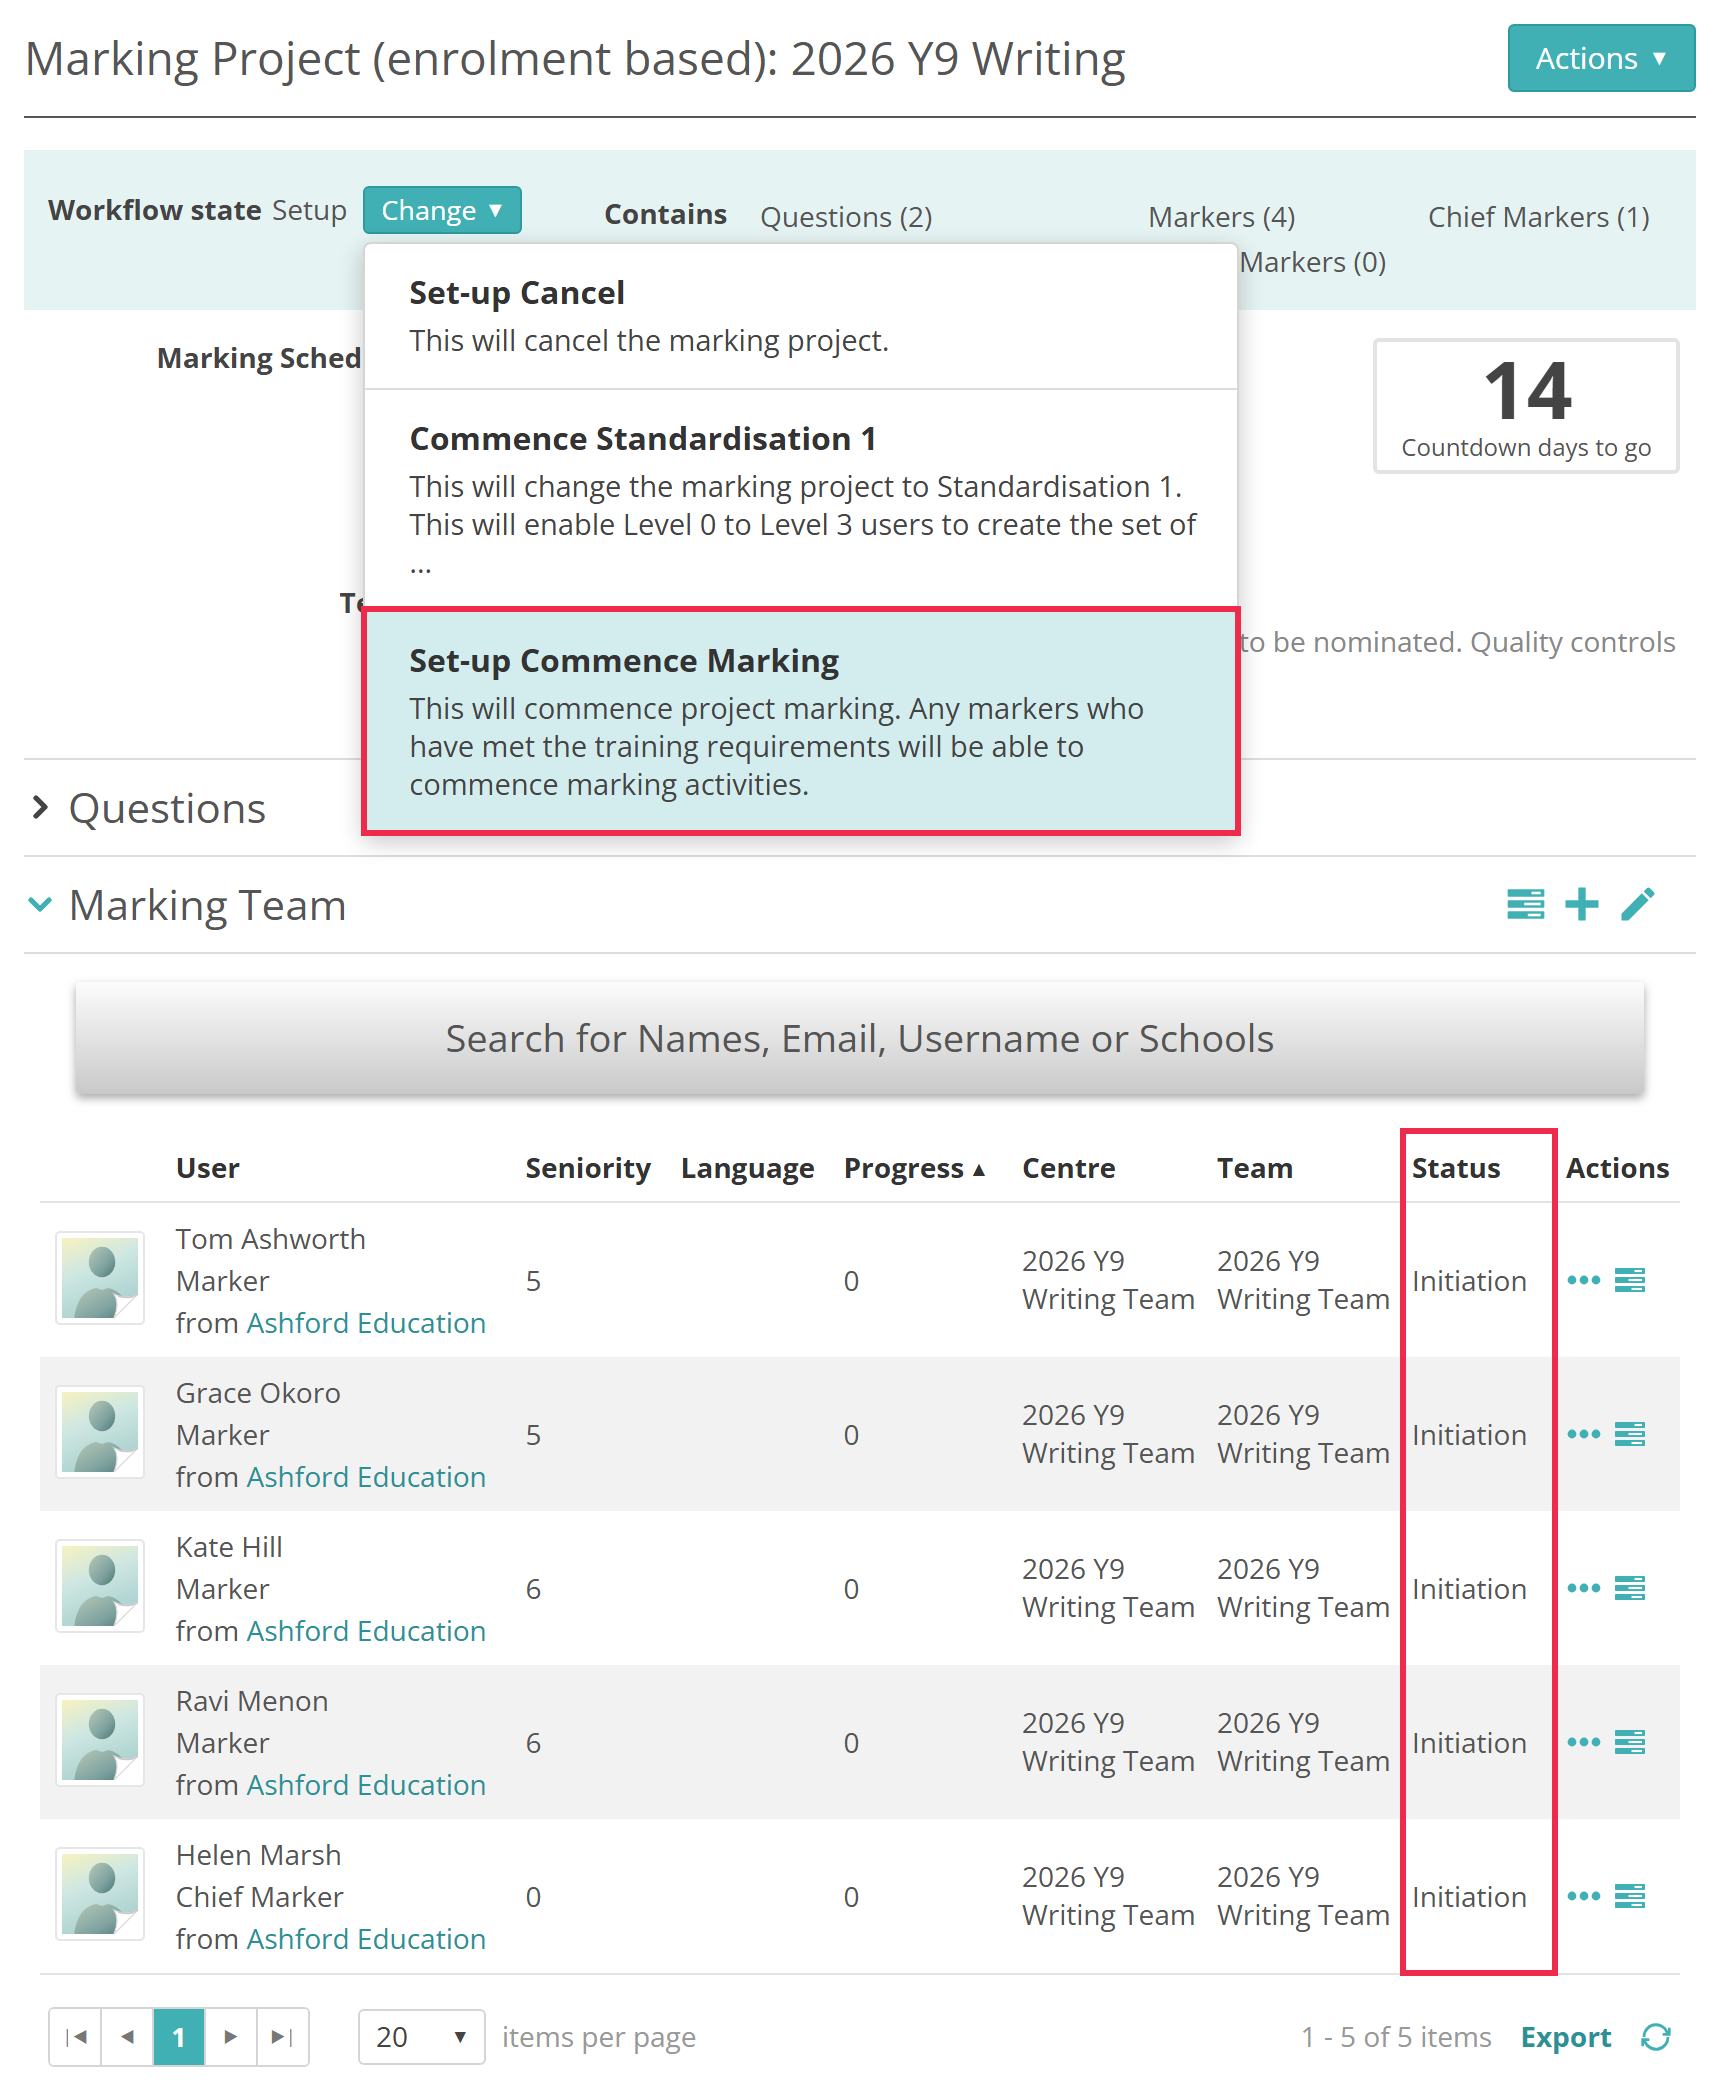
Select Confirm.
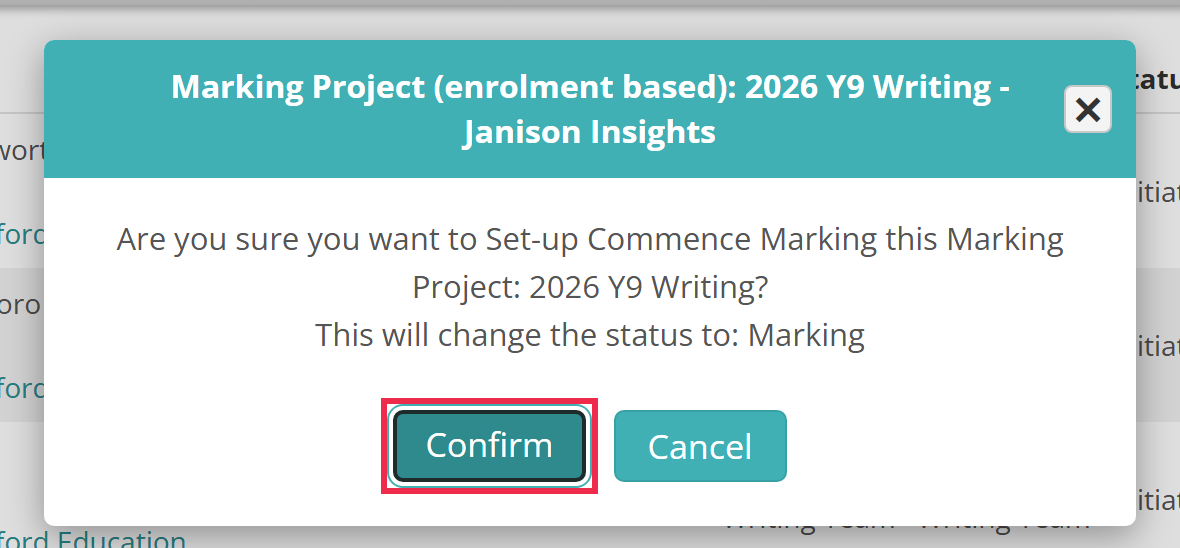
If any marker has no items allocated, the dialog warns in bold that they'll stay at Initiation and can't take part.
The project moves to Marking, and each marker's Status changes to Marking.
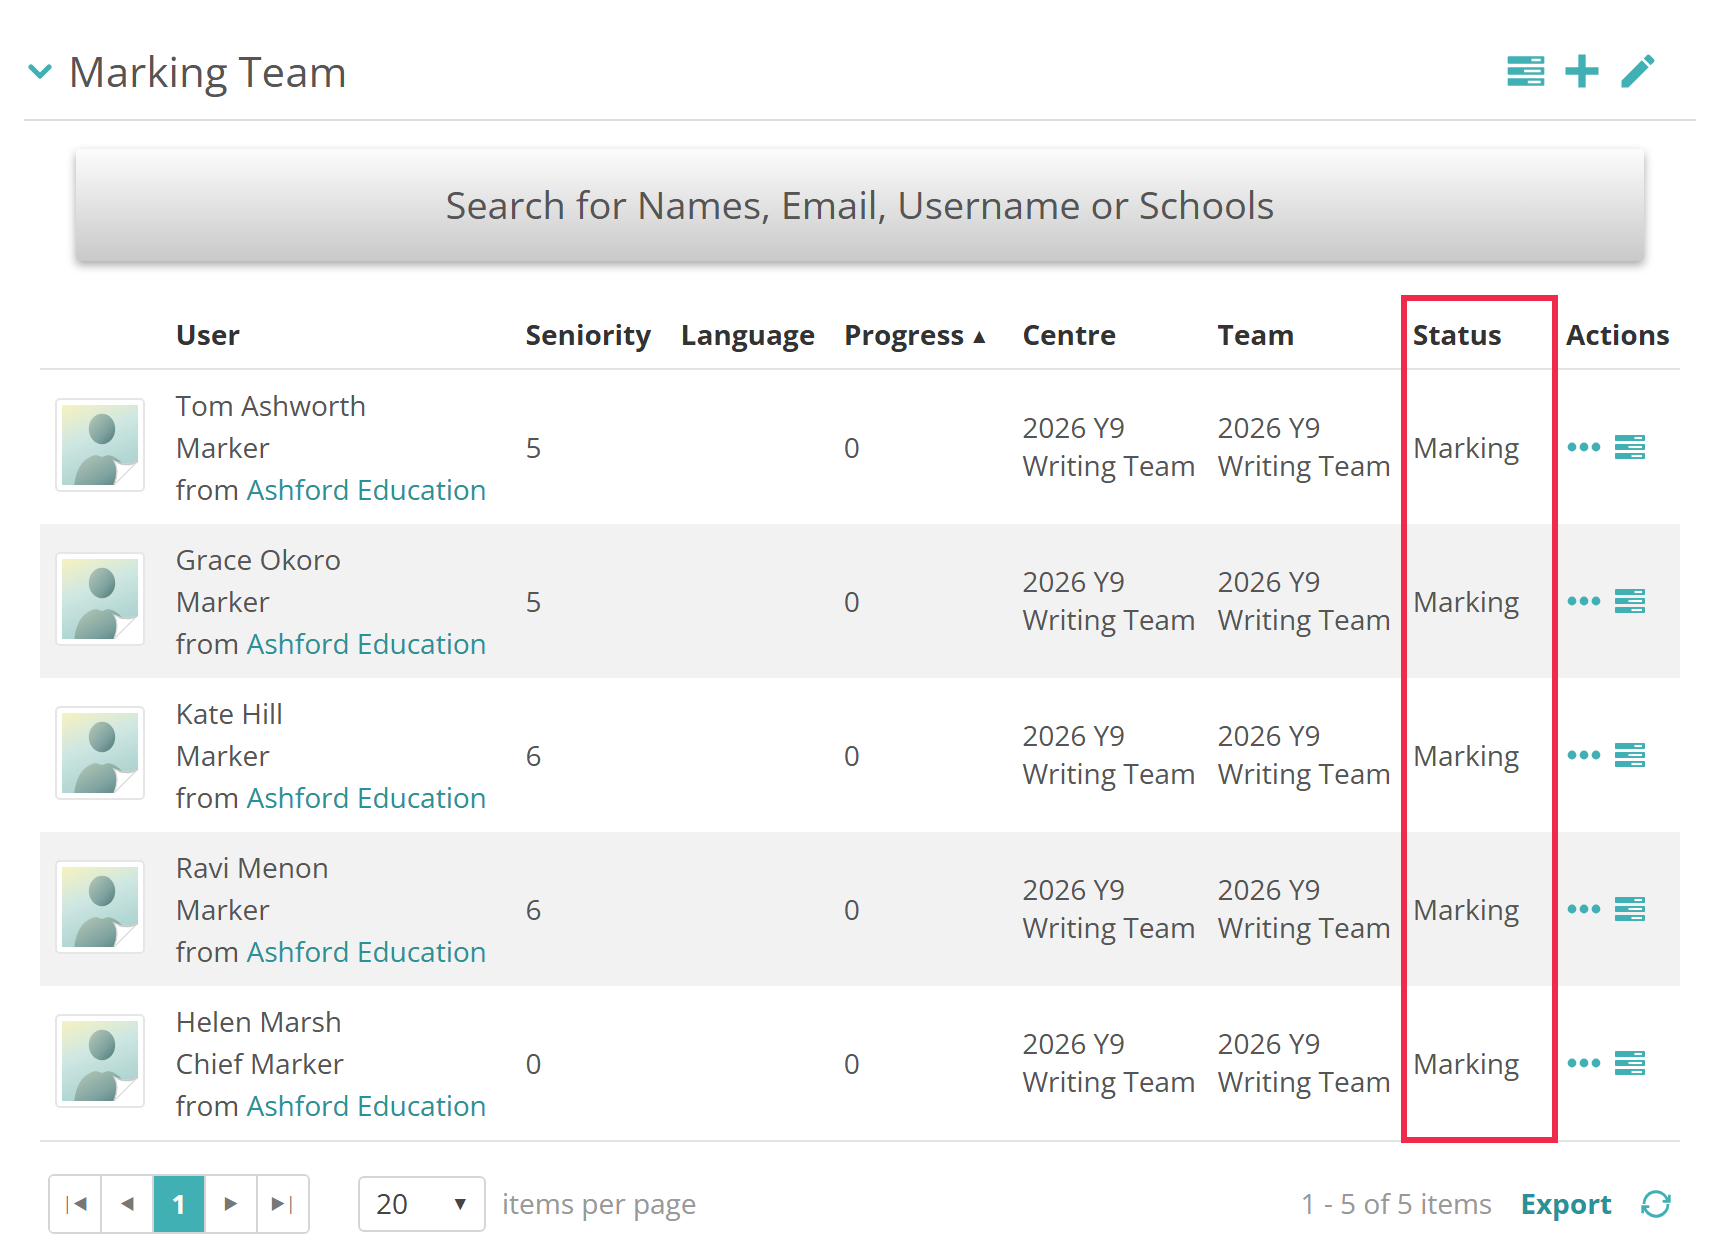
What happens when marking starts
- Markers with at least one item allocated move to Marking. Markers with none stay at Initiation.
- If the project has a training requirement for the whole project, markers move to Training instead. Each moves to Marking once they complete the training.
- The project appears on markers' Marking Dashboard, and they can start marking.
- A notice on the project says answers are being prepared for marking. Markers can start straight away, but some answers reach them only once this finishes.
- Markers you add to the team later move straight to Marking when you save the team.
Marking can't start if no marker role has a marking activity. Insights shows "Cannot transition the marking project when there are no Marking Activities configured." Each role's activities are set in Team Responsibilites. See Team responsibilities.
Finalise a project
Finalise the project when marking is done and its assessment events are closed. Finalising:
- stops marking and sets every marker's status to Complete
- saves each test-taker's final marks to their test attempts
- takes the project off markers' Marking Dashboard.
Insights finalises the project only when:
- every assessment event in the project is Closed
- no test-taker is at Marking in the Enrolments section, which means no marker has a test-taker open.
Test-takers still at Pending Marking, and results waiting at Pending Release, don't stop the project closing. Check the Enrolments section before you finalise.
To finalise, select Change, then Finalise.
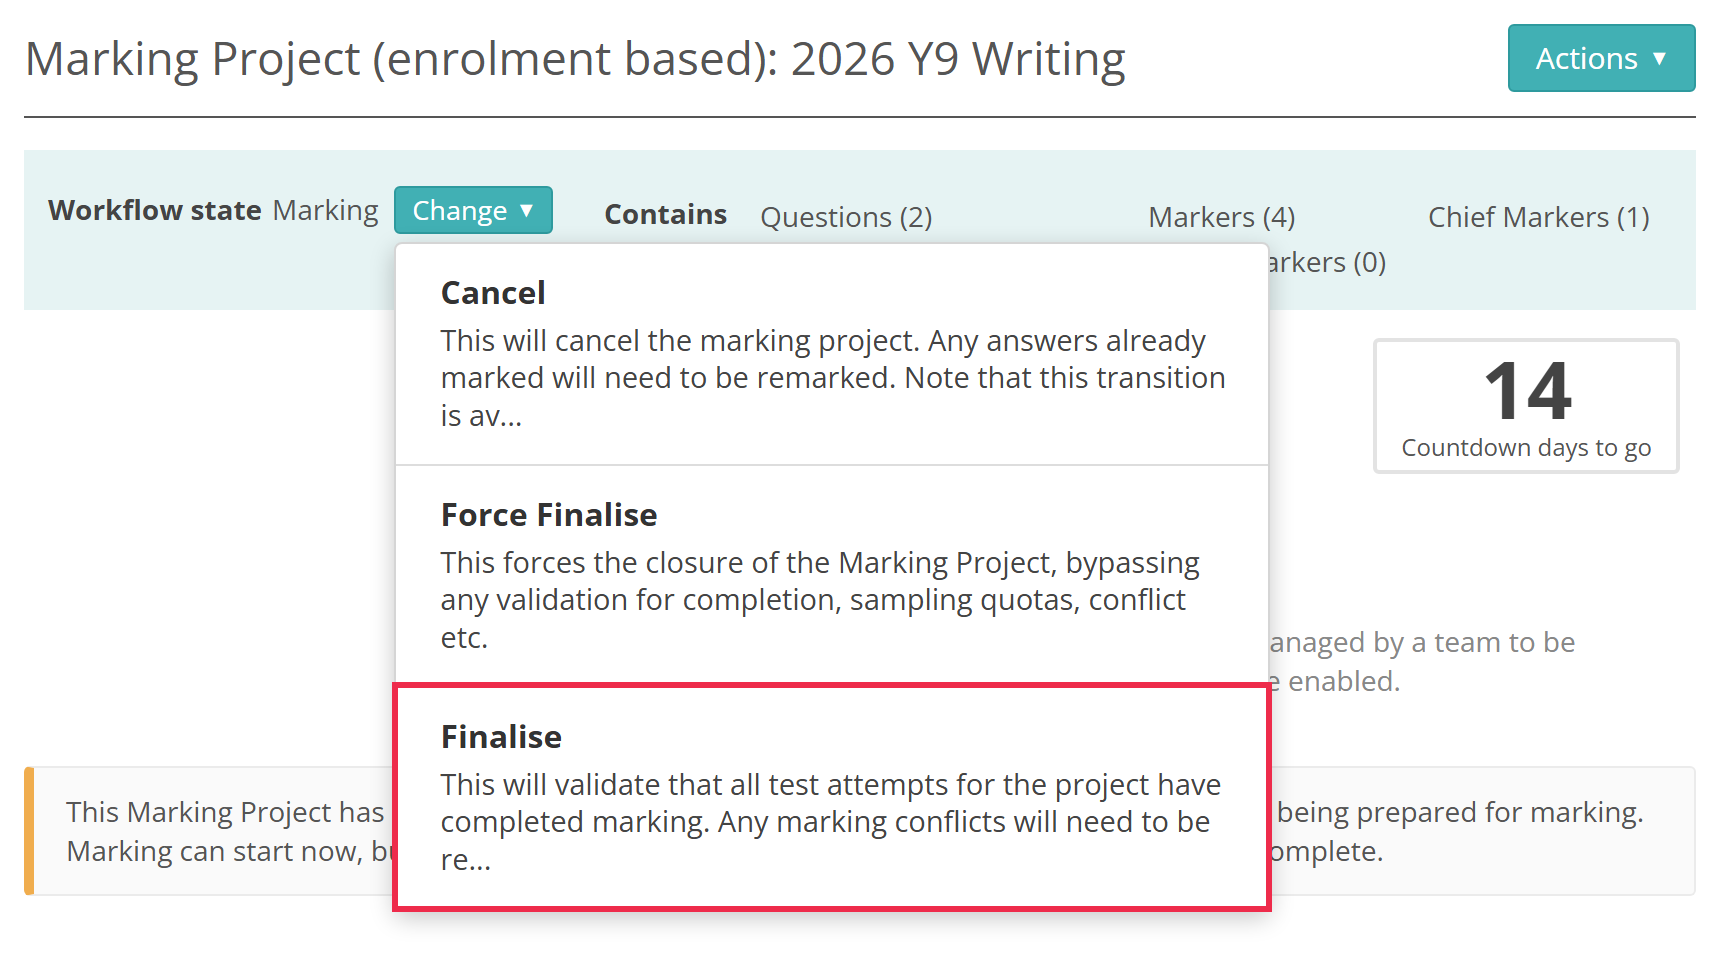
Then select Confirm.
If a check fails, Insights says why and the project stays in Marking:
- "You cannot finalise this Enrolment based marking project because there are open enrolments. Please ensure all enrolments are closed first"
- "You cannot finalise this marking project because the assessment event is not yet in status 'Closed'. Please close the assessment event and try again."
While the project is closed, you can't reopen its assessment events. Reopen the project first. See Assessment events.
Force finalise a project
Force Finalise closes the project without checking the assessment events or the enrolments. A second person has to approve it.
- Select Change, then Force Finalise.
- Select Confirm.
- In the Authorisation window, another person enters their Username and Password, then selects Ok. It must be someone other than you, and their role must allow Force Finalise.
The project then closes as it would with Finalise.
Reopen a project
Reopen a closed project to mark it again. Select Change, then Reopen, then Confirm.
Reopening moves the project and every marker back to Marking. Markers' scores stay in the project.
Important
Reopening clears the marks that finalising saved to test attempts, and sets those test attempts back to Marking. Finalising again saves the marks back.
When you finalise a reopened project, its assessment events don't have to be closed.
Cancel a project
Cancel a project you no longer need. In Setup the option is Set-up Cancel, and in Marking it's Cancel. Select it from the Change menu, then select Confirm.
Warning
You can't undo cancelling. A cancelled project has no options in the Change menu.
When you cancel:
- marking stops, and the project leaves markers' Marking Dashboard
- the project's assessment events become free to add to another marking project.
Scores given in the cancelled project stay with it. Answers already marked need marking again in a new project.
Settings
Administrators can configure these settings at Marking > Marking Extended Settings.
Team Responsibilites > Enrolment Based Projects — the marking activities each role starts with in a new enrolment-based project. Marking can't start on a project where no role has an activity.
Enable Standardisation 1, in Marking Project Settings > Standardisation Feature Settings — lets projects use Standardisation 1. On by default.
Default Standardisation 1 to On, in Quality Controls — turns Standardisation 1 on in every new project, enrolment-based ones included, so Commence Standardisation 1 works on them. It needs Enable Standardisation 1. Off by default.
Enable Standardisation 1 Settings Section, in Marking Project Settings > Enrolment Based Marking Project Section Settings — shows the Standardisation 1 settings on enrolment-based projects, where you can turn it on for one project. Off by default. Enable Standardisation 2 Settings Section and Enable Standardisation 3 Settings Section do the same for the later phases.
Enable Training Requirements, in Marking Project Settings — lets a project require markers to complete training before they mark. Off by default. On enrolment-based projects it also needs Enable Training Requirement Settings Section.
At Settings > Roles:
Each option in the Change menu is a separate permission for the marking project workflow. A role without it still sees the option, but selecting it shows "Access denied". See Configure workflow permissions for roles.