Personal needs and preferences (accessibility)
Personal needs and preferences (PNP) codes adjust a test for individual test-takers. A code can give a test-taker extra time, rest breaks, a high-contrast theme, or a substitute version of an item with larger print or in another language. You create each code once, then allocate it to the test-takers who need it.
Note
On some sites PNP codes are called Disability Adjustment Codes, or DACs.
PNP types
Every code has one type, chosen from PNP Type when you create the code. The type decides what the code does and which options it has. You can't change a code's type once it's saved.
- General Accomodations — records an adjustment that people arrange rather than the system, such as a separate room, a reader or a scribe.
- Test Player Theme — shows the test player in a different theme, such as high-contrast colours for a test-taker with a visual impairment.
- Substitute Question — replaces items with substitute versions, such as ones with larger print or in another language.
- Zoom — makes the zoom tool available and changes how it behaves.
- Extra Time — adds time to a timed test.
- Text Editor — adds larger font sizes and a sticky toolbar to the rich text editor.
- Browser — lets the test-taker sit the test without the secure browser.
- Calculator — shrinks the calculator to fit the window when the test player is zoomed.
- Student Break — gives the test-taker break time they can take during the test.
A test-taker can have one code of each type for a discipline or test attempt. General Accomodations is the exception: a test-taker can have as many of those as they need.
General accommodations
Use General Accomodations for adjustments the system doesn't make itself. Describe the adjustment in the code's Personal Needs and Preference field so teachers and invigilators know what to arrange.
Show on check-in shows the code's Description to the invigilator when they check the test-taker in with Scan check-in on the session dashboard. Use it for high-priority adjustments, such as a test-taker who needs a separate room. It works only when codes are allocated per test attempt (see Settings). See Test session administration.
Test player theme
Choose a theme in Test Player Theme. The test-taker sees it in place of the test's own theme. If more than one code with a theme applies, the code whose identifier comes first alphabetically wins.
When codes are allocated per test attempt, a test-taker's user record also has a Default Test Player Theme field. It adds one of these codes to every new attempt. See Test player themes.
Substitute question
Tick Allow item substitutions so you can link substitute items to the code. Then link a substitute to each item that needs one, and allow substitutes on the test. Substitute test items has the steps.
A test-taker can have only one Substitute Question code for a discipline or test attempt.
If your site has Enable Language Culture Switching turned on (see Settings), the code also has two language fields:
- Specifically to support Languages — marks the code as a language code
- Associate to Language Culture — the language the code supports.
A language code also switches the test player's own wording, such as its buttons and messages, to that language, using your site's translated string resources. See String resources. On the invigilator dashboard, a language code shows as a globe icon rather than with the test-taker's other codes.
Zoom
The zoom tool magnifies the test player to 150%, 200% or 300% (see Zoom tool). These options give it to a test-taker and change how it behaves:
- Enable Zoom makes the zoom tool available to the test-taker. It appears on the form only while Enable zoom tool for all candidates is off, because otherwise everyone already has the zoom tool.
- Enable Zoom-To-Fit adds Zoom-To-Fit to the zoom menu, which scales the test player to fill the window without scrollbars.
- Enable Zoom-To-Fit Always On turns on Zoom-To-Fit at the start of the test and keeps it on. You can tick it only once Enable Zoom-To-Fit is ticked.
- Enable Remember Zoom Level keeps the test-taker's zoom level, such as 200%, as they move between items.
- Enable Zoom Optimised Features rearranges the header and footer when the zoomed test player is bigger than the window, so navigation, tools and information stay within reach.
- Enable Zoom On All Test Pages makes the zoom tool available on every page of the test while the test-taker is logged in.
The options after Enable Zoom only work for a test-taker who has the zoom tool, from Enable Zoom or from the site-wide setting.
Extra time
Extra time is added to the test's timer, so it applies only to timed tests. Under Extra time configuration, choose one of these:
- This PNP doesn't award extra time is the default.
- This PNP awards a standard amount of extra time gives every test-taker with the code the same time.
- This DAC awards a standard percentage of extra time adds a percentage of the test's duration, set in Relative extra time (percentage) to add per test. The result is rounded to the nearest minute, so 15% of a 60-minute test is 9 minutes.
- This PNP awards a configurable amount of extra time for each Test-taker lets you enter each test-taker's minutes when you allocate the code. Maximum extra time in minutes caps what you can enter.
A standard amount can be made of either or both of these:
- Absolute extra time in minutes is a fixed number of minutes.
- Relative extra time (minutes) to add per block and Relative extra time (minutes) block duration add minutes for each whole block of test time. At 5 minutes per 30-minute block, a test of 30 to 59 minutes gets 5 minutes and a test of 60 to 89 minutes gets 10. Fill in both fields or neither.
The two add together. For a one-hour test, 5 minutes absolute plus 5 minutes per 30-minute block gives 15 minutes extra.
Text editor
These options apply to extended text items that use the rich text editor:
- Enable larger font sizes in Rich Text Editor — adds font sizes 18, 20, 22, 24, 26, 28, 36 and 48 pt to the usual 14 and 16 pt
- Enable Rich Text Editor Sticky Toolbar — keeps the editor's toolbar at the top of the screen as the test-taker scrolls, so it's always in reach.
Browser
Exempt from secure browser lets the test-taker sit the test in an ordinary browser, even when the test needs Janison Replay or Safe Exam Browser. This suits test-takers whose assistive tools, such as screen magnifiers, don't work in the secure browser. See Janison Replay.
Calculator
Enable Fit-To-Screen Calculator shrinks the calculator to fit the window when the test player is zoomed and the calculator would be taller than the window. A test-taker at 300% zoom on a 1024 × 768 screen sees the calculator at about 150%.
Student break
A Student Break code puts a Break button beside the test timer. Selecting it pauses the test and its timer until the test-taker selects Resume My Test or their break time runs out. They can split the time across several breaks. The button sits with the timer, so test-takers see it only when the timer is shown.
Under Student break time configuration, choose one of these:
- This DAC awards a fixed amount of break time gives every test-taker with the code the minutes in Fixed break time in minutes.
- This DAC awards a configurable amount of break time for each candidate lets you enter each test-taker's minutes when you allocate the code. Maximum break time in minutes caps what you can enter.
Create a PNP code
Select Deliver > Personal Needs and Preference Codes, then Add Personal Needs and Preference Code.
Tip
If Personal Needs and Preference Codes isn't in your Deliver menu, your site may have moved it. Select the Go to page icon  , type "personal needs" and select the link that appears.
On the form:
- Enter a Name. The Identifier fills in from it, and you can change it. The identifier can hold letters, numbers, hyphens and underscores.
- Choose the PNP Type. The options for that type appear below.
- In Description, describe the code in plain words, so teachers can tell which test-takers it suits.
- In Personal Needs and Preference, describe what the system does for test-takers with the code, for example "5 minutes extra time."
- Set the type's options (see PNP types).
- Select Save.
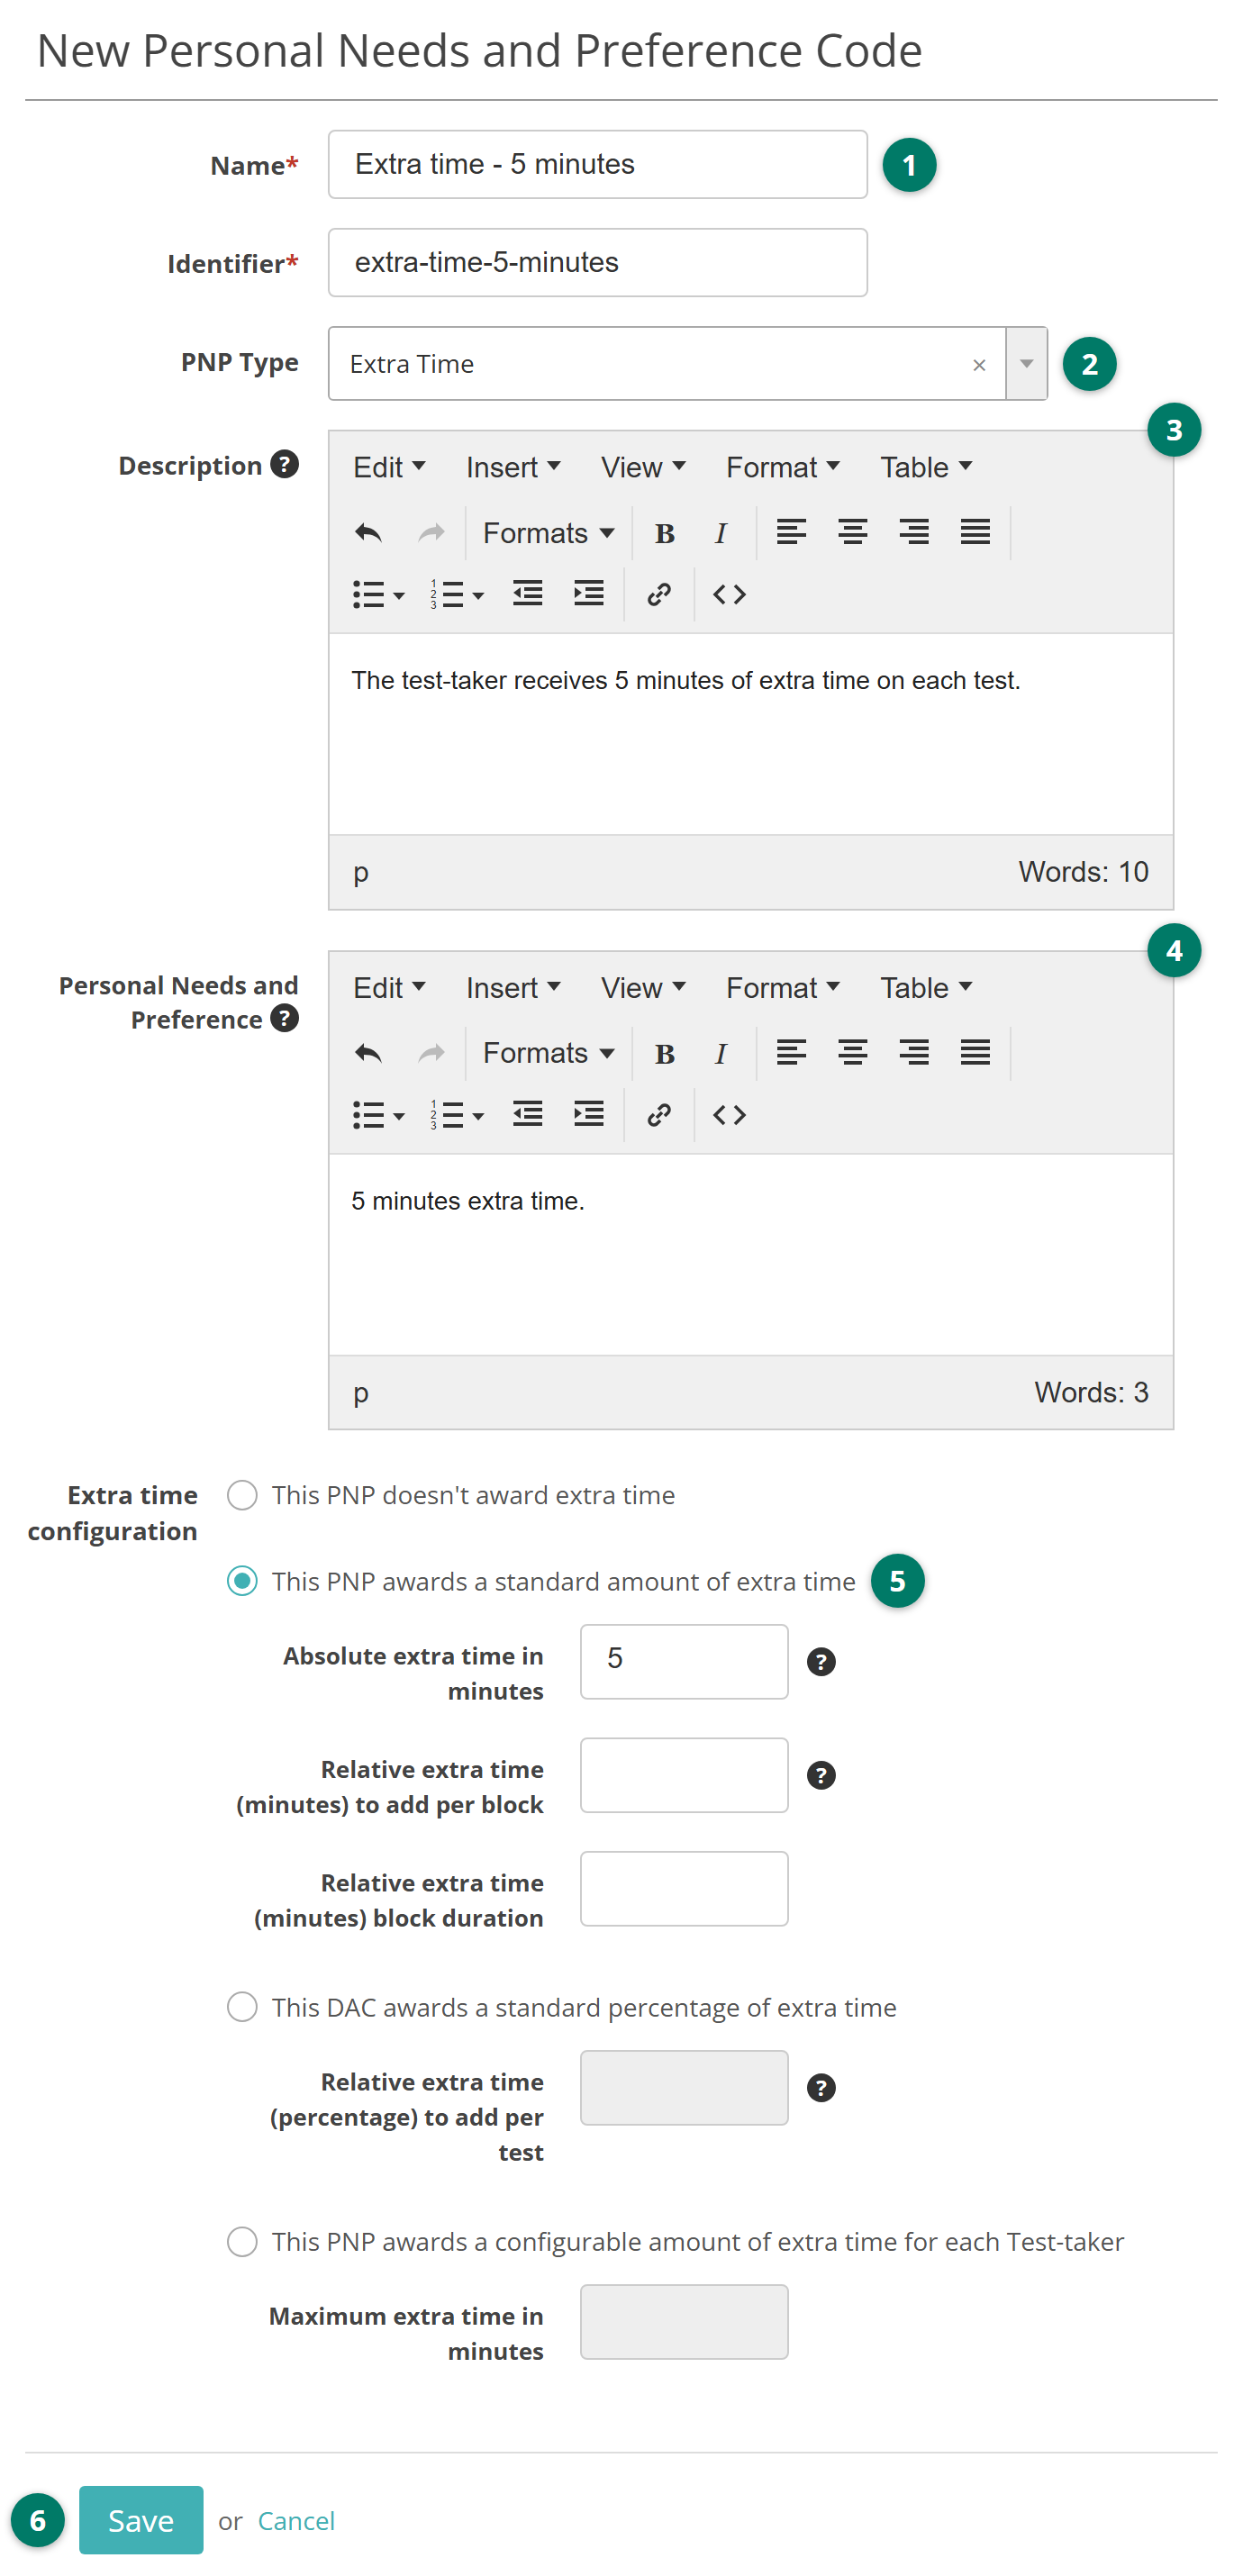
The code's page opens, with Edit PNP and Deactivate PNP at the top.
- Edit PNP changes anything but the type.
- Deactivate PNP takes the code out of the lists you choose codes from. Test-takers and attempts that already have the code keep it on their record. Deactivated codes are on the Inactive tab, where you can open one and select Reactivate PNP.
Some sites also have global codes, shared from the global level. They show "(Global)" after their name when you choose a code, and you can't edit them.
Codes created before PNP types
A code created before types were introduced has no type, and its page shows every option. When you edit it, you have to choose a type, and any options that belong to other types are cleared. If the code combined several adjustments, create a separate code for each of the others.
Allocate PNP codes to test-takers
How a code applies depends on your site's setting (see Settings):
- At discipline level, the default, a code applies to all of a test-taker's tests in that discipline.
- At test attempt level, a code applies to one test attempt.
You can allocate codes on the test-taker's user record or on the test attempt. You can also import them from a spreadsheet.
Some changes are blocked once a test is under way:
- While a test-taker has an attempt in progress, you can't change their codes that affect timing, substitute items or the secure browser.
- At test attempt level, you can't change an attempt's codes once it's submitted. If Lock Editing Of Test Attempt Personal Needs and Preference Codes is ticked, you can't change them once the attempt has any.
On the user record
The Personal Needs and Preference Codes section appears on user records once an administrator makes it visible (see Settings).
Open the test-taker, expand Personal Needs and Preference Codes and select its pencil icon. If the test-taker has no codes yet, you can select Set now instead.
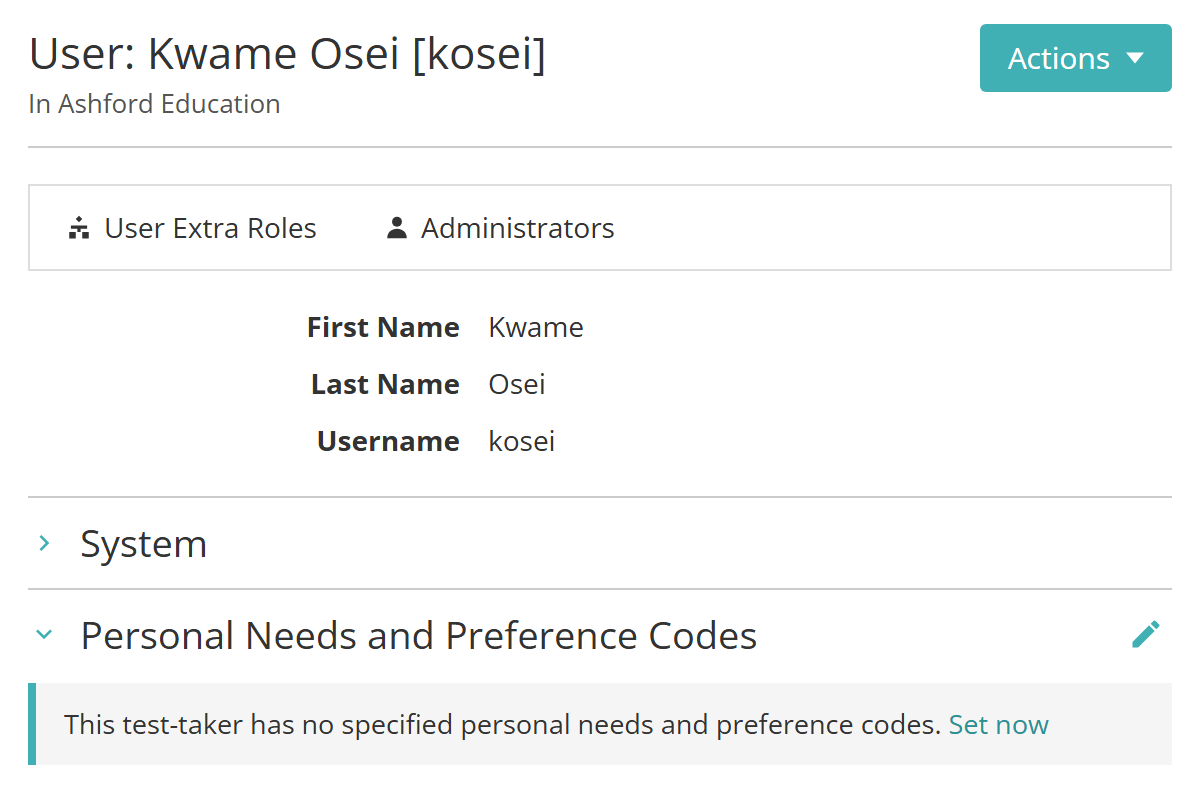
Then:
- In the first column, choose the discipline or test attempt. The column is headed Discipline or Test Attempt, depending on your site's setting. At test attempt level, it lists the test-taker's attempts by test.
- Choose the code in Personal Needs and Preference Code Type. Its type shows under PNP Type.
- If the code lets you set time for each test-taker, enter the minutes in Value, up to the code's maximum.
- Select Add. Repeat steps 1 to 4 for any other codes.
- Select Save.
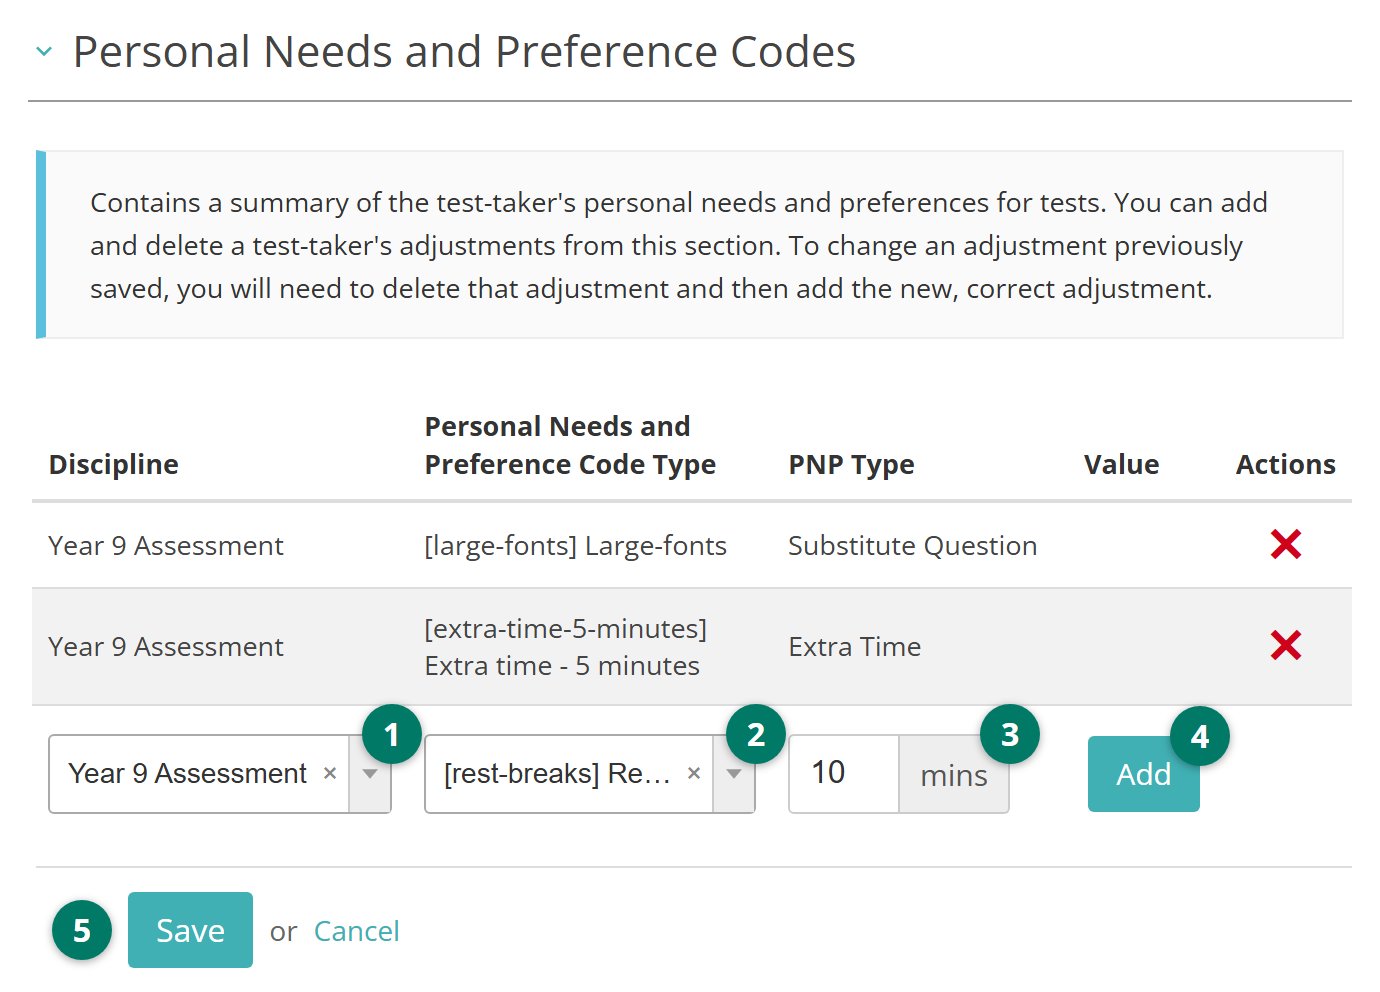
The codes show on the user record, and apply to the test-taker's tests in that discipline or to that attempt. To remove a code, select the pencil, select the code's cross under Actions, then select Save. To change one, remove it and add the correct code.
On the test attempt
The test attempt modal and the test attempt page both have a Personal Needs and Preference Codes section. It works the same way, but the discipline or attempt is already chosen. Use it to add codes for one test-taker's attempt without leaving the attempt. See The test attempt modal.
Import from a spreadsheet
To allocate codes to many test-takers at once, import them. The import works only when codes are allocated at discipline level.
- Select Manage People > Users, then Import Personal Needs and Preference Code Allocation.
- Download the template from the link on the page, and fill in a row for each code you're allocating:
- Username — the test-taker's username
- Discipline — the discipline's identifier
- DAC — the code's identifier
- ExtraTime — minutes of extra time, only for a code that sets time for each test-taker.
- Choose the file in Spreadsheet File. Check Email Address, where the results are sent.
- Select Import and email result.
The import adds and updates allocations. To remove a code, or to set a test-taker's break time, use the user record.
Substitute test items
A substitute item replaces an item for test-takers who have a Substitute Question code. The substitute takes the original item's place, order and weighting, and its results are reported against the original.
Four things have to be in place:
- a Substitute Question code with Allow item substitutions ticked (see Create a PNP code)
- the substitute item, linked to the original
- substitutes allowed on the test
- the code allocated to the test-taker.
Create the substitute item
Create the substitute as a new item (see Items). It must be in the same module as the original, or the same discipline if your site allows cross-module tests. Substitutes can serve different needs:
- Audio alternatives replace an item that relies on audio, such as a spelling item, with a text version such as a proofreading passage.
- Visual alternatives simplify or enlarge text and images, including text inside images.
- Motor alternatives change how the test-taker answers, so they don't have to drag and drop.
- Language versions present the item in the test-taker's language. One test can be delivered in several languages this way.
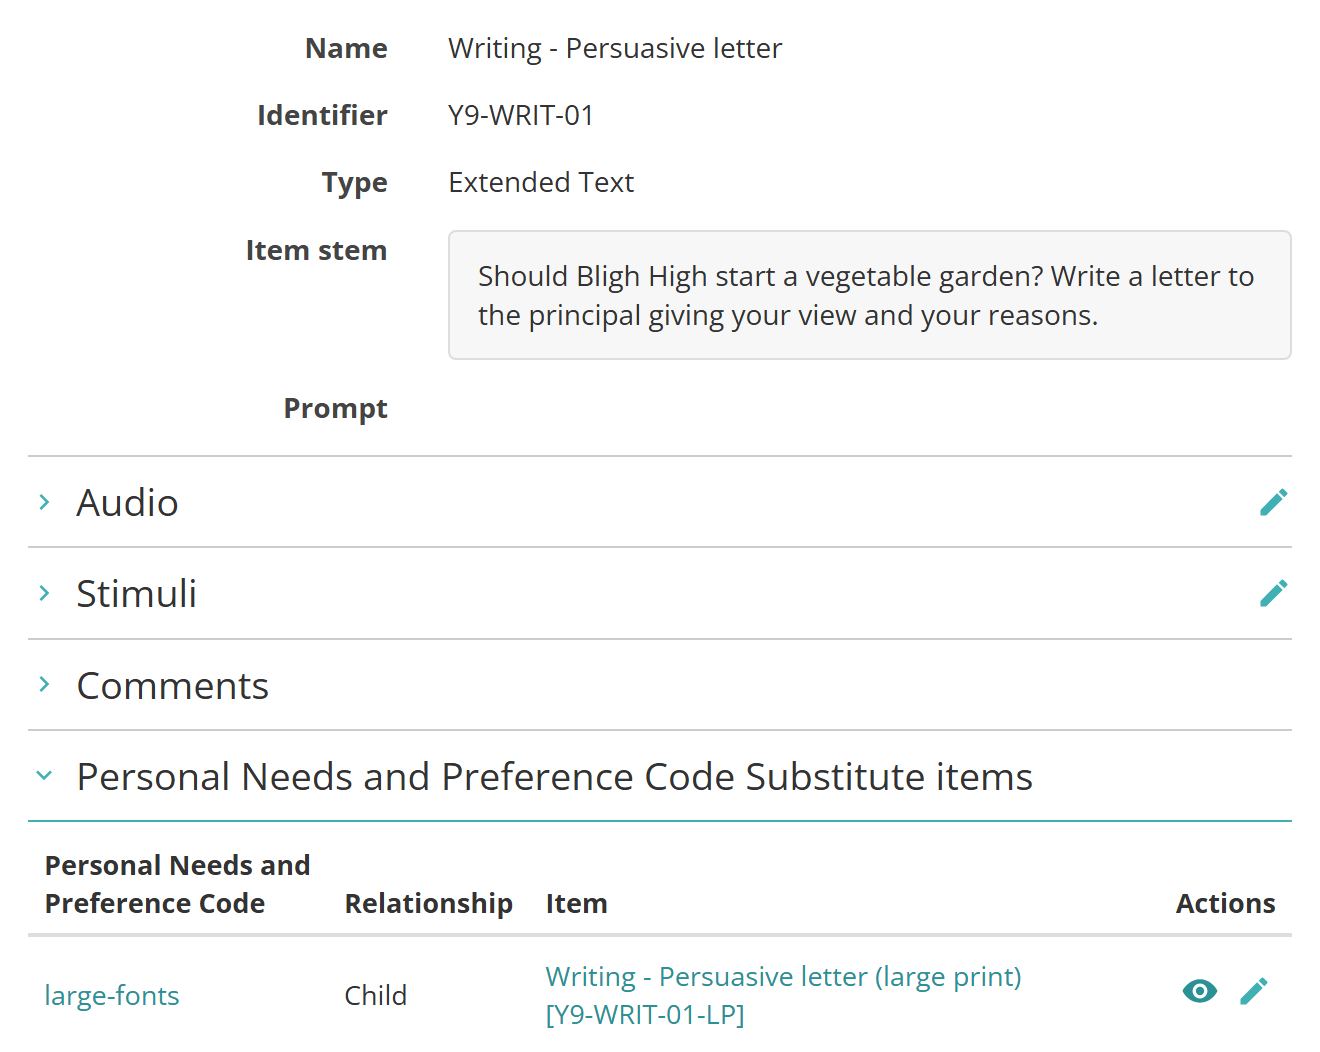
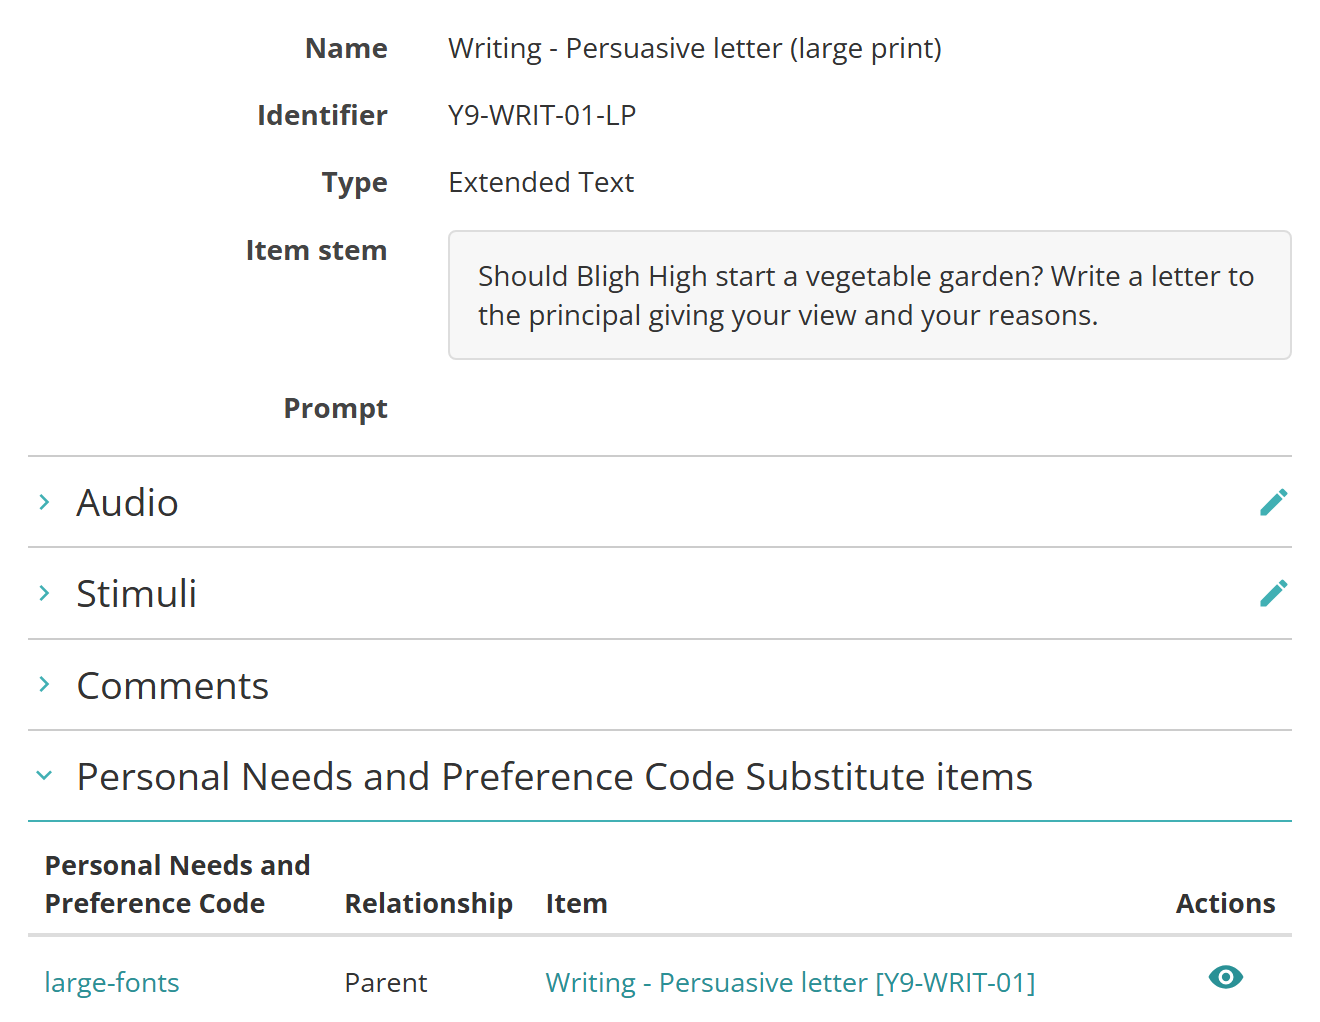
In this example, the original item is Writing - Persuasive letter and its large-print substitute is Writing - Persuasive letter (large print).
Link the substitute to the original
Open the original item and expand Personal Needs and Preference Code Substitute items. Each code that allows item substitutions has a row, with the Relationship Child. Select the pencil in the code's row, then:
- Choose the substitute in the Item column.
- Select Save.
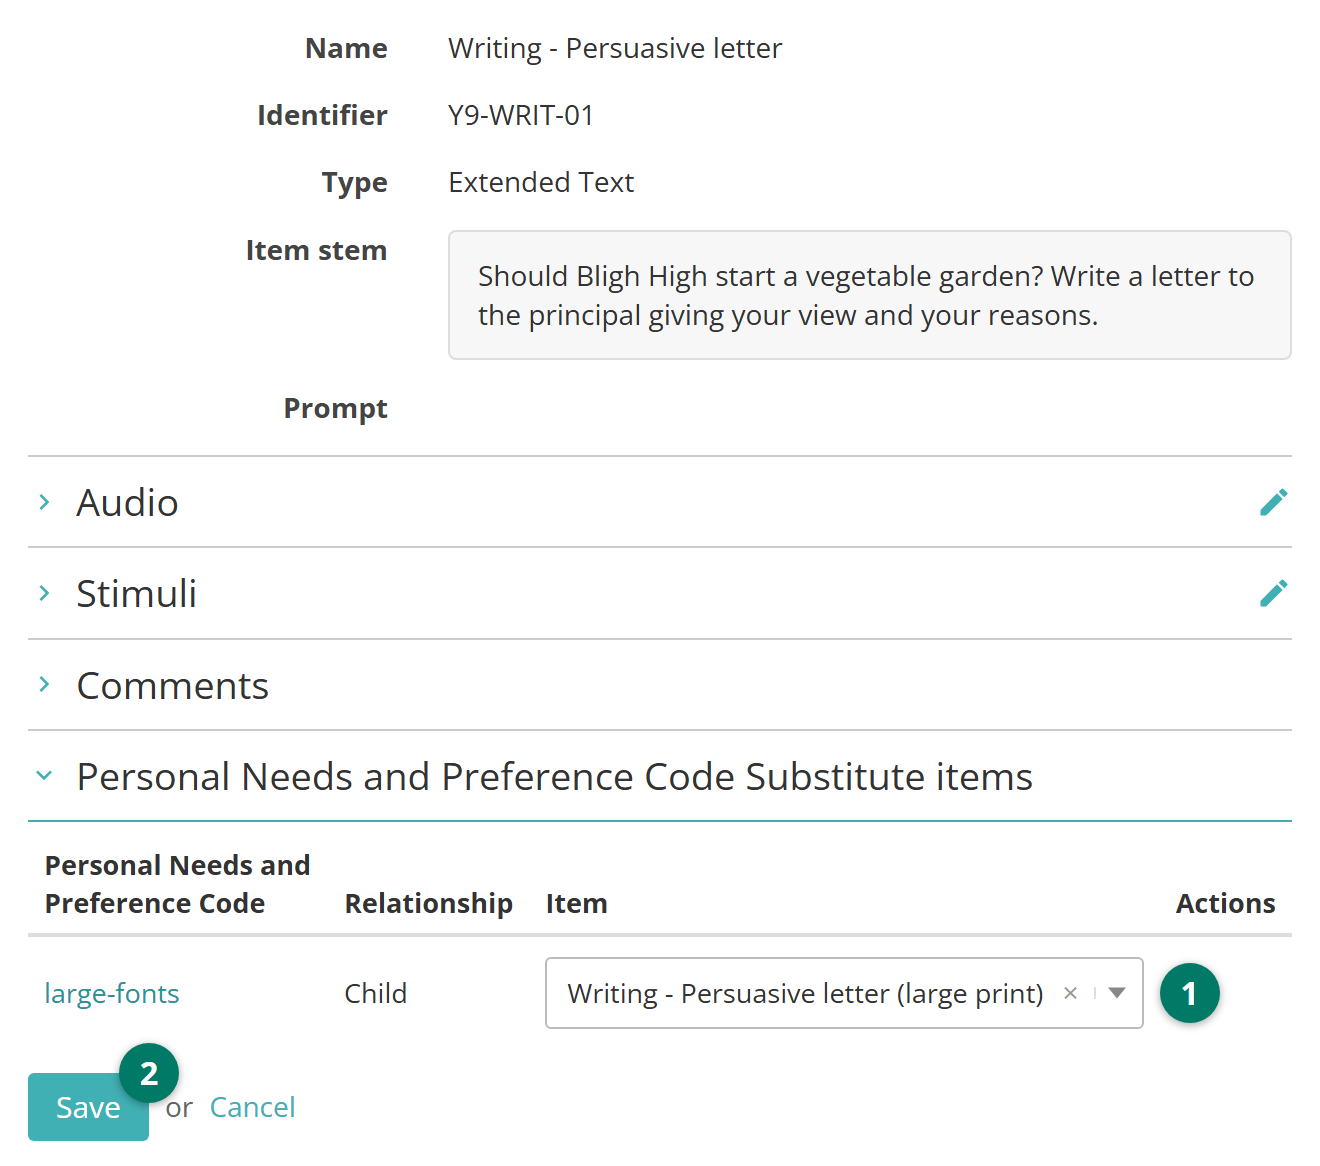
The row now shows the substitute. Its eye icon previews it, and the pencil changes it. The pencil disappears while the item is in an open test attempt.
The substitute item's own section shows the original, with the Relationship Parent. You can preview the original from there, but you change the link from the original item only.
Allow substitutes on the test
Substitute items appear only in tests that allow them. Tick Allow personal needs and preference code substitutes for items when you add the test, or later by editing its details. If a test's items have substitutes but the test doesn't allow them, the test's page shows a warning.
On a blueprint, also choose the codes in Personal Needs and Preference Codes, so the blueprint draws items that have substitutes for them. When Enable Language Culture Switching is on, Support Substitute Languages chooses the language codes the test supports.
Allocate the code
Allocate the Substitute Question code to the test-taker as described in Allocate PNP codes to test-takers. The test player then shows them the substitute in place of the original. To check what they'll see, add the code in the preview tools (see Preview tools).
For a language version, the steps are the same, with the item written in the test-taker's language.
Settings
Administrators set how codes are allocated at Settings > Test Designer Settings > General Assessment Options, under Personal Needs and Preferences.
Linked to test-takers at discipline level — codes are allocated per discipline and apply to all of a test-taker's tests in it. This is the default.
Linked to test-takers at test attempt level — codes are allocated to individual test attempts.
Lock Editing Of Test Attempt Personal Needs and Preference Codes — at test attempt level, stops anyone changing an attempt's codes once it has some. Without it, an attempt's codes can be changed until the test-taker starts the test.
In the Test Player 2 Settings section of the same page, some options can be turned on for every test-taker, so no one needs a code for them:
Enable zoom tool for all candidates — gives everyone the zoom tool, and hides Enable Zoom on codes. It's on by default.
Enable Zoom-To-Fit Option, Enable Zoom-To-Fit Always On, Enable Remember Zoom Level and Enable Zoom Optimised Features — the zoom options, for everyone.
Apply Test Player Features To These Pages — makes the zoom tool available on the pages you choose, as well as in the test.
Enable larger font sizes in Rich Text Editor, Enable Rich Text Editor Sticky Toolbar and Enable Fit-To-Screen Calculator — the text editor and calculator options, for everyone.
Enable Language Culture Switching — adds the language fields to Substitute Question codes, and Support Substitute Languages to tests.
Show the language of the test as part of the identity check screen — shows the language from the test-taker's language code on the test player's identity check screen.
Two more settings affect PNP codes:
- The section on user records. To show it, tick Visible for Personal Needs and Preference Codes at Settings > User Settings > Details View. It's hidden by default. See User settings.
- Substitutes on each test. Allow personal needs and preference code substitutes for items is set on each test (see Allow substitutes on the test).
Access is set per role at Settings > Roles: creating and editing codes, allocating them on user records and test attempts, and linking substitute items each have their own permissions.